Panna Cotta Recipe with My Italian Twist – Emma’s Cake Studio
Rich, creamy, and totally fuss-free—that’s what this panna cotta is all about.
I’ve lost count of how many times this recipe has made an appearance on my table. What makes it stand out isn’t just the perfect balance between cream and milk or the gentle, delicate wobble. It’s the way you can prep it ahead of time, pull it from the fridge, and feel like you’ve served something seriously elegant, all without breaking a sweat.
I’m going to share the exact steps I use in my kitchen to create panna cotta that sets beautifully, tastes luscious without being heavy, and looks stunning on the plate. Plus, I’ll highlight one key ingredient choice that makes a real difference—more than most people realize.
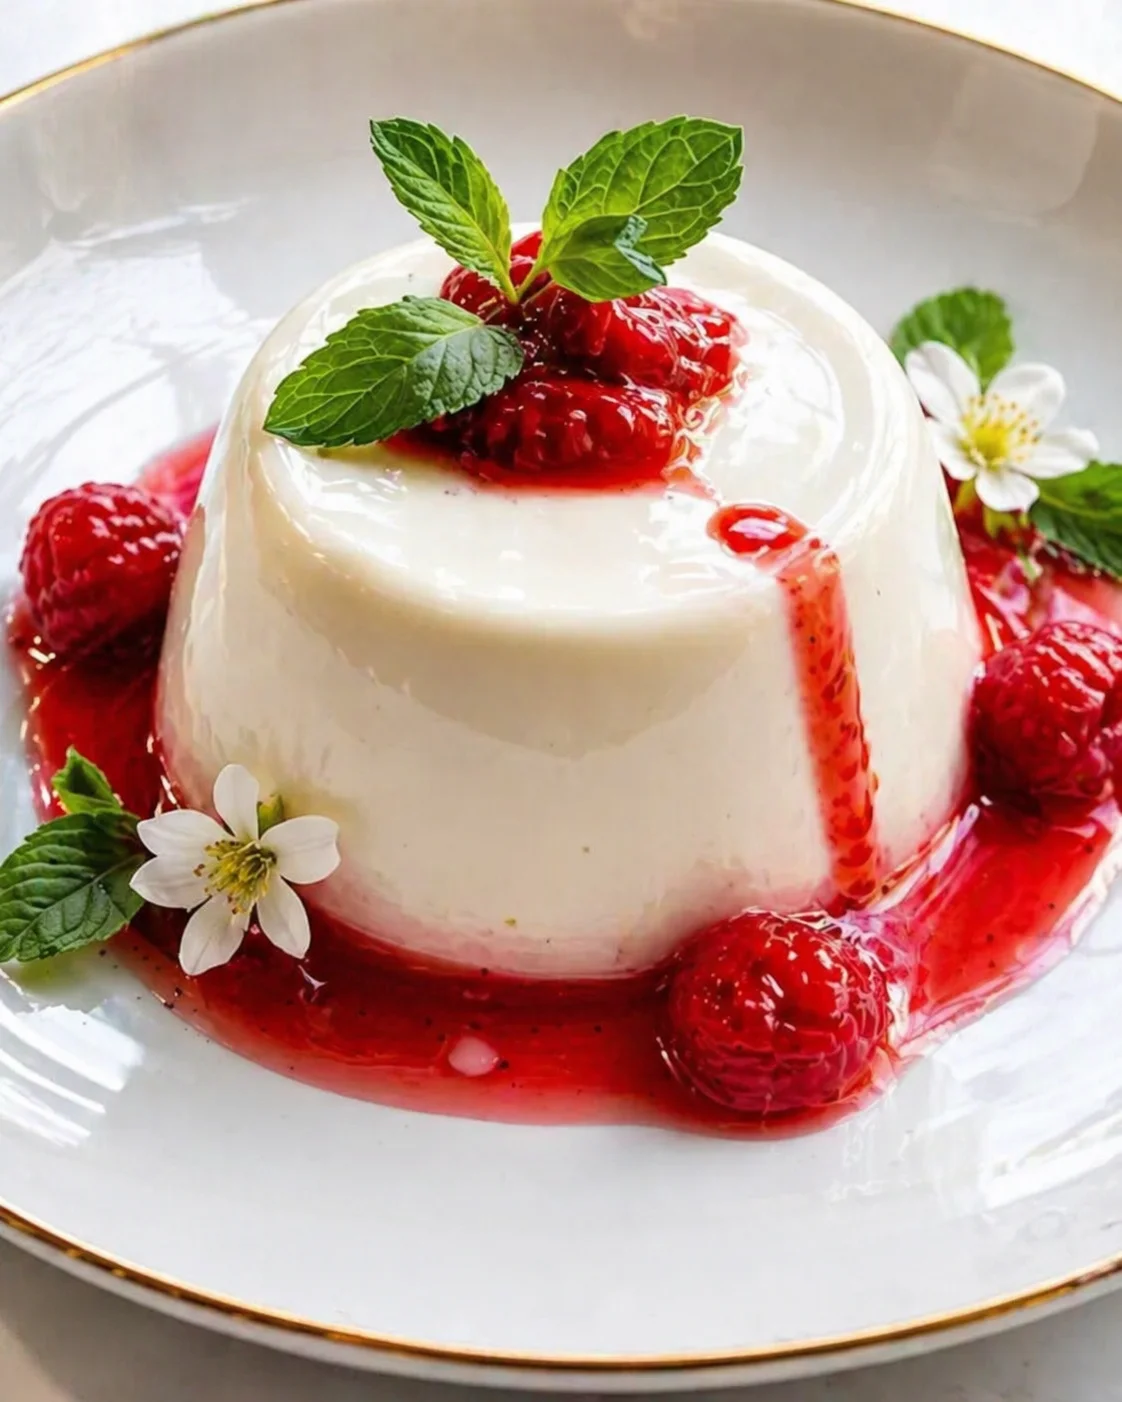
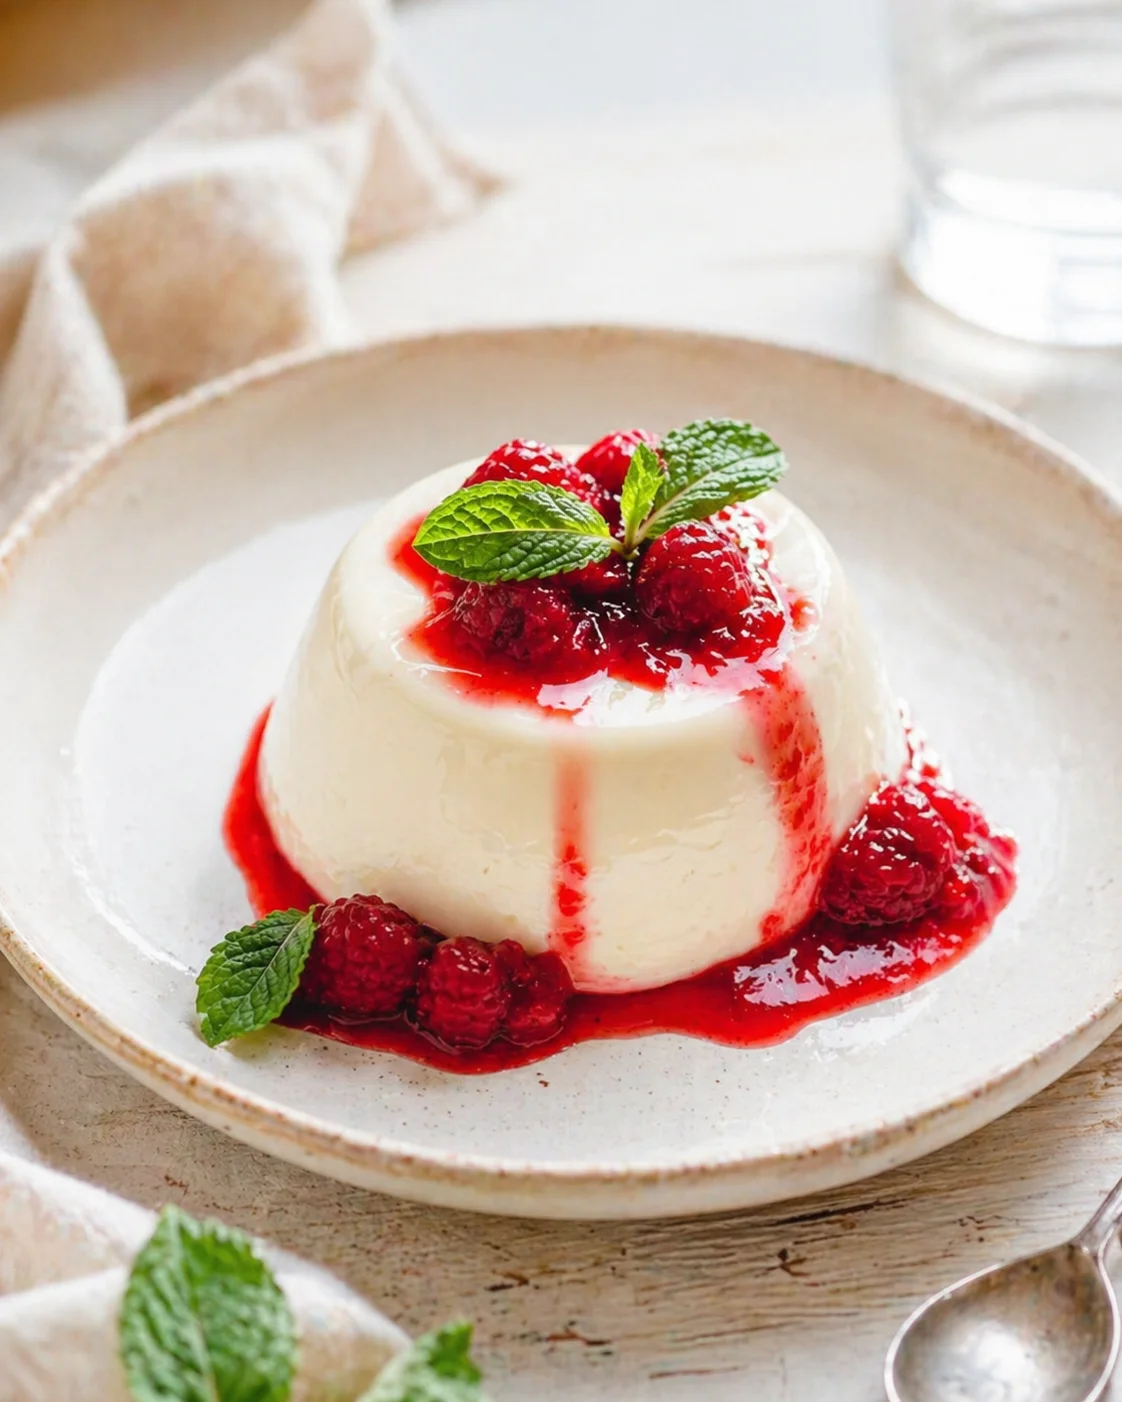
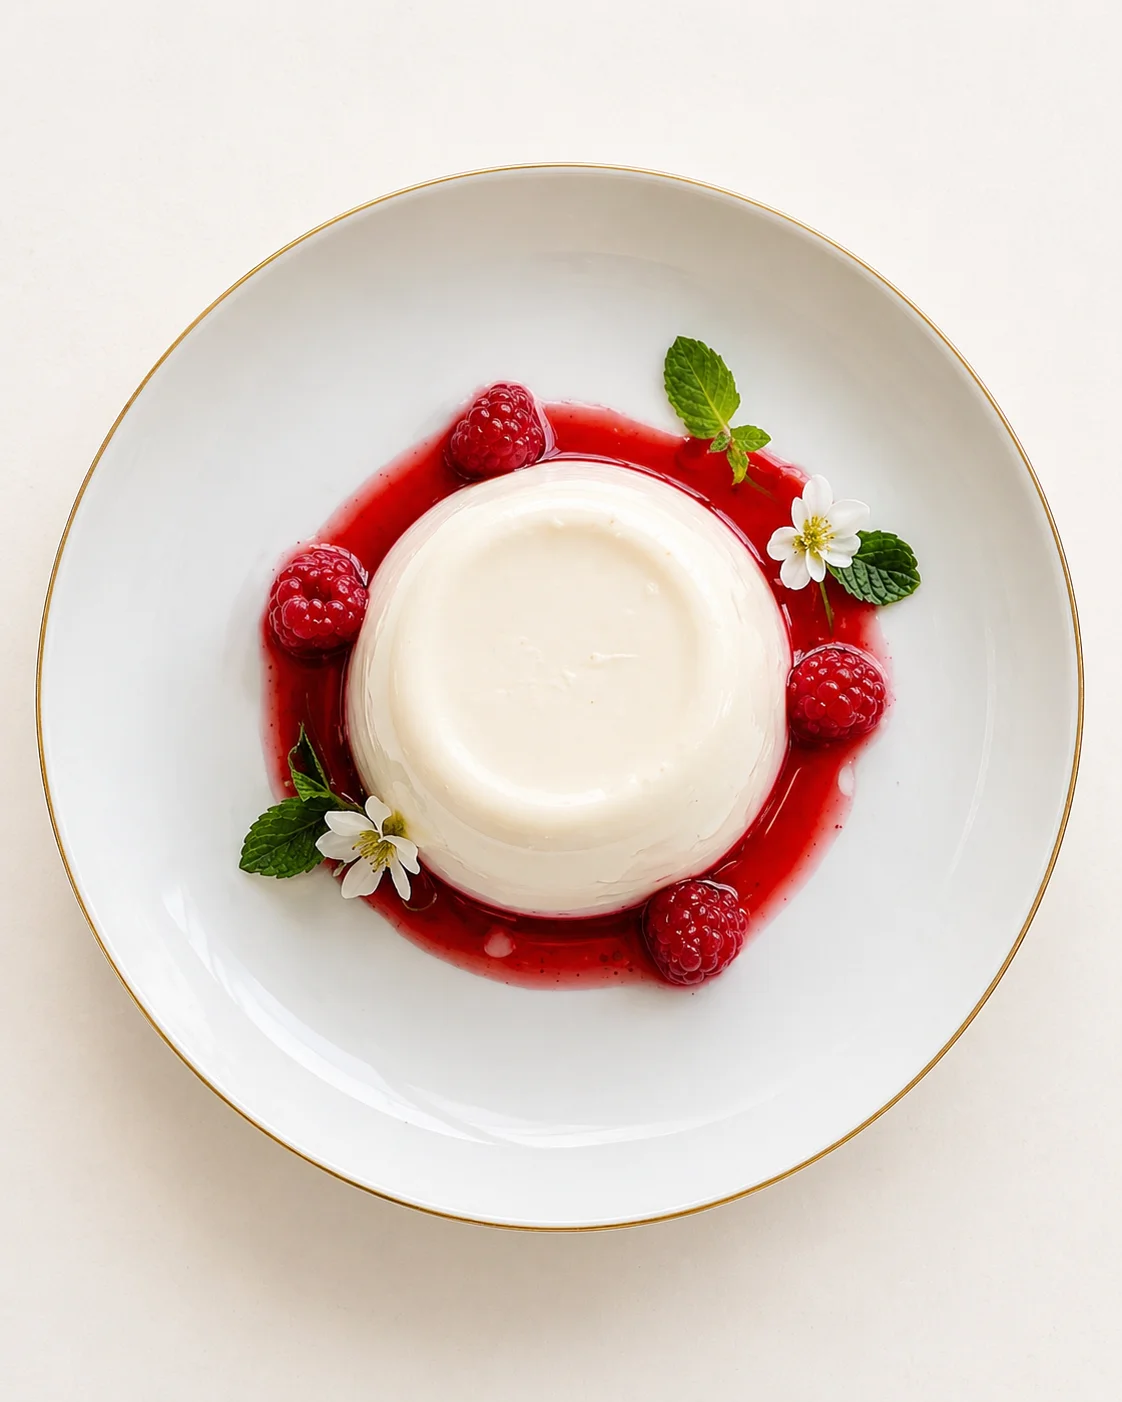
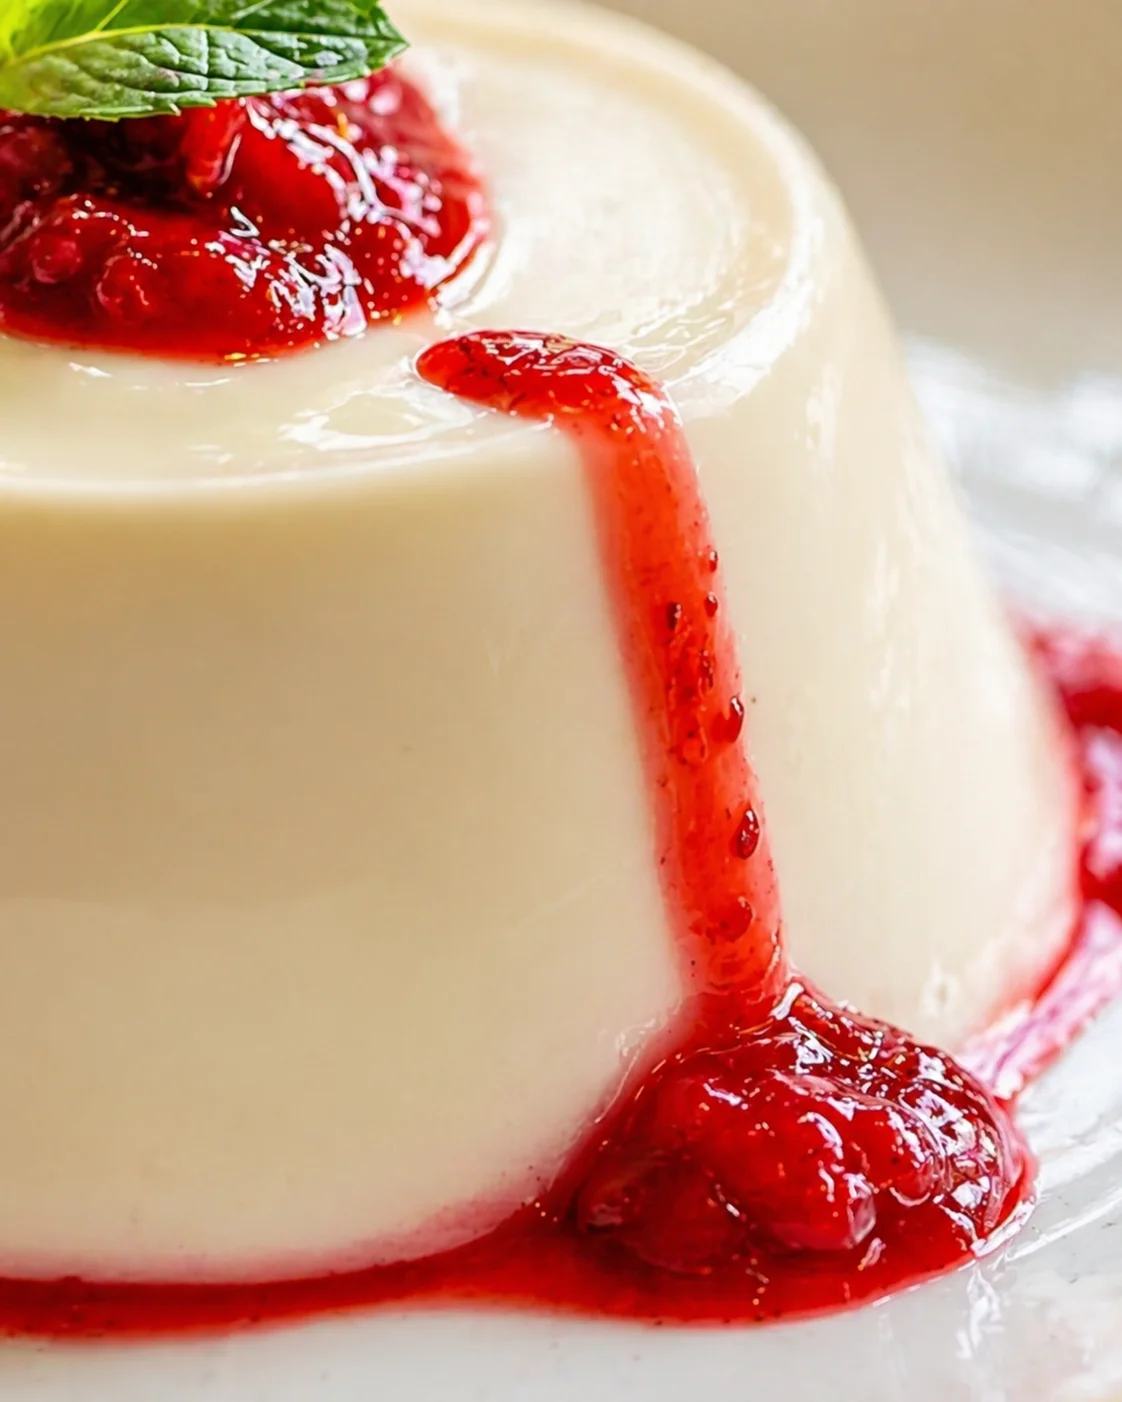
This panna cotta is a winner because it delivers that perfectly silky, restaurant-style dessert with hardly any fuss at all. The magic comes from the cream-to-milk combo—2½ cups cream to ½ cup milk—which gives you that rich, velvety mouthfeel without being over-the-top heavy. What really makes the difference is heating the mixture gently until it just steams (never boiling!), keeping the texture soft and far from rubbery. Plus, it’s make-ahead friendly—it sets in about 4 hours, and stays fresh in the fridge up to two days. You can serve it in pretty glasses for a casual vibe or unmold it for a fancy touch, topping with fresh raspberries, a quick coulis, or even a single mint leaf for a simple but elegant finish.
- Silky, dependable texture when you follow the gentle heating method.
- Simple, everyday ingredients with a straightforward ratio that always performs.
- Make-ahead convenience that makes entertaining less stressful.
- Flexible serving options: in glasses or molded, both look classy with little effort.
- Pairs beautifully with fresh berries or a speedy raspberry coulis to add brightness.
Effortless Elegance in Every Bite
If you’ve been longing for a dessert that seems fancy but feels easy to pull off, this panna cotta fits the bill perfectly. It delivers that silky, smooth finish you’ll find in good restaurants—without any complicated steps or hard-to-find ingredients. Just a handful of pantry staples and a bit of patience in the fridge.
- Silky, perfect texture every time. The carefully balanced 2½ cups cream to ½ cup milk, combined with gentle heating, means no rubbery puddings here—just that soft, delicate wobble you crave.
- Simple ingredients, clear success. Nothing fancy needed—cream, milk, sugar, gelatin, and vanilla (extract or beans) come together for a rich but balanced dessert.
- Make-ahead magic. Sets beautifully in the fridge in about 4 hours, best if left overnight, and keeps up to two days, letting you prep ahead for a relaxed dinner or party. If you love set-and-chill desserts, my No Bake Strawberry Cheesecake offers the same prep-ahead ease.
- Presentation your way. Serve it straight in clear glasses for an easy, laid-back feel, or unmold it from silicone molds for a more polished look—both take minimal effort to look stunning.
- Simple to personalize. Use vanilla extract for everyday simplicity, or vanilla beans when you want an extra-special touch. Fresh raspberries or a quick coulis add brightness and beautiful contrast.
- Easy prep—avoid common pitfalls. Bloom your gelatin properly, heat to steaming (never boiling), and cover while chilling to avoid skin and texture issues.
- Entertainer’s dream. It looks impressive, travels well in the fridge, and frees you up to focus on other parts of your meal while it sets. For another showstopping yet straightforward option, try my Chocolate Pistachio Tart with Ganache.
All these little details add up: you get a dessert that looks like a million bucks, requires minimal effort, and feels just right for any occasion. Trust me, this one will become a go-to.
Ingredients and Key Ratios
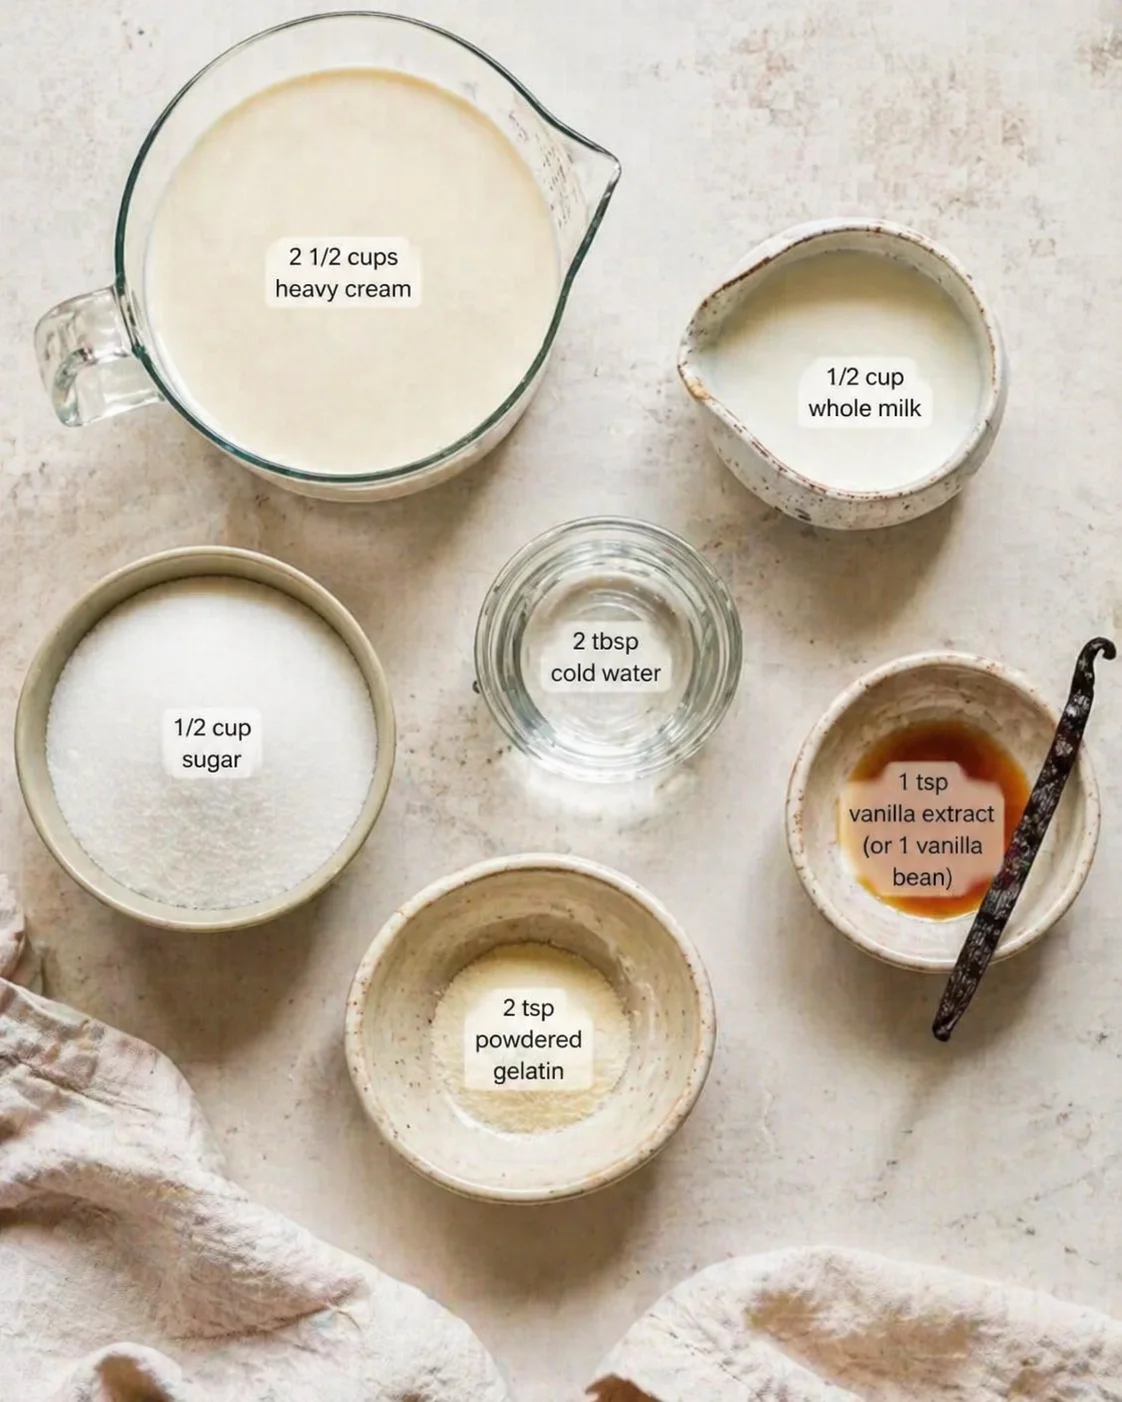
- 2 1/2 cups heavy cream
- 1/2 cup whole milk
- sugar
- powdered gelatin (bloom by sprinkling over cold water) or gelatin sheets (one packet ≈ 2 teaspoons powdered gelatin)
- cold water (for blooming gelatin)
- vanilla extract or vanilla beans
Prepare, Pour, and Chill
- Measure 2½ cups heavy cream and ½ cup whole milk.
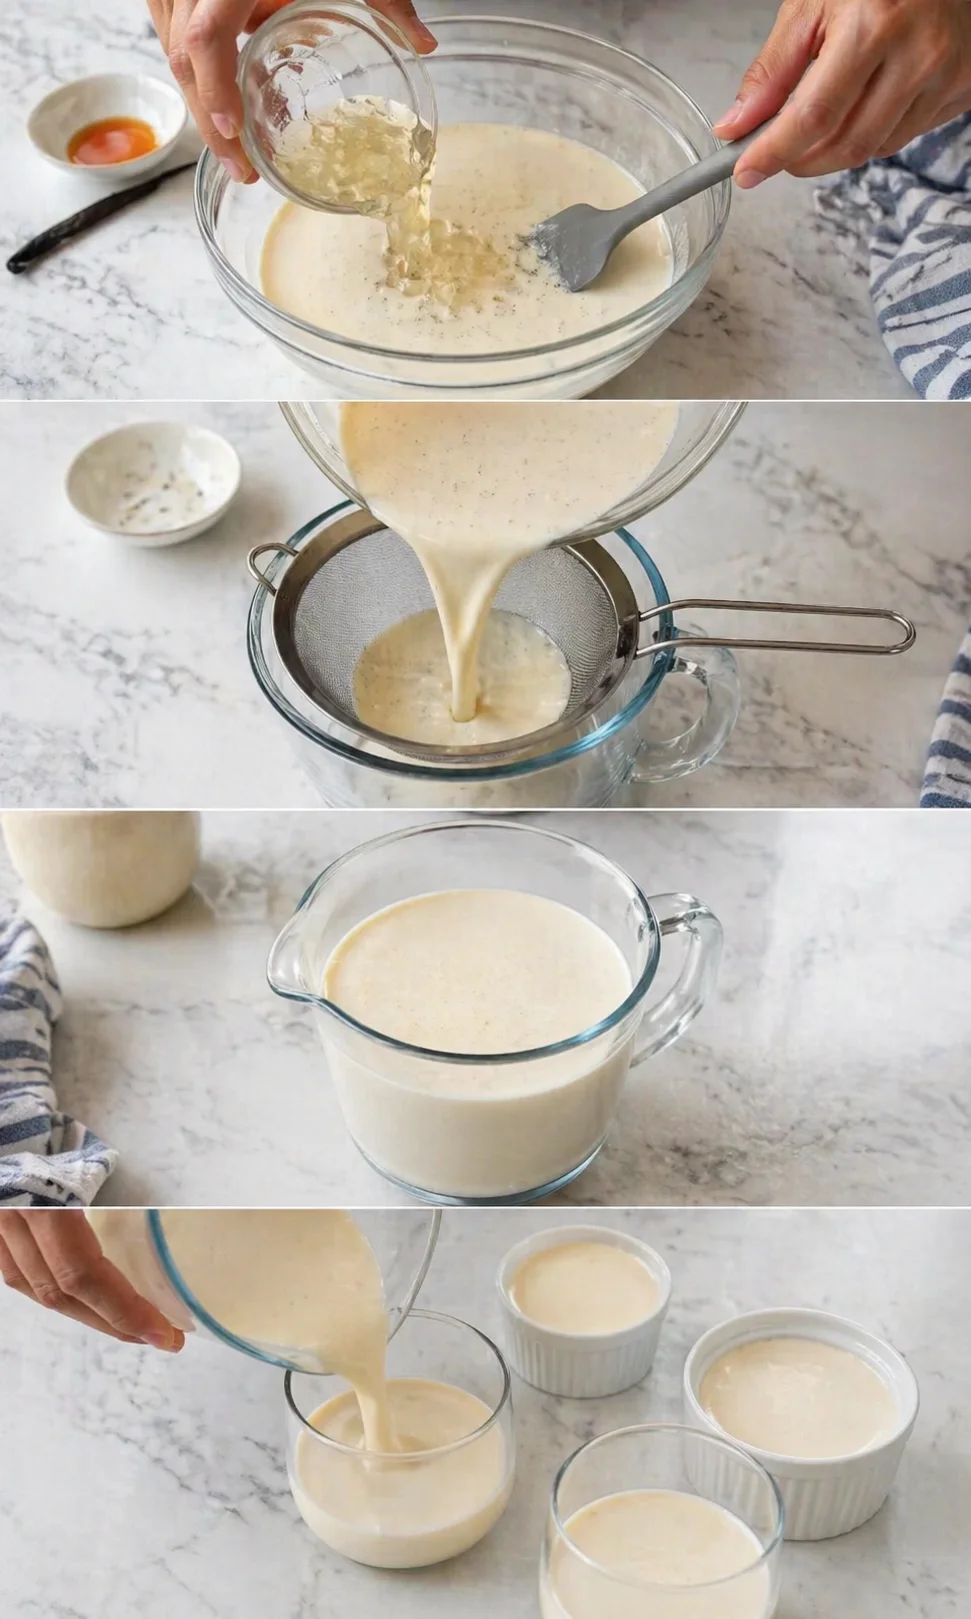
- Sprinkle powdered gelatin over cold water and let it bloom until softened.
- Combine cream, milk, and sugar in a saucepan and heat gently until steaming and the sugar has dissolved—do not boil.
-
Remove the pan from the heat.
- Stir in vanilla and the bloomed gelatin, mixing until the gelatin is fully dissolved.
- Pour the mixture through a fine sieve into a bowl or pitcher to remove any lumps or vanilla bits.
- Let the strained mixture cool a few minutes off the heat until just warm, not hot.
-
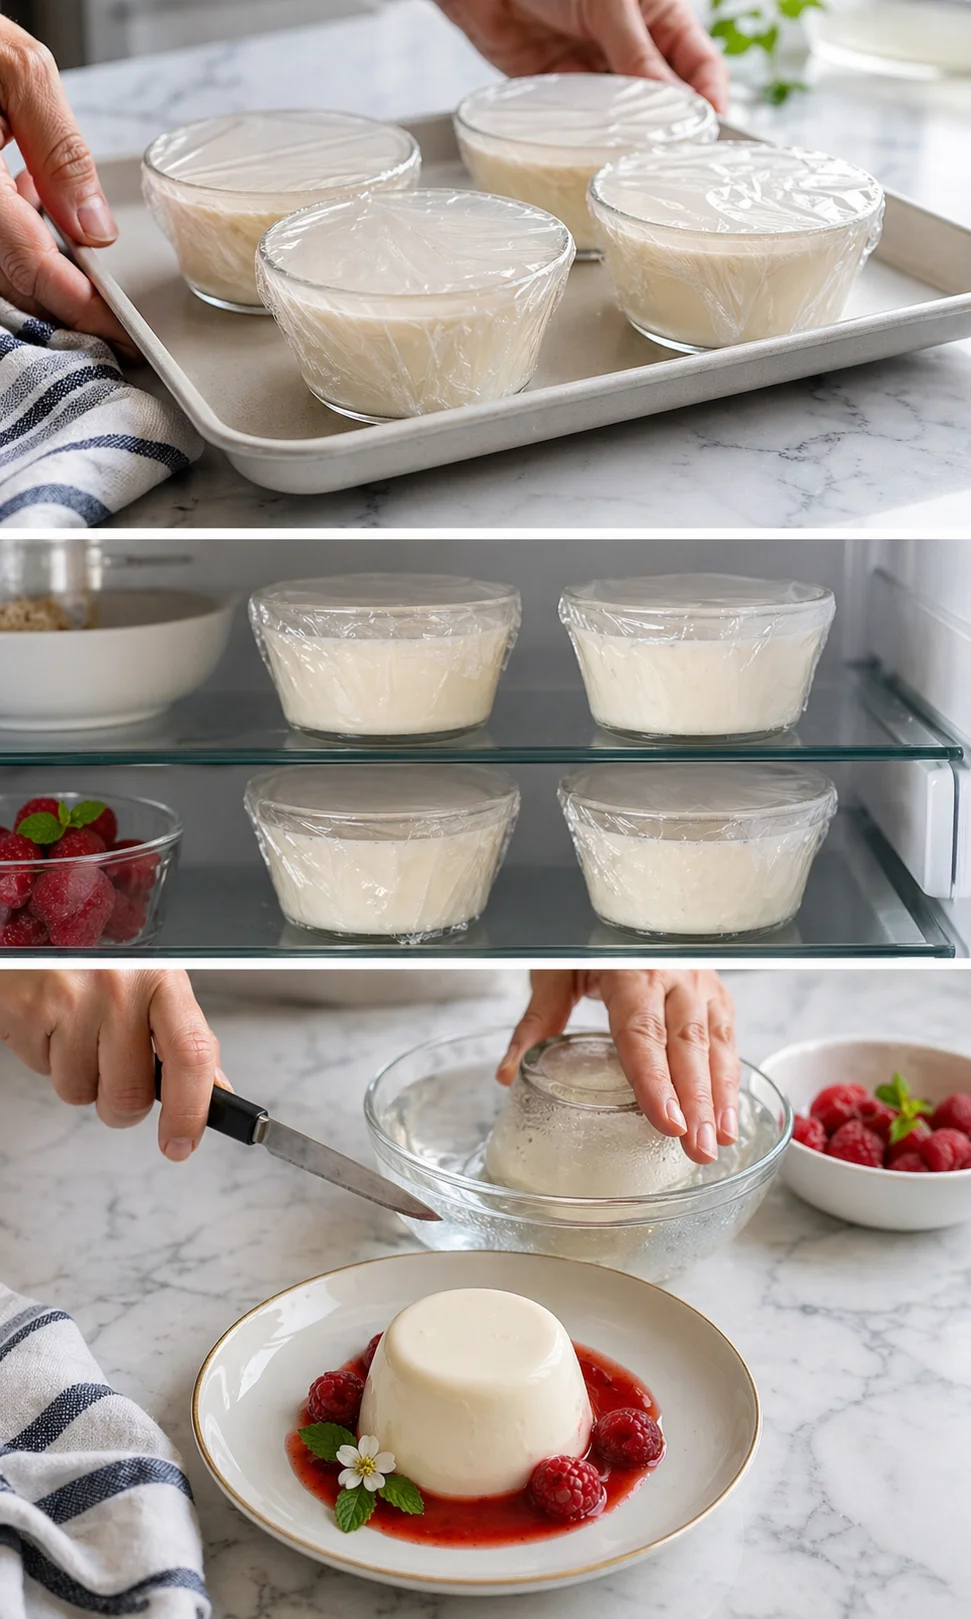
Pour the mixture into clear glasses, silicone molds, or ramekins.
- Place molds on a level tray or shelf and cover each with plastic wrap or lids to prevent a skin forming.
- Chill in the refrigerator for at least 4 hours, preferably overnight (about 8 hours), until set.
-
To unmold, briefly dip the bottoms of molds or ramekins in warm (not hot) water, run a thin knife around the edge, then gently invert onto a plate.
Pro Tips for Silky Results
Here’s the no-nonsense, practical advice I swear by to get silky-smooth panna cotta every single time. Plus, heads-up on the slip-ups that can mess it all up.
- Bloom your gelatin properly: Sprinkle your powdered gelatin over cold water and let it sit until it softens before mixing it into the warm cream. If it still feels gritty, it means it’s not fully bloomed or dissolved yet.
- Fully dissolve the gelatin: Stir the bloomed gelatin into the steaming hot cream until you see it disappear completely. Any undissolved bits will cause specks or weak setting.
- Heat gently—don’t boil: Heat the mixture until it’s steaming and the sugar has melted, then pull it off the heat. Boiling makes the proteins clump tighter, which leads to that unwanted rubbery texture.
- Let it cool a bit before pouring: Let the mix sit a few minutes off the heat to be just warm, not hot. Pouring boiling-hot cream into molds can cause puddles of condensation and a soggy top layer.
- Strain for a flawless finish: Pour the mix through a fine sieve into your molds or glasses to catch any leftover bits or vanilla lumps—this ensures the smoothest panna cotta possible.
- Cover while chilling: Always cover with plastic wrap or lids while in the fridge. This stops a skin from forming and keeps that velvety texture.
- Use a level surface: Place your molds on a flat tray or shelf so your panna cotta sets evenly without lopsided tops.
- Unmold easily with warm water: For silicone or ramekins, dip the bottom briefly in warm (not hot) water, run a thin knife around the edge, then flip out gently.
- Pay attention to chill time and temp: At least 4 hours is a must, but overnight (about 8 hours) is best for the cleanest set. If your fridge runs warm, give it extra time.
- Never freeze: Freezing messes with the texture, making panna cotta grainy or watery when it thaws. Keep it refrigerated up to two days for best results. If you want a make-ahead dessert that thrives in the freezer, try this Strawberry Crunch Ice Cream Cake.
- Add toppings last minute: Put on fresh berries, syrup, or garnishes just before serving so juices don’t spread and flavors stay fresh and bright. For a caramelized fruit option, the Brown Sugar Peach Cake recipe shows how to make jammy brown-sugar peaches that are fantastic spooned over panna cotta.
- Use extract for everyday, beans for wow: Vanilla extract is perfect for quick, everyday versions. Vanilla beans add those pretty flecks and a totally lovely aroma for special occasions.
- Scaling and swaps: Feel free to double or halve the recipe, just keep the cream-to-milk and gelatin ratios consistent. If you swap gelatin for agar or another thickener, follow a trusted recipe since textures will differ.
- Sweetness is flexible: You can cut back the sugar if you want a less sweet panna cotta, but taste the warm mixture before chilling to make sure it’s still balanced.
The key to that dreamy smooth panna cotta is heating the cream just enough to dissolve the sugar fully. I watch carefully for the moment when steam rises but before you see bubbles—then it’s time to take it off the heat.
Boiling spells trouble here. It changes the cream’s structure, tightening the proteins and resulting in a dense, rubbery finish instead of that tender wobble you want.
I’ve tested both ways, and the difference is day and night. Gentle heat keeps your panna cotta soft, smooth, and just right.
Flavor Swaps and Topping Ideas
I’ve experimented with both scraped vanilla beans and vanilla extract in this panna cotta. My verdict? Unless you have vanilla beans on hand or it’s a special occasion, stick with vanilla extract. It’s easier and flavors the dessert beautifully.
Vanilla beans definitely look prettier with those delicate flecks, but in terms of flavor, a good-quality extract holds its own without fuss.
For everyday dinners or casual get-togethers, extract really does the job wonderfully. No need to overcomplicate things!
When it comes to toppings, I’ve enjoyed panna cotta with both fresh berries and homemade coulis. Fresh berries bring clean, natural tartness that cuts through the creaminess perfectly.
On the other hand, a quick coulis made by simmering frozen berries with a bit of sugar and lemon juice adds a deeper color and richer flavor—great for cooler months or when fresh berries aren’t at their peak. If you love that bright lemon-and-berry pairing, you might also enjoy my Lemon Blueberry Delight.
Fresh raspberries are usually my go-to—they’re just tart enough to balance the richness. Raspberry coulis ranks right behind if you want a smoother, saucier topping. Any extra coulis is lovely spooned over my Sour Cream Pound Cake recipe.
For a final flourish, I sometimes add a single mint leaf or an edible flower. Keep it minimal so the panna cotta remains the star on your plate.
How to Store and Make Ahead
I always make panna cotta the night before—it sets perfectly overnight and saves me a bunch of time on the day I want to serve. You can even make it up to two days ahead as long as you keep it covered and chilled in the fridge. If you like make-ahead chilled desserts, my Key Lime Bars recipe also keeps beautifully in the fridge.
Just remember: don’t freeze it. Freezing changes the texture and leads to that grainy, watery mess nobody wants.
Troubleshooting and Common Questions
-
Q: How long does panna cotta need to set?
A: Pop it in the fridge for at least 4 hours, but overnight (about 8 hours) is perfect for a beautifully clean set. You can make it up to two days ahead and keep it chilled until serving.
-
Q: Can I swap powdered gelatin for gelatin sheets?
A: Yes! One packet (about 2 teaspoons powdered gelatin) roughly equals one gelatin sheet. Follow the instructions for blooming and dissolving your sheets, then stir into the warm cream as usual.
-
Q: What if my panna cotta doesn’t set properly?
A: The biggest culprits: not enough gelatin or gelatin that wasn’t fully dissolved. Make sure to bloom your gelatin well in cold water and stir it completely into your hot cream mixture. Also, check your fridge temperature and chill time—some fridges might need extra hours.
-
Q: How do I unmold panna cotta without ruining it?
A: Dip the bottom of your ramekin or silicone mold into warm (not hot) water for a few seconds to loosen it up. Run a thin knife carefully around the edge, then gently invert onto a plate. Silicone molds usually release easier than rigid ramekins.
-
Q: Can I use less sugar or a sugar substitute?
A: Absolutely, you can lower the sugar if you prefer less sweetness—just taste the warm mixture before chilling to be sure the flavor still feels balanced. If you’re using non-caloric sweeteners, check how they behave when heated and dissolve them fully during the steaming step.
-
Q: Can I make this dairy-free or vegan?
A: This traditional recipe depends on dairy cream and gelatin (which comes from animals). For a dairy-free or vegan version, try full-fat coconut milk or plant-based cream and substitute agar-agar for gelatin. Just note agar sets firmer and more rigid, so you’ll need a tested recipe for best results.
-
Q: Is vanilla bean better than extract?
A: Both work beautifully! Vanilla beans add pretty flecks and a bit more aromatic depth for special occasions. Extract is your best friend for everyday ease without compromising flavor.
-
Q: Can I freeze panna cotta?
A: I recommend not freezing it. The texture doesn’t hold up well—panna cotta can become grainy or watery once thawed. Instead, keep it in the fridge and enjoy within two days.
-
Q: Can I make a larger or smaller batch?
A: Yes! Just keep the cream-to-milk and gelatin ratios the same, and scale everything together. This way, you’ll keep that perfect creamy balance and the right firm-yet-velvety texture.
-
Q: Why shouldn’t I boil the cream mixture?
A: Boiling changes the proteins in the cream and makes the panna cotta firm up too much, leading to a rubbery texture. Heat until it steams and the sugar dissolves, then take it off the heat before adding gelatin to keep it soft and silky.
A rich, creamy, and fuss-free panna cotta with a perfect balance of heavy cream and whole milk, gently heated and set with gelatin for a silky, delicate wobble. Serve chilled, topped with fresh raspberries or raspberry coulis and a mint leaf for an elegant dessert.
- Prep Time: 10 minutes
- Cook Time: 10 minutes
- Total Time: 4 hours 20 minutes (including chilling time)
- Yield: 6 servings 1x
- Category: Dessert
Ingredients
- 2 1/2 cups heavy cream
- 1/2 cup whole milk
- 1/4 to 1/3 cup sugar (adjust to taste)
- 2 teaspoons powdered gelatin or 1 gelatin sheet (approximately equal)
- 3 tablespoons cold water (for blooming gelatin)
- 1 teaspoon vanilla extract or 1 vanilla bean (split and scraped)
Instructions
- Measure 2 1/2 cups heavy cream and 1/2 cup whole milk.
- Sprinkle the powdered gelatin over 3 tablespoons cold water and let it bloom until softened (about 5 minutes). If using gelatin sheets, soak according to package instructions.
- Combine cream, milk, and sugar in a saucepan and heat gently over medium-low heat until steaming and the sugar dissolves completely; do not boil.
- Remove the saucepan from heat.
- Stir in vanilla extract or the scraped seeds and pod from the vanilla bean.
- Add the bloomed gelatin and stir until fully dissolved with no granules remaining.
- Pour the mixture through a fine sieve into a bowl or pitcher to remove any lumps or vanilla bean bits.
- Let the strained mixture cool for a few minutes until just warm, not hot.
- Pour the panna cotta mixture into clear glasses, silicone molds, or ramekins.
- Place molds on a level tray and cover each with plastic wrap or lids to prevent skin formation.
- Refrigerate for at least 4 hours, preferably overnight (about 8 hours), until fully set.
- To unmold, briefly dip the bottoms of molds or ramekins in warm (not hot) water, run a thin knife around the edge, then gently invert onto a plate.
- Serve plain or topped with fresh raspberries, raspberry coulis, a single mint leaf, or edible flowers as desired.
Notes
Ensure gelatin is fully bloomed and dissolved to avoid texture issues., Heat cream mixture gently to steaming, never boiling, to maintain silky texture., Cover panna cotta while chilling to prevent skin formation on the surface., Panna cotta sets best on a level surface to avoid uneven tops., Do not freeze panna cotta as texture will deteriorate; keep refrigerated for up to two days., Adjust sugar to taste before chilling to ensure balanced sweetness., Vanilla extract is good for everyday use; vanilla beans add a more aromatic and visually appealing finish for special occasions., For dairy-free or vegan versions, substitute coconut milk or plant-based cream and use agar-agar instead of gelatin but follow a tested recipe for best results.
Nutrition
- Serving Size: 1 serving (approximately 1/2 cup)
- Calories: Approximately 250 calories per serving
- Fat: 24 g per serving
- Carbohydrates: 6 g per serving
- Protein: 3 g per serving
More in Uncategorized