American Flag Cake Roll with Red, White, and Blue Watercolor Finish – Emma’s Cake Studio
This cake speaks softly but beautifully—no flashy glitter or noisy fireworks here. Instead, you get a tender vanilla roll that tells its story through vibrant color and clean, simple lines. The red, white, and blue glaze isn’t piped on or printed—it’s brushed by hand, just like a flag fluttering in the breeze. I’ll guide you through how to make the glaze stick perfectly, keep the sponge soft and crack-free, and paint that gorgeous watercolor effect with just food coloring and patience.
If you’ve ever found flag cakes too busy or just not quite right, this one’s made to change your mind. It’s subtle, elegant, and totally doable. By the end, you’ll confidently build it from inside out—knowing exactly why each step matters for the best results.
Most American flag cakes lean on buttercream and heavy coloring. Not this one. Here, we keep things light with a soft sponge, airy whipped filling, and a glaze that sets just right without overpowering the cake.
The magic happens at the end, not at the start. Brushing the colors on after the cake is chilled and rolled gives you much better control. Your lines stay sharp. The stars rest neatly on top. And your roll stays firm all the way to the last slice.
This recipe is designed to give you real confidence, not just a list of steps.
This watercolor flag roll doesn’t ask for perfection—it just wants your patience, a little brushwork, and good ingredients. You’ll learn how to roll without cracks, fill for stability, and paint a flawless watercolor finish. Everything you need is right here.
Save this recipe to your holiday sweets collection for easy access when you’re ready.
And if you give it a try, please drop a comment below. I’m excited to hear how your stars and stripes turned out—and what dessert you’re pairing it with this summer.
Prep Time 25 minutes
Cook Time 12 minutes
Additional Time 2 hours
Total Time 2 hours 37 minutes
Ingredients
- For the Sponge Cake
- 4 large eggs, room temperature
- ¾ cup granulated sugar
- 1 tsp vanilla extract
- ¾ cup all-purpose flour
- 1 tsp baking powder
- ¼ tsp salt
- Powdered sugar, for rolling
- For the Filling
- 1 cup heavy whipping cream
- ½ cup powdered sugar
- 1 tsp vanilla extract
- Optional: 2 tbsp cream cheese, softened
- For the Watercolor Glaze
- 1 cup white chocolate chips or white candy melts
- ¼ cup heavy cream
- Red and blue gel food coloring
- Small food-safe brushes or offset spatulas
- White fondant or candy stars
Instructions
- PREP YOUR PAN: Heat your oven to 350°F (175°C). Line a 10×15-inch jelly roll pan with parchment paper, then lightly grease the paper so the cake won’t stick.
- MAKE THE SPONGE: In a large bowl, beat the eggs on high with an electric mixer for 4 to 5 minutes until fluffy and pale. While mixing, slowly add the sugar and vanilla until everything is combined and smooth.
- MIX DRY INGREDIENTS: In another bowl, whisk together the flour, baking powder, and salt. Gently fold the dry mix into the egg batter just until no streaks remain—don’t overmix!
- BAKE: Pour the batter evenly into your prepared pan, smoothing to the edges. Bake for about 10 to 12 minutes. Test by pressing gently on the cake’s surface—if it springs back, it’s done.
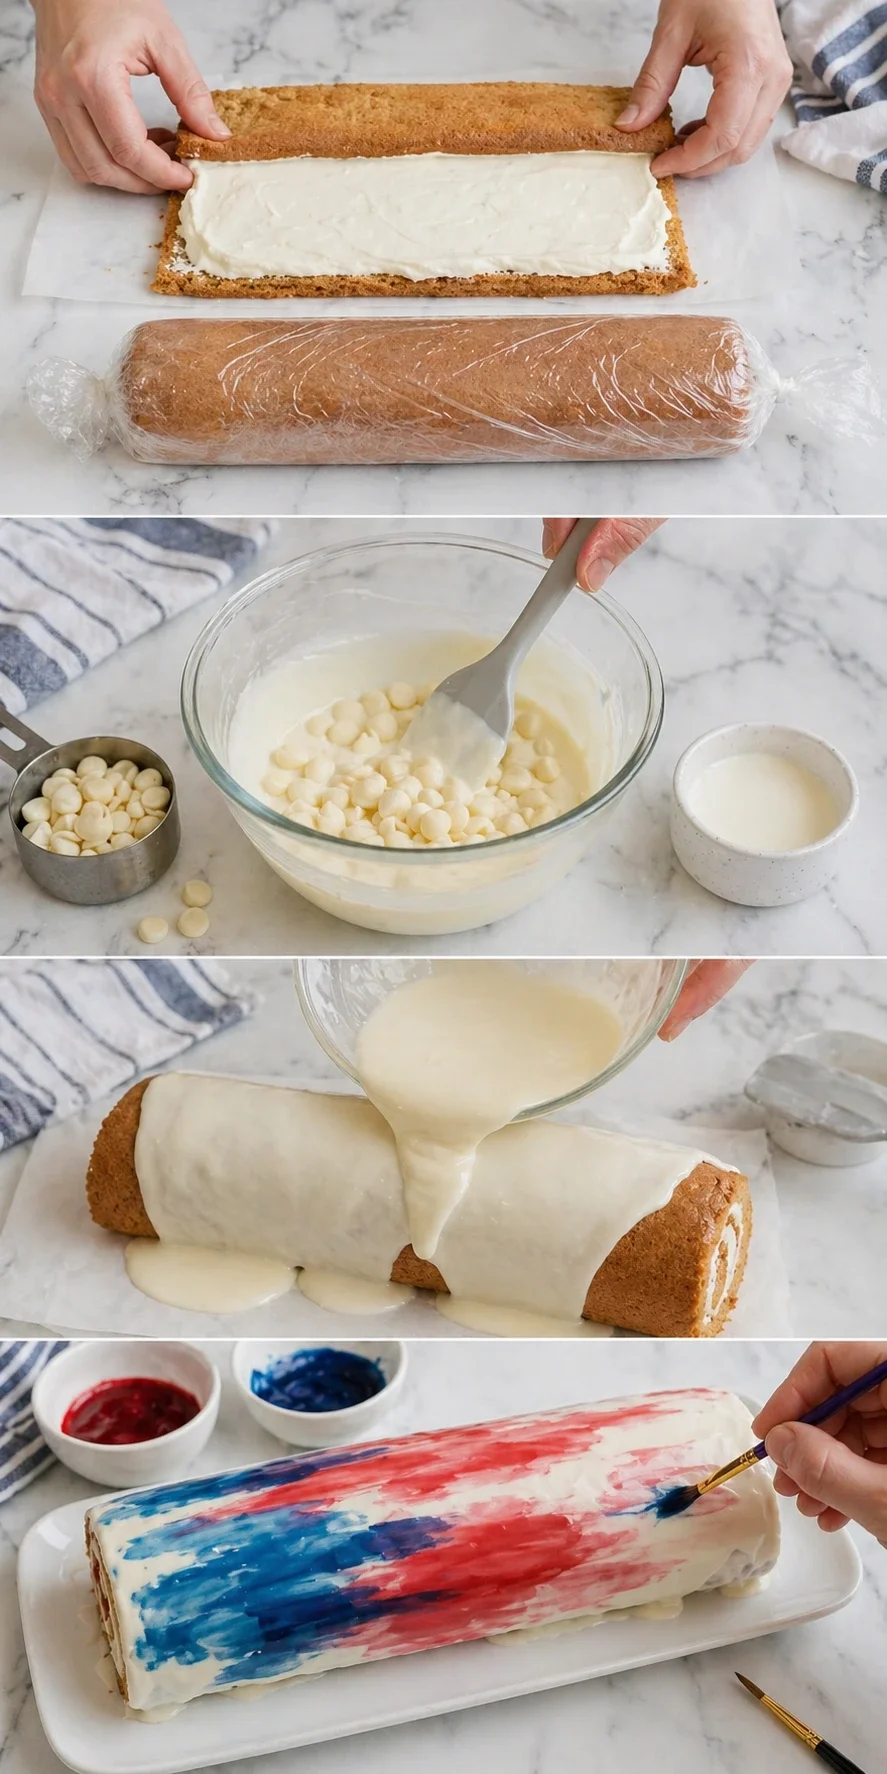
- ROLL THE CAKE WARM: Lay a clean kitchen towel flat and dust it generously with powdered sugar. Quickly flip the hot cake out onto the towel, peel off the parchment, and roll the cake up inside the towel. Let it cool fully rolled to hold its shape.
- WHIP THE FILLING: Chill a mixing bowl and beat the cream, powdered sugar, vanilla, and cream cheese (if using) until stiff peaks form.
- ASSEMBLE: When the cake is cool, gently unroll it and spread the whipped filling evenly across. Then roll it back up without the towel, wrap the whole roll tightly with plastic wrap, and refrigerate for at least 1 hour.
- MAKE THE GLAZE: In a microwave-safe bowl, heat the white chocolate chips and heavy cream in short 20-second bursts, stirring well each time until smooth. Let it cool for 5 to 10 minutes before glazing.
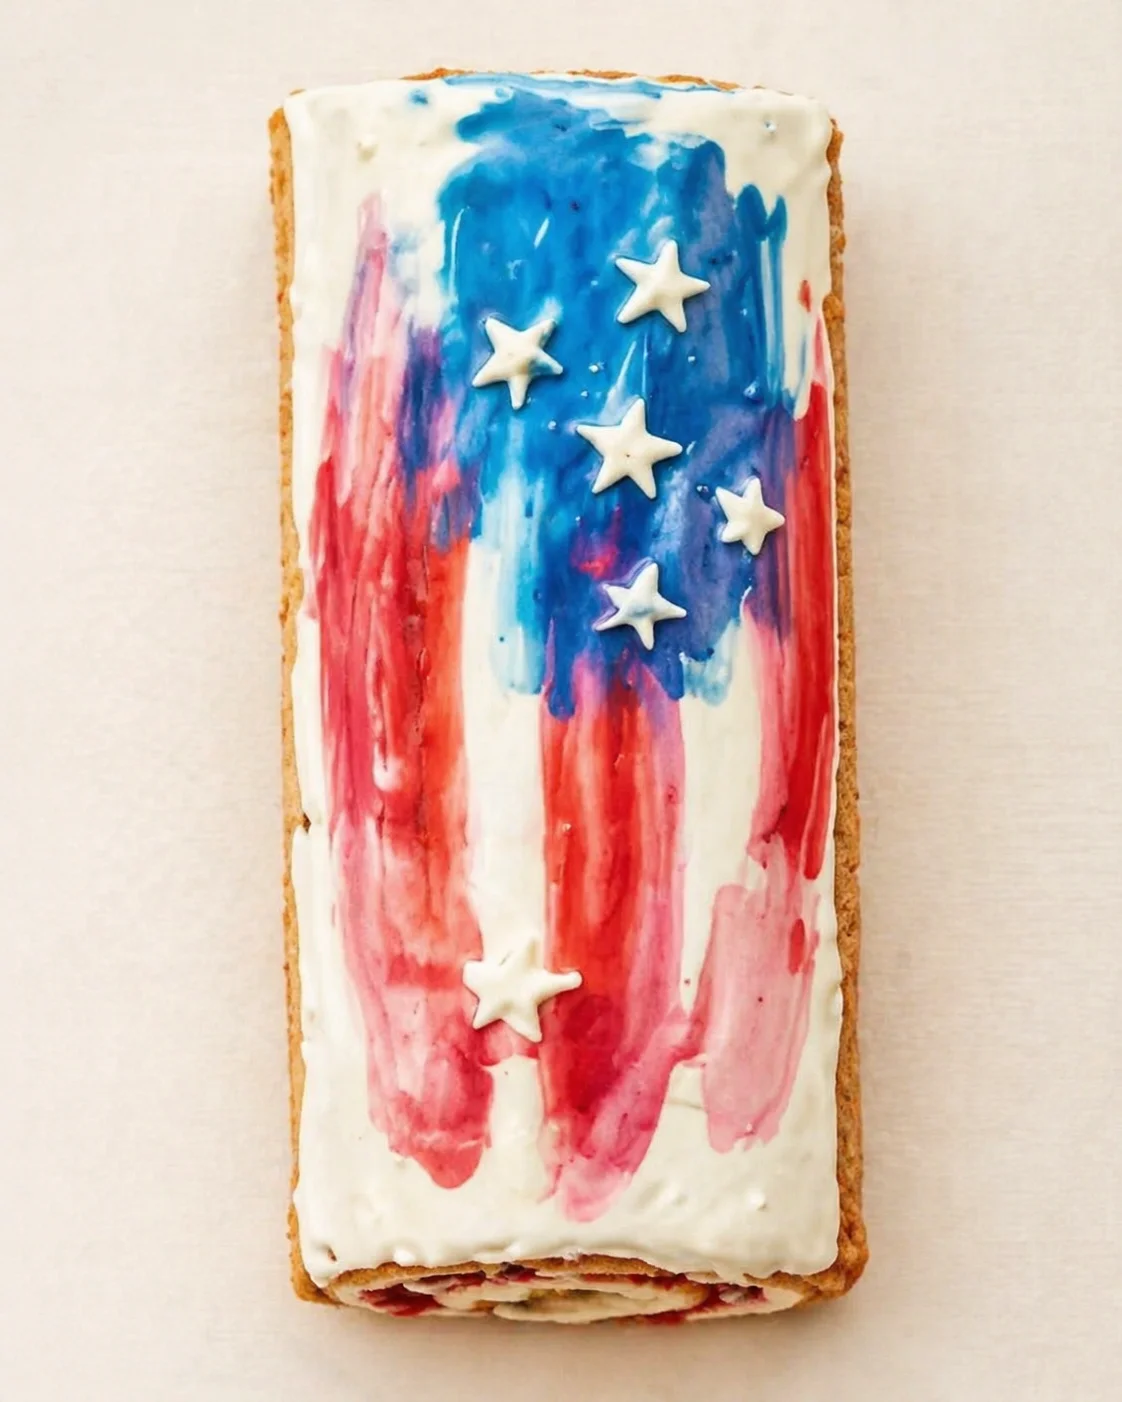
- DECORATE: Pour the glaze over your chilled roll. Using small brushes or offset spatulas, swipe red and blue gel food coloring across the glaze in sweeping strokes to create a watercolor look. While the glaze is still soft, press on your fondant or candy stars in the blue area.
Notes
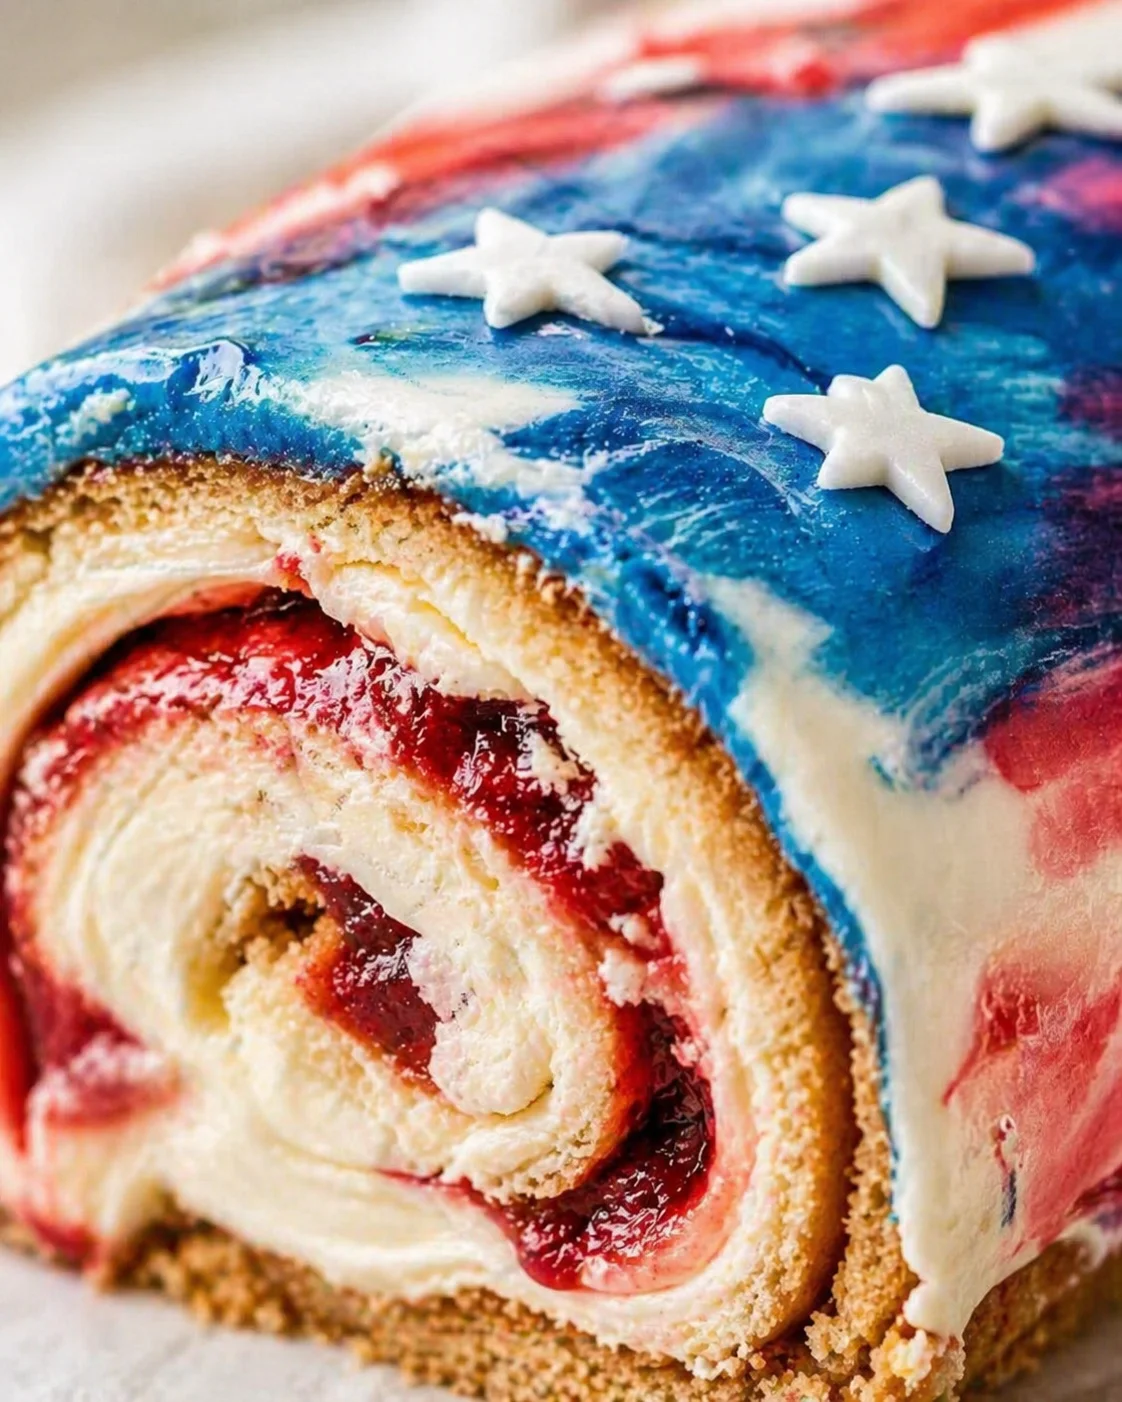
Adding cream cheese in the filling gives it more body and firmer slices but isn’t mandatory. For the best-looking swirls when you slice, chill the roll for two hours before serving. Keep it refrigerated until it’s time to dig in.
Nutrition Information
Yield
10
Serving Size
1
Amount Per Serving Calories 430 Total Fat 19g Saturated Fat 11g Trans Fat 0g Unsaturated Fat 6g Cholesterol 118mg Sodium 192mg Carbohydrates 60g Fiber 0g Sugar 51g Protein 6g
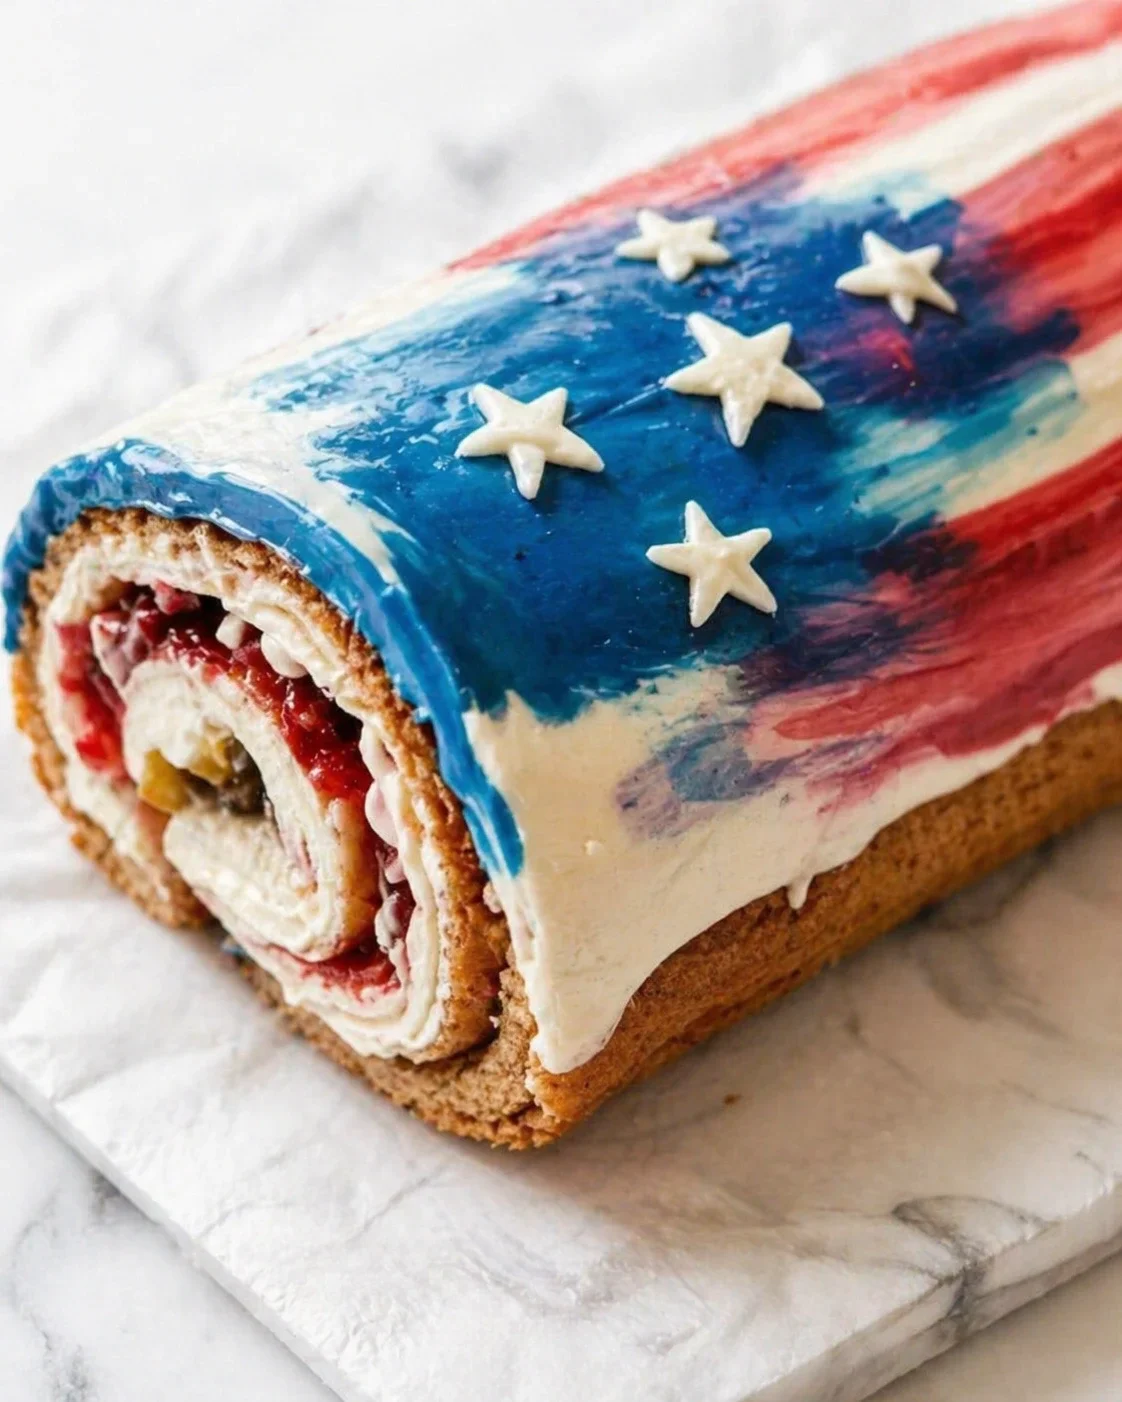
This recipe celebrates quiet patriotism with a soft vanilla cake roll that whispers red, white, and blue—no loud piping or complicated designs. Imagine brushstrokes of color instead of icing details, a sponge that stays flexible and doesn’t crack, and a white chocolate glaze you can hand-paint for a dreamy watercolor look. The end result is elegant, approachable, and surprisingly easy.
You’ll find everything you need right here: how to whip the eggs just the right way so your sponge is light and elastic, a simple tip for rolling your cake while warm so it won’t break, a no-fuss whipped filling (with an easy cream cheese swap for firmer slices), and how to make a glaze that you can paint on with food coloring without melting that lovely filling.
Before we dive into the steps, I’ve included prep and cook times, a chill period suggestion, and a straightforward list of pantry-friendly ingredients like white chocolate, heavy cream, and gel colors. Plus, I’ll flag key timing moments—when to glaze, when to add stars, and how long to chill for slicing perfection—as well as handy quick fixes if your roll starts to crack.
No matter if you’re baking for backyard barbecues, potlucks, or just because, this guide is made for home bakers wanting a showstopper without the fuss. Read through once, gather your supplies, and you’ll be ready to paint your own stars and stripes.
Why You’ll Love the Results
This cake nails the patriotic look without relying on buttercream or fancy piping. The sponge is light and rolls beautifully thanks to whipped whole eggs, the filling is versatile and can be made airier or firmer with cream cheese, and the watercolor glaze finishes things off with big impact but little stress—if you want another effortless red, white, and blue bite for the table, try these patriotic chocolate-dipped cherries.
- An elegant, understated flag design that’s totally customizable.
- A soft, elastic sponge that rolls easily without cracking when handled right.
- A simple, stable glaze made from white chocolate and cream—no tempering required.
- Make-ahead friendly: the roll firms up nicely in the fridge and keeps well through the party. Planning a full dessert table? Browse our 150 best patriotic 4th of July desserts.
Ingredients for Sponge, Filling, Glaze
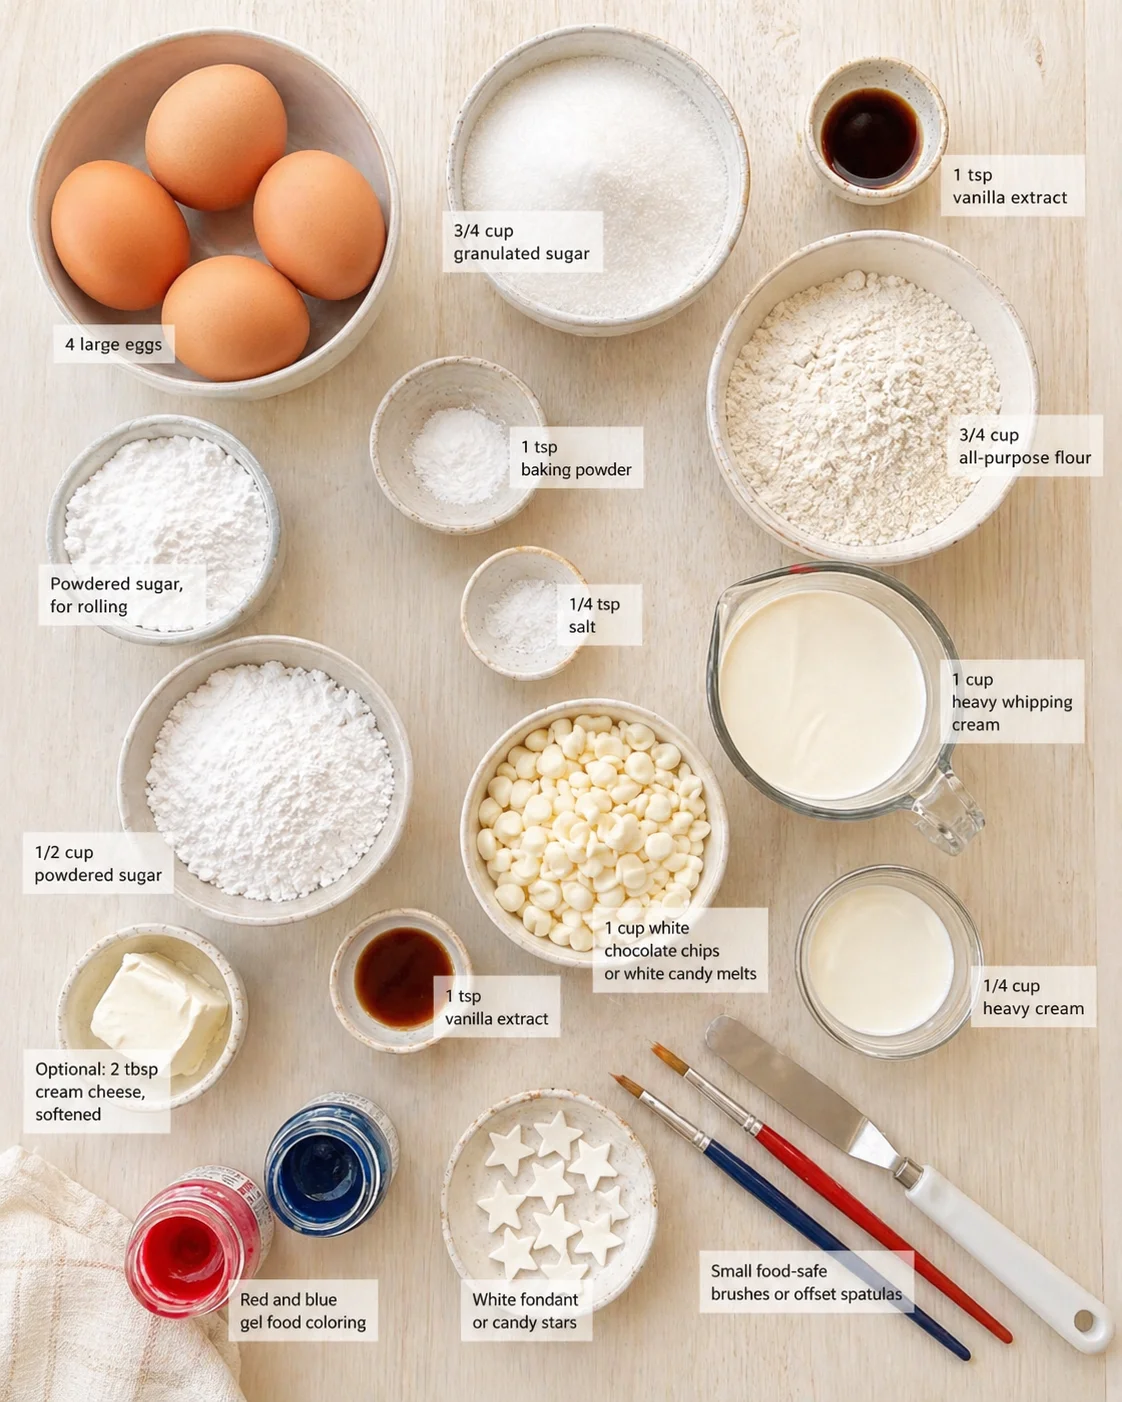
- 4 large eggs, room temperature
- 3/4 cup granulated sugar
- 1 tsp vanilla extract
- 3/4 cup all-purpose flour
- 1 tsp baking powder
- 1/4 tsp salt
- Powdered sugar, for rolling
- 1 cup heavy whipping cream
- 1/2 cup powdered sugar
- 1 tsp vanilla extract
- Optional: 2 tbsp cream cheese, softened (for firmer slices)
- 1 cup white chocolate chips or white candy melts
- 1/4 cup heavy cream
- Red and blue gel food coloring
- Small food-safe brushes or offset spatulas
- White fondant or candy stars
Whip, Bake, Roll, and Paint
- Preheat oven to 350°F (175°C); line a 10×15-inch jelly roll pan with parchment and lightly grease the paper.
- Beat 4 large eggs on high with an electric mixer for 4–5 minutes until fluffy and pale, slowly adding 3/4 cup granulated sugar and 1 tsp vanilla while mixing.
- Whisk together 3/4 cup all-purpose flour, 1 tsp baking powder, and 1/4 tsp salt.
-
Gently fold the dry ingredients into the egg batter until no streaks remain, avoiding overmixing.

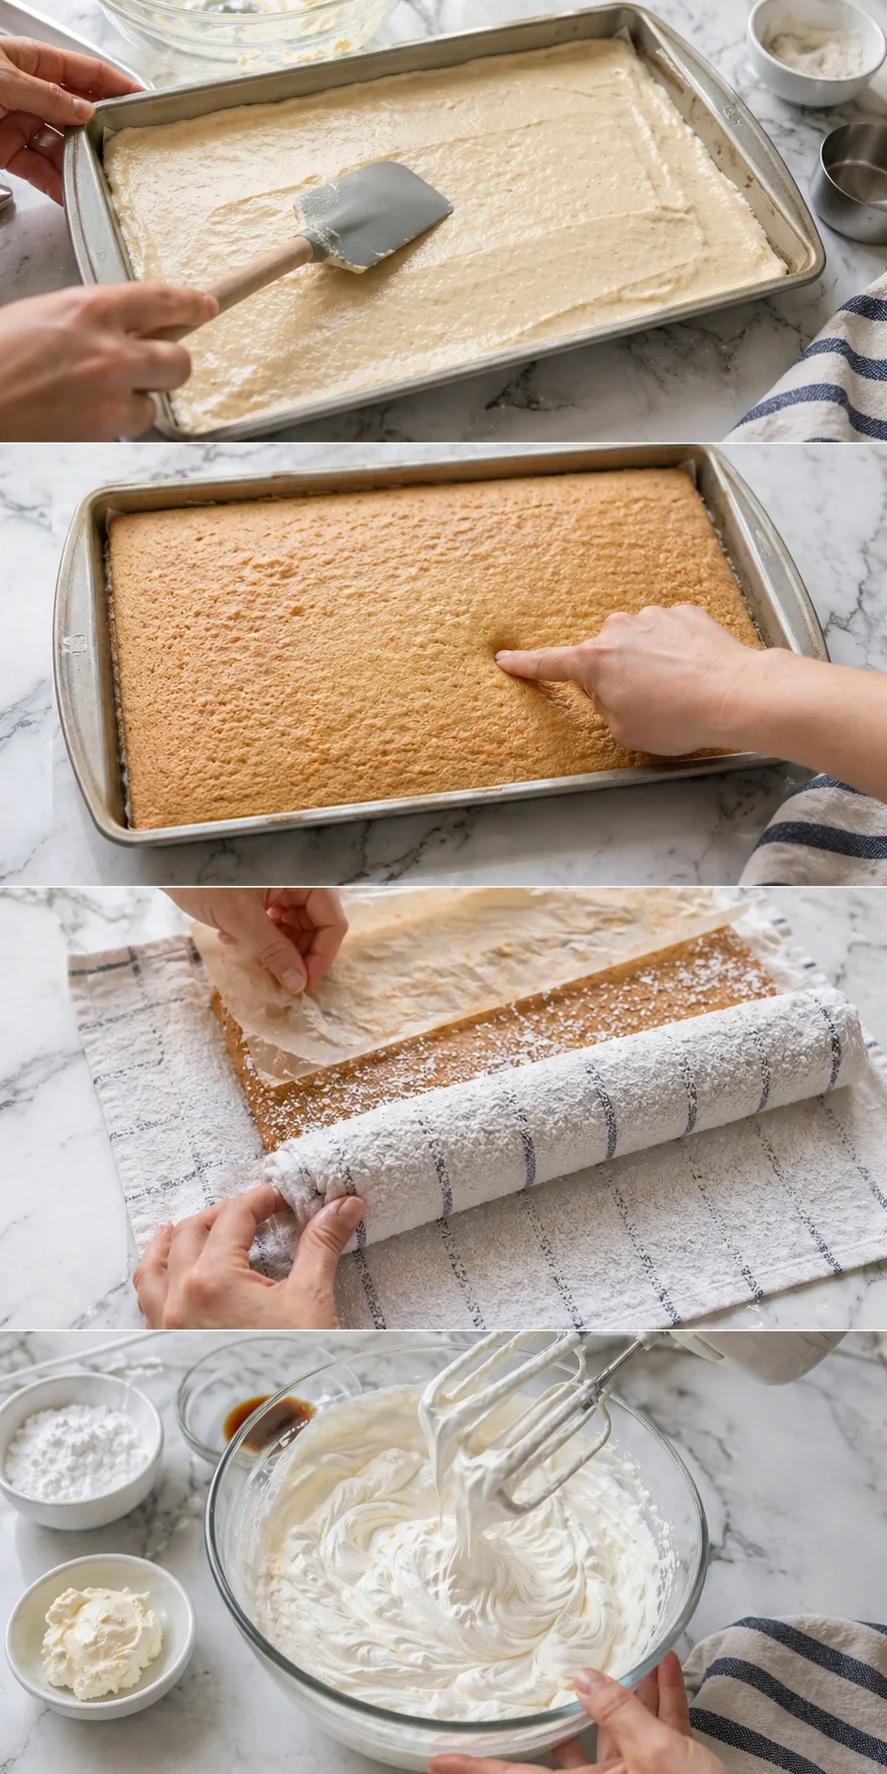
- Pour the batter into the prepared pan and smooth to the edges.
- Bake 10–12 minutes until the surface springs back when lightly pressed.
- Dust a clean kitchen towel generously with powdered sugar, flip the hot cake onto the towel, peel off the parchment, and roll the cake inside the towel while warm; cool fully rolled.
-
Chill a mixing bowl, then beat 1 cup heavy whipping cream, 1/2 cup powdered sugar, 1 tsp vanilla (and optional 2 tbsp softened cream cheese) until stiff peaks form.
- Unroll the cooled cake, spread the whipped filling evenly, re-roll without the towel, wrap tightly in plastic wrap, and refrigerate at least 1 hour.
- Heat 1 cup white chocolate chips and 1/4 cup heavy cream in a microwave-safe bowl in 20-second bursts, stirring until smooth; let cool 5–10 minutes.
- Pour the cooled glaze over the chilled roll and spread evenly.
-
Use small food-safe brushes or offset spatulas to apply red and blue gel food coloring in horizontal sweeping strokes across the glaze to create a watercolor effect, leaving some white areas.
- While the glaze is still tacky, press white fondant or candy stars into the blue area.
- Refrigerate the decorated roll at least 1 hour (ideally 2 hours) to firm before slicing.
-
Slice the chilled roll with a serrated knife, wiping the blade between each cut.

Pro Tips for Crack-Free Rolls
- Beat the eggs on high speed for the full 4–5 minutes to build a strong sponge structure. Your batter should be pale and thick.
- Use a 10×15-inch jelly roll pan for a perfectly thin and even sponge. If using a larger sheet pan, pour less batter so the cake stays thin—about 1/4-inch thick is ideal after baking.
- Roll the cake immediately while warm. Dust a clean towel heavily with powdered sugar, flip the cake onto it, peel off parchment, and roll gently inside the towel to set shape.
- Check doneness at 10–12 minutes by lightly springing the cake’s surface. If it springs back, take it out. Overbaking dries it out and causes cracking.
- Let your glaze cool 5–10 minutes before applying so it paints smoothly and doesn’t melt the filling underneath.
- Brush color in horizontal strokes and leave some white areas for the watercolor effect. Press stars into the blue glaze while it’s still tacky for best adhesion, as shown in our Patriotic Éclairs guide.
- Refrigerate the whole roll at least 1 hour, ideally 2 hours, before slicing to get neat, clean slices. Use a serrated knife and wipe between each cut.
- Store the roll wrapped or in an airtight container in the fridge for up to 2–3 days. For brightest colors and shine, decorate just before serving.
Flavor and Filling Swaps
When it comes to the filling, you’ve got options. The simplest is just whipped cream with powdered sugar, which gives you a light and airy texture. But if you want a filling that holds its shape better after slicing, pop in a couple tablespoons of softened cream cheese. That little bit of cream cheese adds structure—the same principle behind a No Bake Strawberry Cheesecake.
I personally do both depending on the occasion. The whipped cream alone is lovely and light but needs longer chilling for firmer slices. Adding cream cheese sharpens those swirl lines and helps the filling hold up better, which is great for parties or buffets. For a similarly sturdy, make-ahead tray dessert, try Summer Berry Jello Lasagna.
For the best sponge results, stick to a jelly roll pan. Its 10×15-inch size lets the cake bake evenly and roll nicely without cracking. A standard half sheet pan makes a thicker cake that’s tough to roll without breaking or squishing the filling out.
If you don’t have a jelly roll pan, no worries! Line your baking pan and pour a thinner layer of batter—just enough for about a 1/4-inch thickness after baking. This helps your cake roll easier.
Chill, Slice, and Store Properly
Once your cake is rolled and filled, give it at least two hours in the fridge before slicing. This resting time helps the filling firm up and keeps those slices looking neat and tidy.
When you’re ready to cut, use a serrated knife and wipe the blade after each slice. Serve the roll chilled rather than frozen—room temperature can make the filling too soft and ruin the structure. If you need a room-temperature option for the dessert table, try these Fourth of July chocolate-dipped pretzels that stay crisp without refrigeration.
Any leftovers keep well wrapped in plastic wrap or stored airtight in the fridge for 2 to 3 days.
If you’re preparing this ahead of time, I suggest decorating the glaze and adding the stars on the day you plan to serve. That way, the colors stay bright, and the glaze keeps its perfect shine. For a low-effort make-ahead companion that keeps well, add a tray of Red White and Blue Rice Krispie Treats.
Answers to Common Questions
- Can I make this ahead? – Absolutely! Roll and wrap the cake, then chill it for several hours or overnight. For the freshest look, add the glaze and stars the day you want to serve—perfect timing if you’re setting out a patriotic dessert table alongside our Red White and Blue Pudding Shots.
- Do I need cream cheese in the filling? – Not at all. The whipped cream-only filling is lighter, but a couple tablespoons of cream cheese help the filling stay firm and give extra sharpness to your slices.
- What if my cake cracks when rolling? – Don’t worry! Gently try re-rolling and patch cracks with extra filling. Make sure not to overbake and roll the cake while it’s warm—not too hot.
- Can I use buttercream or store-bought frosting instead of glaze? – You can, but this recipe is built for a thin, paintable white chocolate glaze that takes the watercolor colors well. Buttercream might hide that effect or look too thick unless you spread it super thin.
- How do I keep colors vibrant without bleeding? – Use gel food coloring in small amounts and apply streaks lightly, not heavy patches. Let the glaze set slightly between layers and before adding stars.
- Can I freeze the roll? – Yes, but only freeze it before glazing. Wrap it well and freeze up to a month. Thaw in the fridge, then add glaze and decorations. Freezing after glazing can dull the shine and change texture.
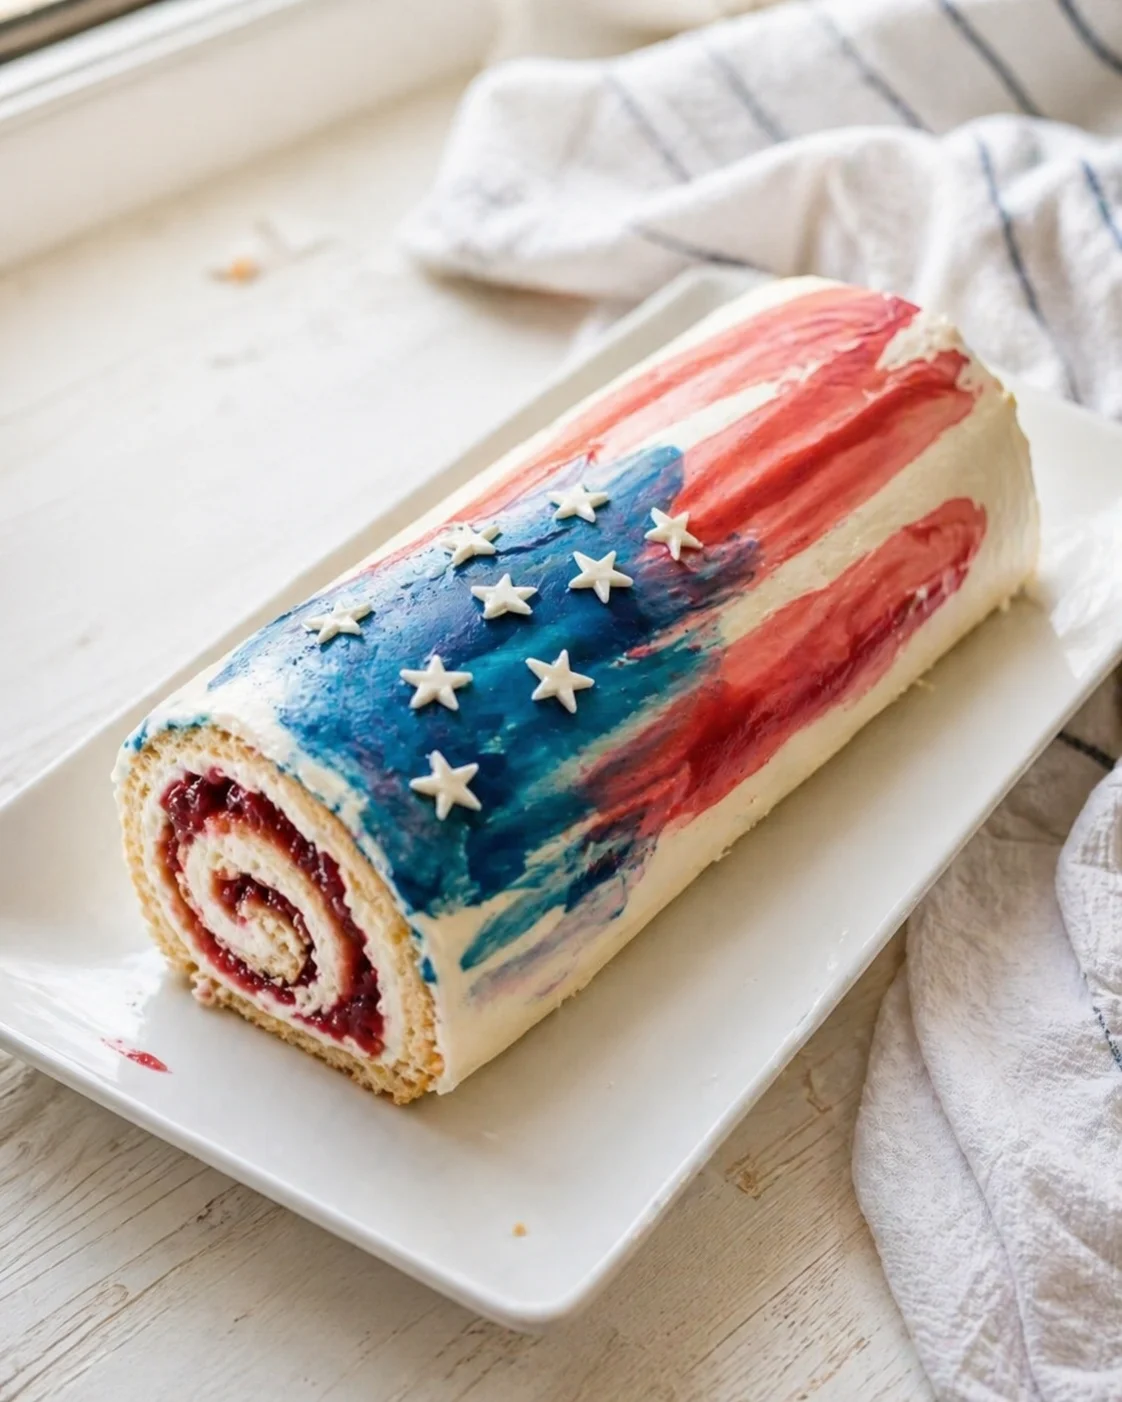
A soft vanilla sponge cake rolled with airy whipped filling and decorated with a hand-painted watercolor white chocolate glaze in red, white, and blue, accented with white fondant or candy stars. This elegant and approachable flag-themed cake roll is designed for a crack-free sponge, stable filling, and perfect glazing technique.
- Prep Time: 25 minutes
- Cook Time: 12 minutes
- Total Time: 2 hours 37 minutes
- Yield: 10 servings 1x
- Category: Dessert
Ingredients
- 4 large eggs, room temperature
- 3/4 cup granulated sugar
- 1 tsp vanilla extract
- 3/4 cup all-purpose flour
- 1 tsp baking powder
- 1/4 tsp salt
- Powdered sugar, for rolling
- 1 cup heavy whipping cream
- 1/2 cup powdered sugar
- 1 tsp vanilla extract
- Optional: 2 tbsp cream cheese, softened (for firmer slices)
- 1 cup white chocolate chips or white candy melts
- 1/4 cup heavy cream
- Red gel food coloring
- Blue gel food coloring
- Small food-safe brushes or offset spatulas
- White fondant or candy stars
Instructions
- Preheat oven to 350°F (175°C); line a 10×15-inch jelly roll pan with parchment paper and lightly grease the paper.
- Beat 4 large eggs on high with an electric mixer for 4–5 minutes until fluffy and pale, slowly adding 3/4 cup granulated sugar and 1 tsp vanilla extract while mixing.
- In a separate bowl, whisk together 3/4 cup all-purpose flour, 1 tsp baking powder, and 1/4 tsp salt.
- Gently fold the dry ingredients into the egg batter just until no streaks remain, avoiding overmixing.
- Pour the batter evenly into the prepared pan and smooth to the edges.
- Bake for about 10 to 12 minutes until the surface springs back when lightly pressed.
- Dust a clean kitchen towel generously with powdered sugar, flip the hot cake onto the towel, peel off the parchment, and roll the cake inside the towel while warm. Let it cool fully rolled to hold its shape.
- Chill a mixing bowl. Beat 1 cup heavy whipping cream, 1/2 cup powdered sugar, 1 tsp vanilla extract, and optional 2 tbsp softened cream cheese until stiff peaks form.
- Unroll the cooled cake, spread the whipped filling evenly, then re-roll without the towel. Wrap tightly in plastic wrap and refrigerate for at least 1 hour.
- Heat 1 cup white chocolate chips and 1/4 cup heavy cream in a microwave-safe bowl in short 20-second bursts, stirring until smooth. Let cool for 5–10 minutes before glazing.
- Pour the cooled glaze evenly over the chilled roll.
- Use small food-safe brushes or offset spatulas to apply red and blue gel food coloring across the glaze in sweeping horizontal strokes to create a watercolor effect, leaving some white areas.
- While the glaze is still tacky, press white fondant or candy stars into the blue area.
- Refrigerate the decorated roll for at least 1 hour (ideally 2 hours) before slicing.
- Slice chilled roll with a serrated knife, wiping the blade between each cut.
Notes
Adding cream cheese in the filling gives the roll more body and firmer slices but is optional., For the best-looking swirls and neat slices, chill the roll for two hours before serving., Store the rolled cake wrapped or in an airtight container in the refrigerator for up to 2–3 days., Decorate the glaze and add stars on the day you plan to serve for brightest colors and best shine., If the cake cracks when rolling, gently re-roll and patch cracks with extra filling., Avoid overbaking to prevent drying out and cracking., Use a 10×15-inch jelly roll pan or a similarly sized pan with thinner batter layer to ensure easy rolling.
Nutrition
- Serving Size: 1 slice
- Calories: 430
- Fat: 19g
- Carbohydrates: 60g
- Protein: 6g
More in Uncategorized