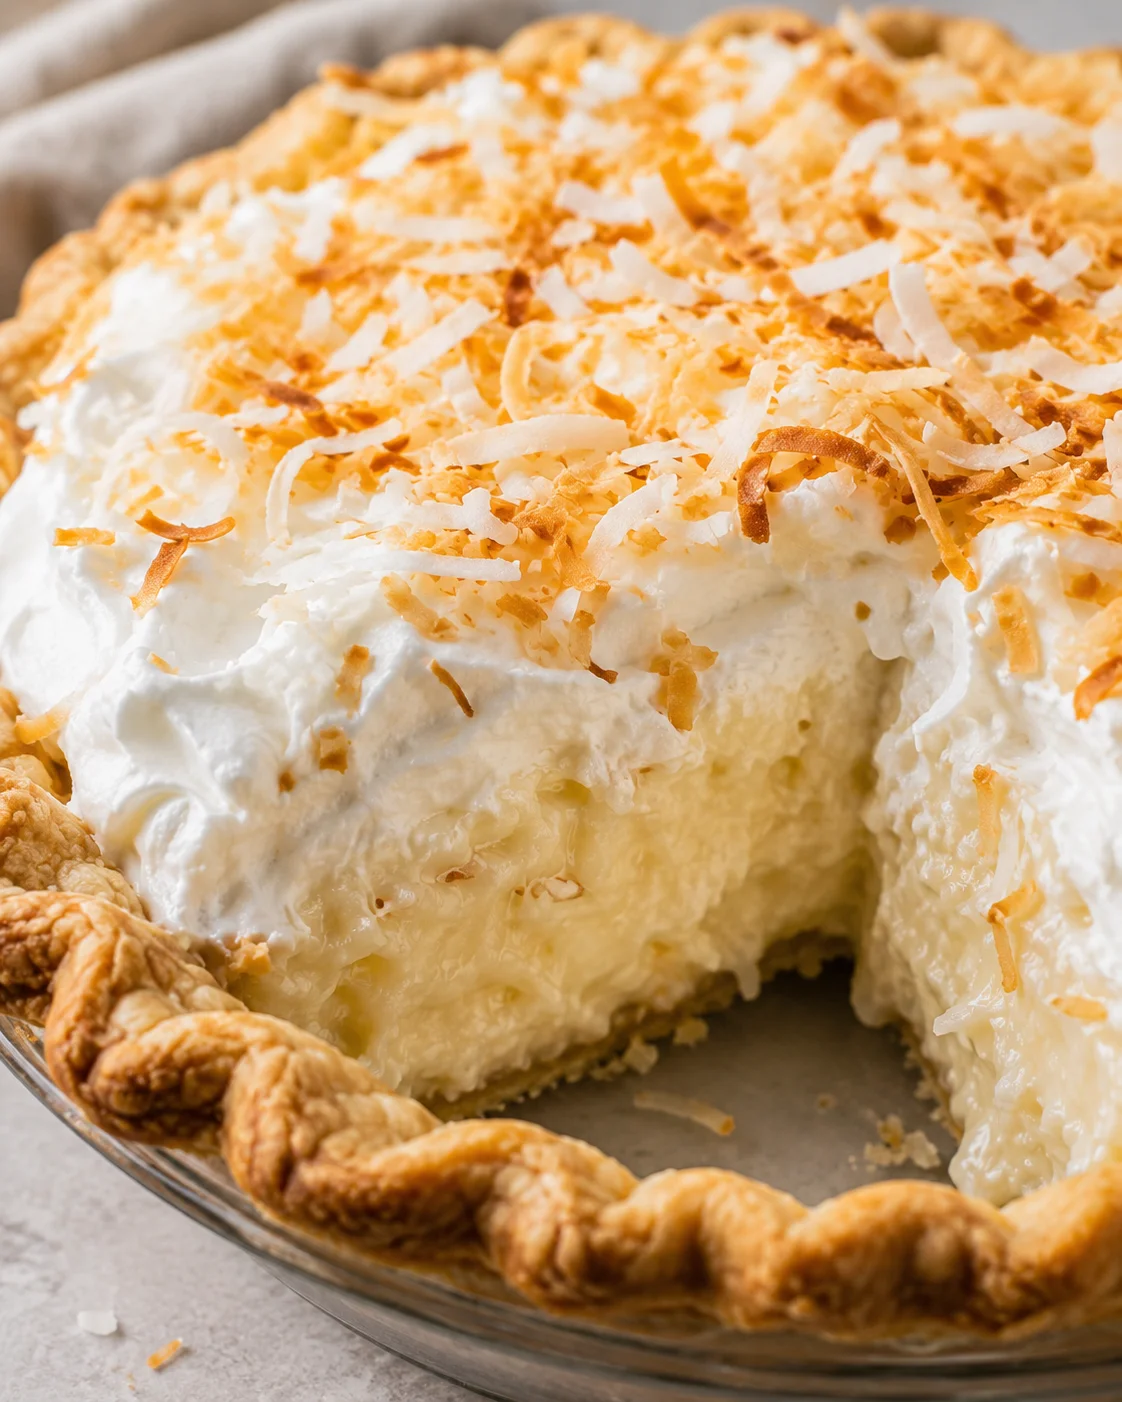
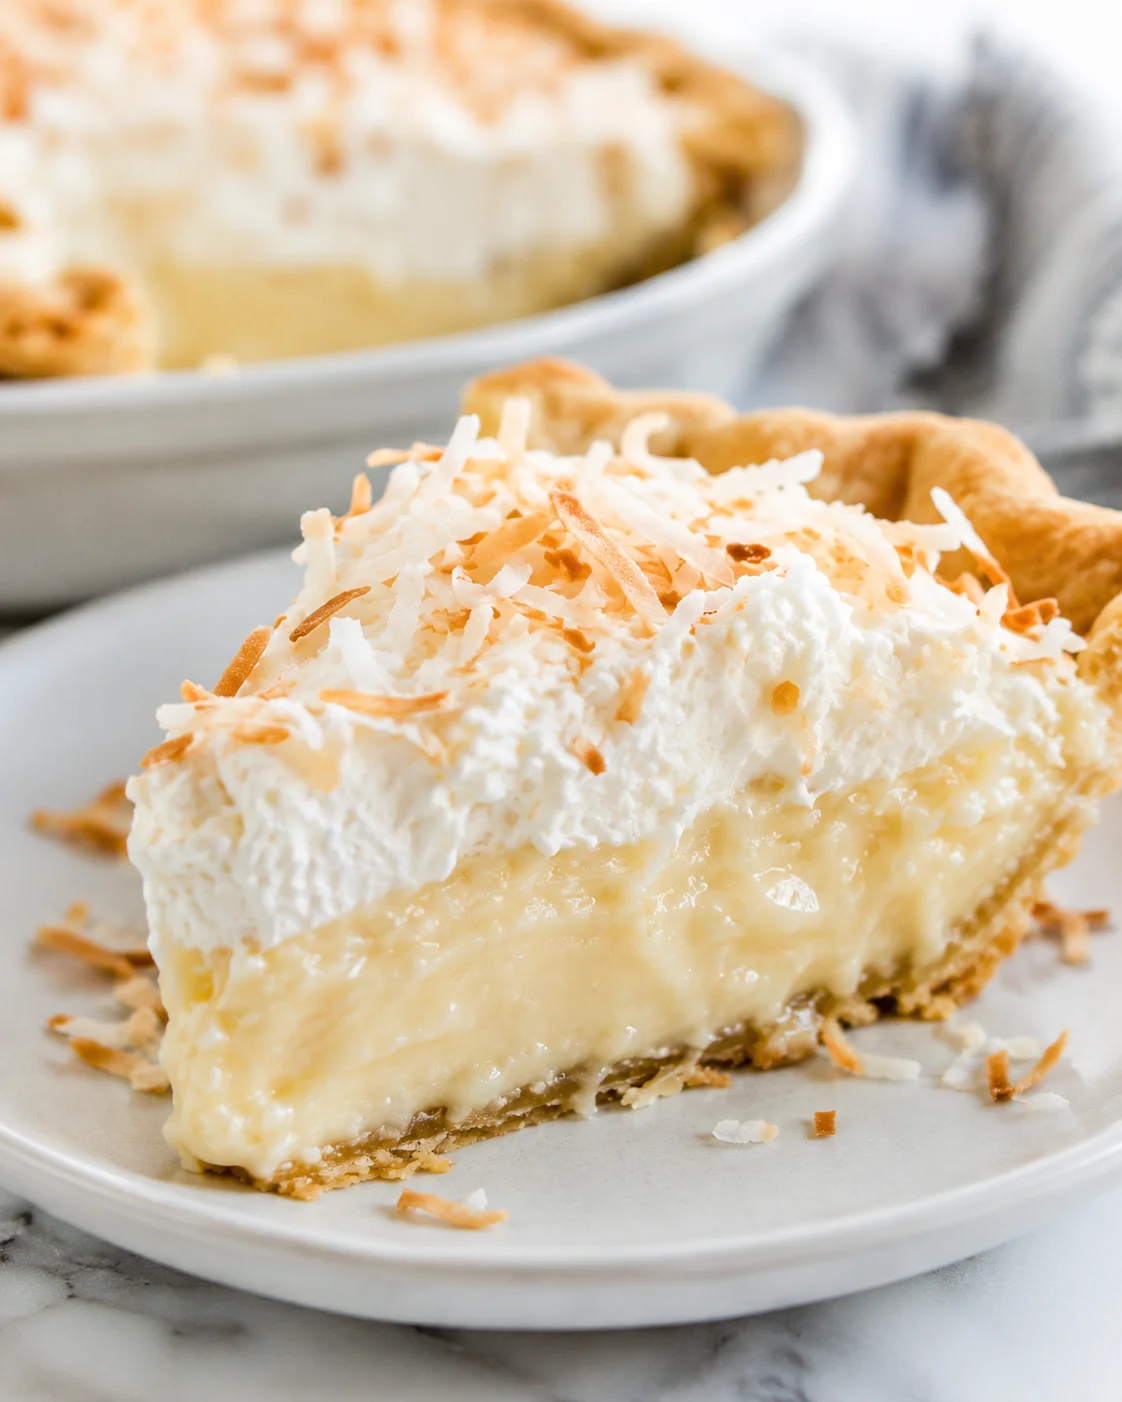
Coconut Cream Pie
Nothing beats a homemade pie in my book, especially when it comes to a coconut cream pie. Thanksgiving feels like my personal pie-making championship, and this recipe is one I always count on. The filling is silky and rich, loaded with that classic coconut goodness. For the best flavor and texture, I highly suggest trying my foolproof pie crust recipe alongside it—it makes all the difference.
Every Thanksgiving, I whip up a bunch of pies, and this easy coconut cream pie is always a go-to that steals the show. It blends a smooth, custard-like coconut filling with heaps of toasted coconut flakes and a buttery, flaky crust that’s pre-baked to perfection. I really encourage you to use my perfect pie crust recipe and give it a blind bake first — it’s a game changer for taste and texture.
In this guide, I break down every step clearly, with photos to show you how to toast your coconut just right, temper those eggs perfectly for a silky filling, and put it all together so your slices come out clean and pretty. While it doesn’t take long to mix everything up, the pie does need some chill time—plan to refrigerate it for a good 4 hours or better yet, overnight before topping it off with whipped cream and serving. This recipe yields around 12 servings and is great to make ahead, especially for holidays and get-togethers.
- What you’ll learn: how to get perfectly toasted coconut, create a smooth lump-free coconut custard, and finish it off with fluffy whipped cream and crunchy toasted flakes.
- Time & yield: the hands-on time is short, but you’ll want to allow several hours for chilling; this pie feeds about 12 happily.
- Key tips up front: blind bake that crust fully, temper the eggs slowly for smooth filling, and press plastic wrap to the filling surface as it cools to avoid skin.
Why Guests Will Rave
This coconut cream pie is a delicious mix of creamy custard and crunchy toasted coconut all resting in a flaky, perfectly baked crust. It feels rich and indulgent but never heavy, thanks to the blend of whole milk and canned coconut milk. The toasted coconut adds a lovely nutty crunch that everyone loves. If you love a citrusy twist on creamy pies, try our lemon mascarpone cream pie. Plus, it’s easy to prep ahead, so you can relax while your guests rave about your baking skills. It’s a classic dessert that works beautifully for holidays (browse our holiday pie recipes) or any time you want a cozy, homemade treat.
Ingredients and Measurements
- 1 9-inch pre-baked pie crust*, (Follow my recipe and blind bake pie crust)
- 1 cup shredded sweetened coconut
- 4 large egg yolks
- 1/3 cup cornstarch
- 1 1/4 cups whole milk, divided
- 14 ounce can unsweetened coconut milk
- 1/2 cup + 2 Tablespoons granulated sugar
- 1/4 teaspoon salt
- 3 Tablespoons unsalted butter, room temperature*
- 1 teaspoon vanilla extract
- 1/2 teaspoon coconut extract, to taste
- 1 1/2 cups heavy cream, lightly sweetened
- 3-4 Tablespoons powdered sugar
- 1/2 teaspoon vanilla extract
Method: Filling, Baking, and Assembly
- Blind bake a 9-inch pie crust until fully cooked and cool completely.
- Place shredded coconut in a dry skillet over medium-low heat; stir and toss often until mostly golden, then remove and cool.
- In a bowl, whisk together 4 egg yolks, 1/3 cup cornstarch, and 1/4 cup whole milk; set aside.
- In a medium saucepan combine the remaining 1 cup whole milk, 14-ounce can coconut milk, 1/2 cup + 2 Tbsp granulated sugar, and 1/4 tsp salt; heat over medium until it gently simmers, stirring occasionally.
- While whisking the yolk mixture, slowly ladle a bit of the hot milk mixture into the yolks to temper them; repeat with another ladleful.
-
Pour the tempered egg mixture back into the saucepan and cook over medium heat, stirring/whisking constantly for 2–3 minutes until the custard thickens.
- Remove the pan from heat and stir in 3 Tbsp room-temperature unsalted butter, 1 tsp vanilla extract, and 1/2 tsp coconut extract until the butter melts and the filling is glossy.
- Fold 3/4 cup of the toasted coconut into the filling, reserving the rest for topping.
- Pour the warm coconut cream filling into the cooled pre-baked pie crust.
- Press plastic wrap directly onto the surface of the filling to prevent a skin, then refrigerate at least 4 hours or overnight to set.
- Whip 1 1/2 cups heavy cream with 3–4 Tbsp powdered sugar and 1/2 tsp vanilla with electric beaters until soft to medium peaks form.
- Spread or pipe the whipped cream over the chilled filling and sprinkle with the remaining toasted coconut.
Pro Tips for Best Results
- Toast the coconut over medium-low heat and stir constantly to ensure even, golden toasting without burning. It happens fast, so stay nearby!
- Use whole milk and full-fat canned coconut milk for the creamiest, most luscious filling. Lower-fat versions can make the custard thin and less rich.
- Tempering the eggs slowly by adding hot milk bit by bit keeps your custard silky and prevents scrambled bits from forming.
- Right when the filling thickens, remove it from heat and stir in butter and extracts. This gives the filling a beautiful shine and smooth flavor balance.
- Press plastic wrap directly onto the warm filling surface before chilling to stop that annoying skin from forming.
- Chill the pie at least 4 hours or overnight so the filling sets completely before you add the whipped cream topping.
- When whipping cream, stop at soft to medium peaks so your topping stays fluffy and doesn’t get grainy or weepy.
- If you’re using your own homemade crust (try this double pie crust recipe), blind bake it fully and cool it completely before filling. This keeps your bottom crust from turning soggy.
Flavor Swaps and Mix-Ins
- Try the old-school version by swapping the butter for 3 oz of cream cheese for a creamier, slightly tangy filling texture.
- Change the base by using a graham cracker or vanilla wafer crust for a sweeter, crunchier twist.
- Add a layer of rich chocolate ganache on the crust or drizzle melted chocolate over the finished pie for a decadent coconut-chocolate combo.
- Brighten the filling with a tablespoon of fresh lime or lemon zest folded in—adds a fantastic citrus note; for a bolder lime fix, try the Key Lime Bars recipe.
- Mix in chopped macadamia nuts or toasted almonds replacing half the shredded coconut for extra texture and a nutty surprise.
- Make individual mini tartlets with the same filling using small, prebaked tart shells—perfect for party servings.
- For an ultra-rich filling, swap the canned coconut milk for canned coconut cream, just decrease the other milk a bit to keep the right texture.
Storage, Make-Ahead, and Freezing
Keep your assembled coconut cream pie covered and refrigerated for 2 to 3 days. For longer storage, skip the whipped topping and wrap the pie tightly—the filling stays good for up to 3 days refrigerated. For a fuss-free, make-ahead refrigerator dessert, try my No Bake Strawberry Cheesecake.
Freezing the whole pie with whipped cream is tricky because the cream separates and the texture suffers. Instead, freeze the baked crust or the cooled coconut custard filling separately (store filling in a freezer-safe container) for up to a month. Thaw the filling overnight in the fridge and whip fresh topping when you’re ready to serve. If you want a make-ahead dessert that’s designed to live in the freezer, my Strawberry Crunch Ice Cream Cake freezes beautifully and slices cleanly.
Before slicing chilled pie, take it out of the fridge 10 to 15 minutes ahead so it cuts easily. If your filling feels a bit too firm, let it gently soften at room temp rather than nuking it in the microwave.
Common Questions and Answers
- Q: Can I swap out the coconut milk for just regular milk? A: For best coconut flavor and creamy texture, use the canned coconut milk called for. Using only regular milk will dull the coconut taste and make the filling less rich. However, using a combo like the recipe suggests gives you the best of both worlds.
- Q: Can I make this recipe dairy-free or vegan? A: This recipe isn’t set up for vegan or dairy-free as it uses eggs, butter, and heavy cream. To make a vegan version, you’d need egg substitutes that thicken well, plant-based butter alternatives, and a stabilized non-dairy whipped topping—results will be very different.
- Q: Why did my filling get lumpy or curdled? A: That usually happens when the eggs are added too quickly or the temperature is too high. Always temper the eggs slowly and keep the heat medium to medium-low while stirring constantly for smooth custard.
- Q: How can I prevent a soggy crust? A: Blind-bake your crust fully and let it cool completely. You can also warm it briefly in the oven before filling to dry it out a bit.
- Q: Can I prep parts in advance? A: Yes! Toast the coconut a few days ahead or longer, blind bake the crust and store it, or make the custard filling and refrigerate it for up to 3 days. Always add whipped cream and toasted coconut topping just before serving for freshness.
- Q: How long should the pie chill before serving? A: At minimum, refrigerate at least 4 hours, but overnight is ideal to let the custard totally firm up and slice nicely.
A luscious and creamy coconut custard filling baked in a flaky pie crust, topped with whipped cream and toasted coconut flakes. Perfect for holidays or any occasion.
- Prep Time: 3 hours
- Cook Time: 20 minutes
- Total Time: 3 hours 20 minutes
- Yield: 12 servings 1x
- Category: Dessert
Ingredients
- 1 9-inch pre-baked pie crust (follow pre-bake instructions)
- 1 cup shredded sweetened coconut
- 4 large egg yolks
- 1/3 cup cornstarch
- 1 1/4 cups whole milk, divided
- 1 (14-ounce) can unsweetened coconut milk
- 1/2 cup plus 2 tablespoons granulated sugar
- 1/4 teaspoon salt
- 3 tablespoons unsalted butter, room temperature
- 1 teaspoon vanilla extract
- 1/2 teaspoon coconut extract, to taste
- 1 1/2 cups heavy cream, lightly sweetened
- 3–4 tablespoons powdered sugar
- 1/2 teaspoon vanilla extract
Instructions
- Blind bake a 9-inch pie crust until fully baked and cool completely.
- Toast shredded coconut in a dry skillet over medium-low heat, stirring constantly until golden, then remove and cool.
- In a bowl, whisk together 4 egg yolks, 1/3 cup cornstarch, and 1/4 cup whole milk; set aside.
- In a medium saucepan, combine remaining 1 cup whole milk, canned coconut milk, 1/2 cup plus 2 tablespoons granulated sugar, and salt; heat over medium until simmering, stirring occasionally.
- Slowly temper the egg yolk mixture by whisking in a few ladlefuls of the hot milk mixture.
- Return tempered egg mixture to saucepan; cook over medium heat, stirring constantly for 2–3 minutes until thickened.
- Remove from heat; stir in butter, vanilla extract, and coconut extract until glossy.
- Fold 3/4 cup toasted coconut flakes into filling, reserving the rest for topping.
- Pour warm coconut cream filling into cooled pre-baked pie crust.
- Press plastic wrap directly onto the surface of the filling to prevent skin formation; refrigerate at least 4 hours or overnight to set.
- Whip heavy cream with powdered sugar and vanilla extract until soft to medium peaks form.
- Spread or pipe whipped cream over chilled filling and sprinkle with remaining toasted coconut flakes.
Notes
Toast coconut over medium-low heat, stirring constantly to avoid burning., Use full-fat canned coconut milk and whole milk for best flavor and texture., Temper eggs slowly to prevent lumps or curdling in custard., Press plastic wrap on filling to prevent skin formation., Chill pie at least 4 hours or overnight before topping and serving., Stop whipping cream at soft to medium peaks to prevent grainy or weepy topping., Blind bake crust fully and cool to avoid soggy bottom., Try variations like adding cream cheese to filling, using different crusts, chocolate ganache layers, citrus zest, or nuts for texture., Store assembled pie covered and refrigerated up to 3 days; freeze crust or filling separately for up to 1 month.
Nutrition
- Serving Size: 1 slice
- Calories: Approximately 350-400 calories per serving (estimate based on typical ingredients)
- Fat: 25 g per serving (estimate)
- Carbohydrates: 30 g per serving (estimate)
- Protein: 5 g per serving (estimate)
More in Uncategorized