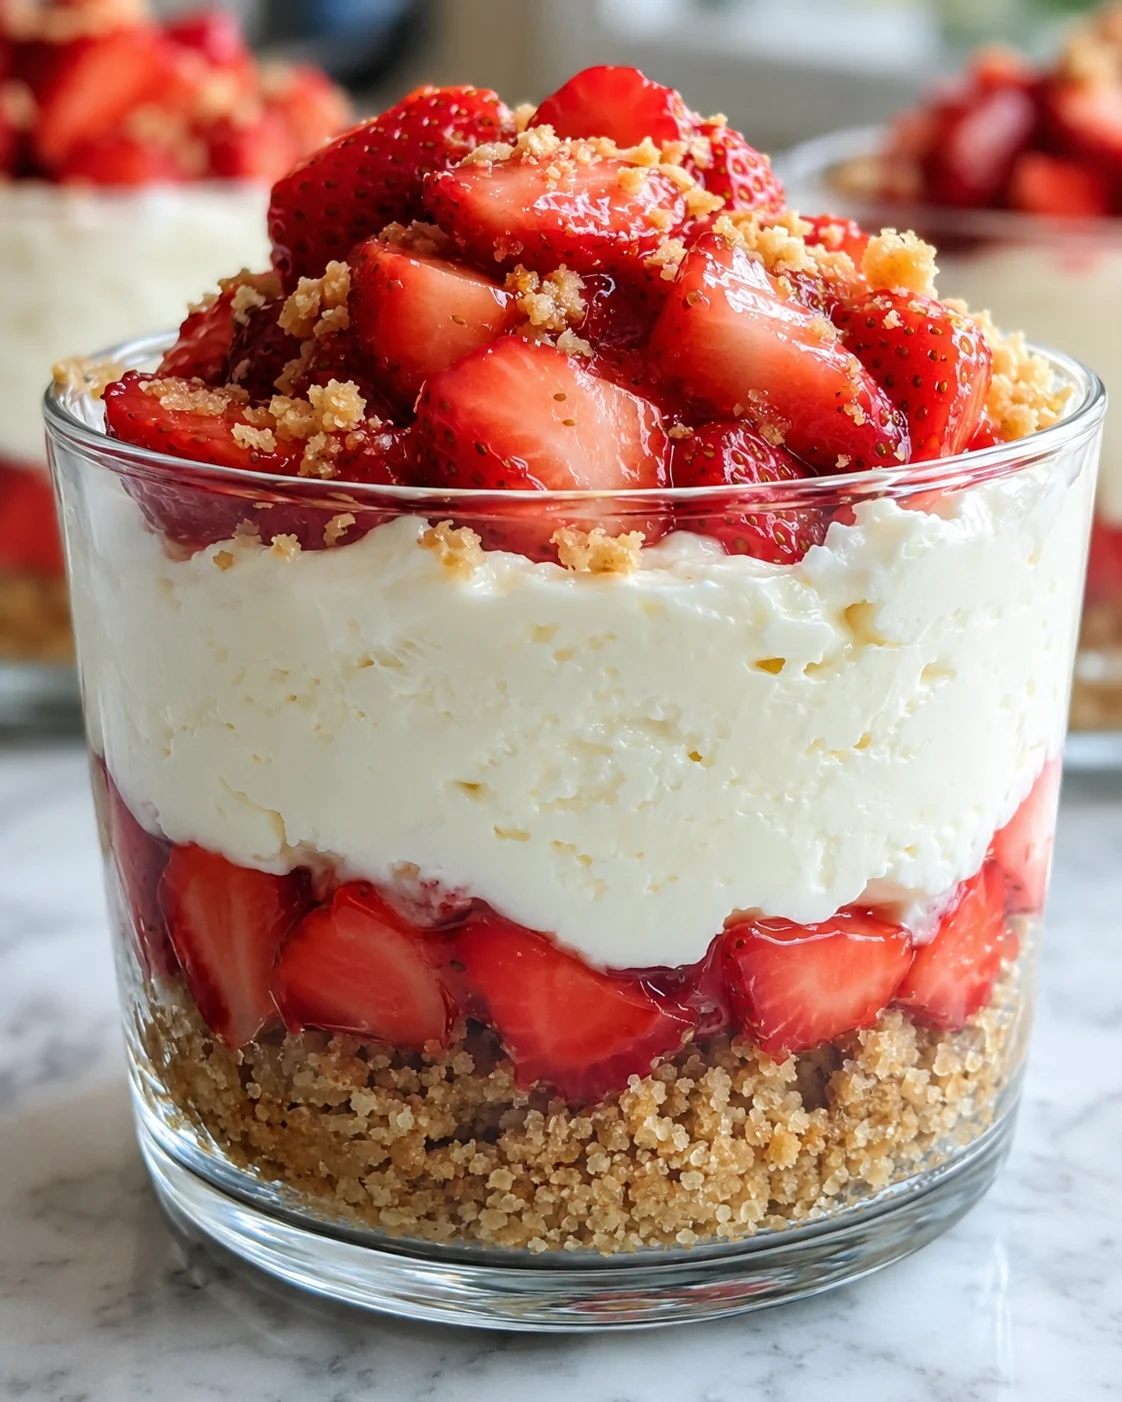
Easy No-Bake Strawberry Cheesecake Cups with Creamy Bliss
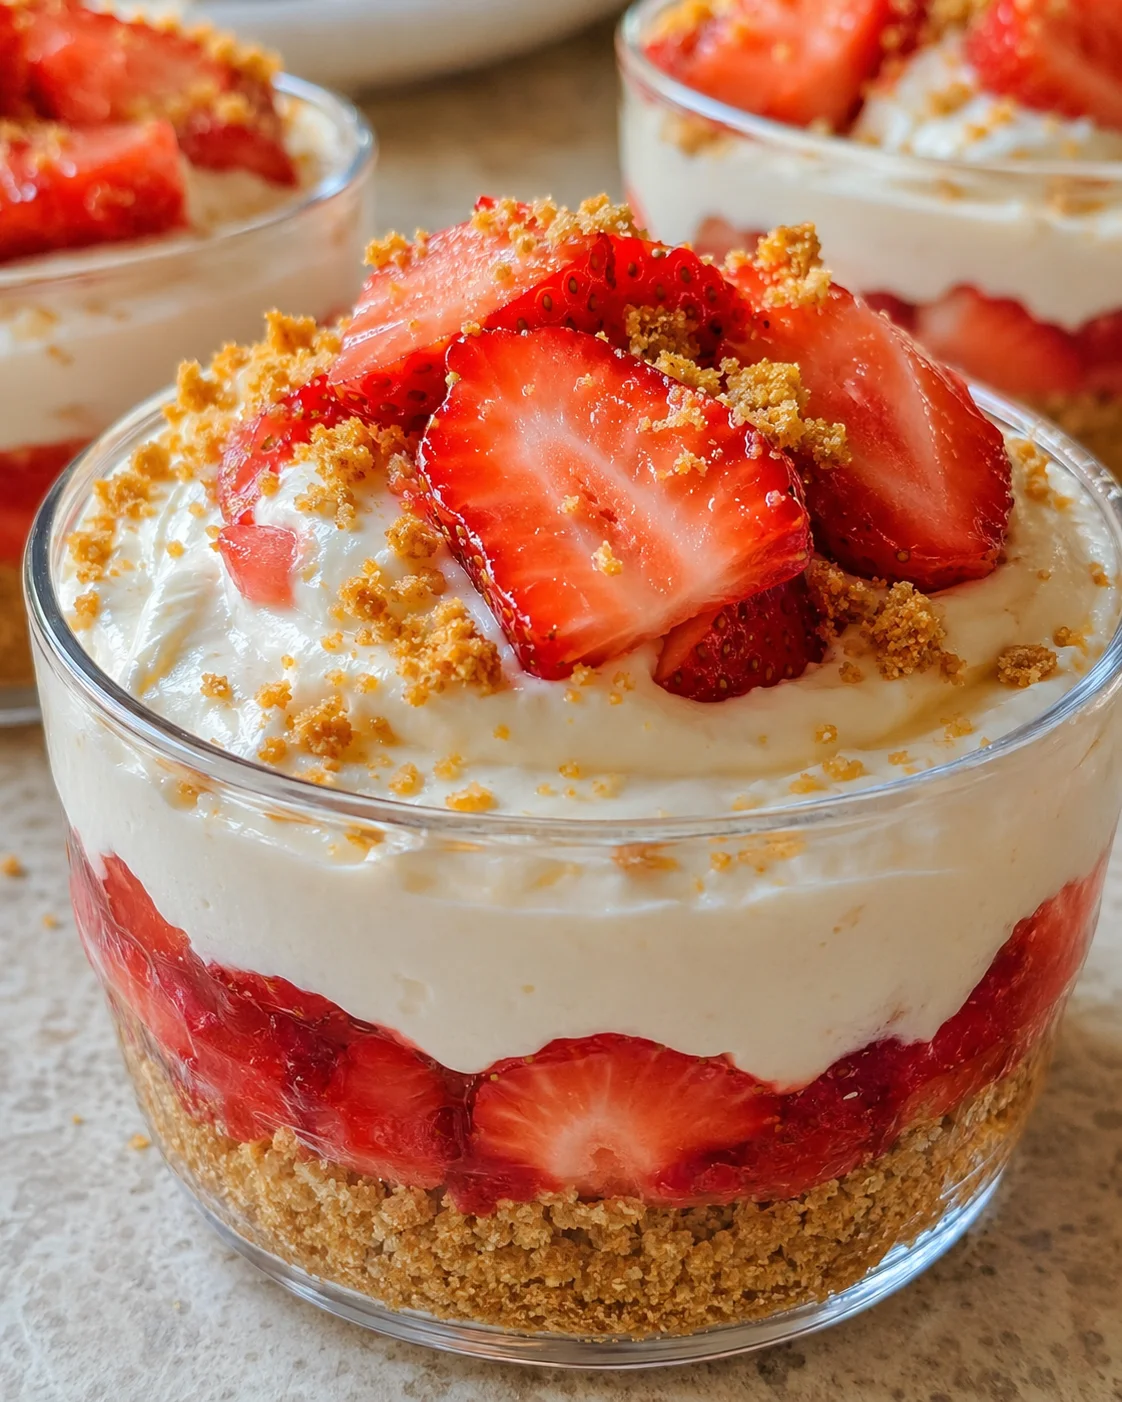
Who doesn’t love a dessert that feels like a special treat but comes together in no time—without even turning on the oven? These No-Bake Strawberry Cheesecake Cups quickly became my favorite when I needed something fresh, creamy, and naturally sweet without any hassle. Picture layers of smooth, dreamy cheesecake paired with juicy, ripe strawberries sitting atop a buttery, crunchy crust. Plus, they’re perfectly portioned in handy cups, making them great for sharing or indulging in a little secret moment just for yourself. Whether you’re a kitchen pro or just want a simple way to wow your family and friends, this recipe is your new best friend—bright, luscious, and totally fuss-free. Let’s bring a little slice of springtime sweetness to your table anytime you want!
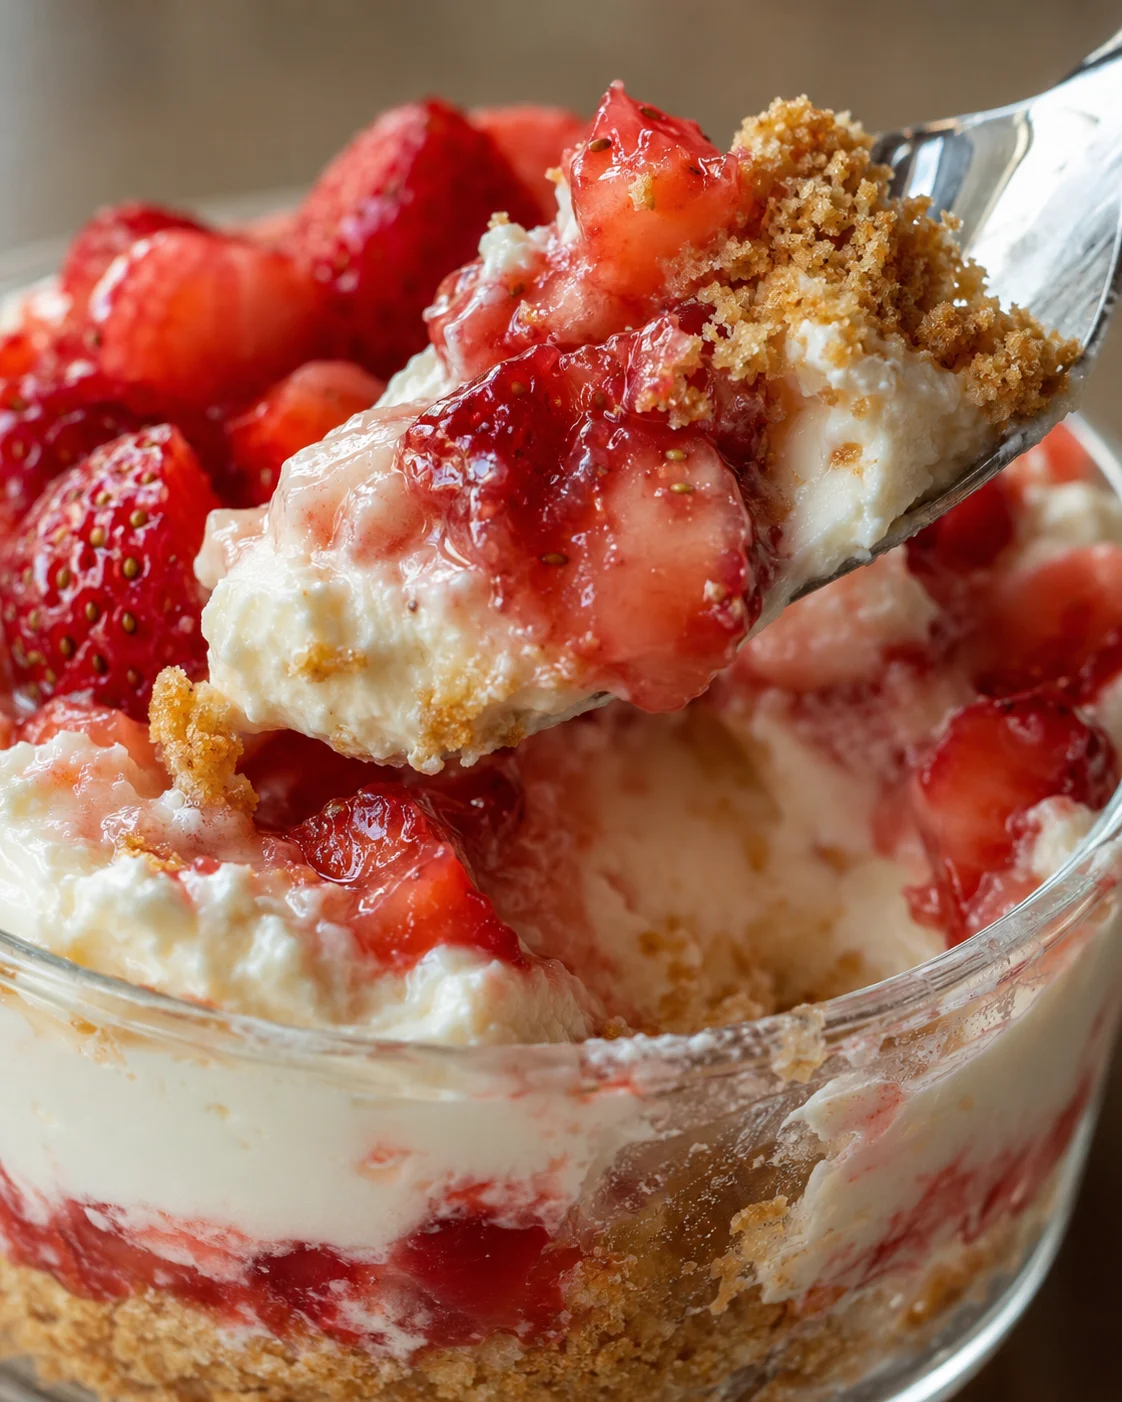
Dive into these No-Bake Strawberry Cheesecake Cups, a quick and delightful dessert featuring creamy cheesecake layers topped with juicy strawberries—all made in minutes.
If you adore cheesecake but dread the wait or the oven heat, you’re going to love these No-Bake Strawberry Cheesecake Cups. They boast a crisp, buttery graham cracker crust, silky cream cheese filling whipped with rich heavy cream, and fresh strawberries kissed with a splash of lemon juice to brighten every bite. This dessert is as stunning as it is easy, and the best part? No baking required!
You’ll spend about 30 minutes prepping, plus at least 2 hours chilling time to get that perfect creamy set. This makes six cups, ideal for family gatherings or a casual treat. Scroll down, and I’ll walk you through a simple ingredient list, step-by-step instructions, handy pro tips, easy swaps for dietary needs, plus storage advice so you can get ahead or freeze extras. Let’s dive in!
Why These Are So Irresistible
Zero-Bake Ease: Forget the oven! Creamy layers come together super fast—just like this no-bake strawberry cheesecake.
Bright & Fresh: Juicy strawberries bring a natural pop of sweetness that’s refreshing.
Perfect for Any Occasion: These cups fit right in from Sunday family dinners to elegant parties.
Family Favorite: Kids to adults—everyone can’t get enough of this sweet treat.
Grab & Go: Served in cups, they’re mess-free and fun to eat anywhere you want.
Ingredients You’ll Need
- Graham cracker crumbs, finely crushed
- Unsalted butter, melted
- Granulated sugar
- Cream cheese, softened
- Powdered sugar
- Heavy cream
- Vanilla extract
- Fresh strawberries, sliced
- Lemon juice
- Honey or maple syrup (optional)
Assembly and Preparation Steps
- Combine graham cracker crumbs, granulated sugar, and melted butter until evenly coated and crumbly.
- Firmly press the crumb mixture into six cups, smooth the tops, and refrigerate for 10 minutes to set the crust.
- Let cream cheese come to room temperature until softened.
-
Whisk the softened cream cheese with powdered sugar until silky smooth, about 1–2 minutes.
- In a separate bowl, whip the heavy cream with vanilla extract until stiff, glossy peaks form, about 2–3 minutes.
- Gently fold the whipped cream into the cream cheese mixture until fully combined and light.
- Spoon the cheesecake filling evenly over the chilled crusts, smooth the surfaces, and refrigerate for at least 2 hours or overnight to set.
-
Hull and slice the strawberries.
- Toss the sliced strawberries with lemon juice and honey until shiny and syrupy, about 1 minute.
-
Spoon the strawberry mixture over each chilled cheesecake cup, allowing some juices to drizzle down the sides.
Finishing Touches and Serving Tips
Making dessert isn’t just about the final bite—it’s about the whole experience, from preparation to presentation. Here are some easy tips to take your No-Bake Strawberry Cheesecake Cups to the next level!
- Fresh Fruit Salad: Serve alongside a bright fruit salad with seasonal favorites. It adds a crunchy, refreshing contrast and colorful appeal to your dessert spread. For larger gatherings, round out the table with an Easy Strawberry Crunch Ice Cream Cake.
- Mint Tea: This aromatic herbal tea cleanses your palate, balancing the richness of the cheesecake and enhancing the fresh strawberry flavors.
- Chocolate Drizzle: Warm some chocolate and drizzle it over the top for an extra indulgent touch that pairs beautifully with the strawberries.
- Lemon Sorbet: A zesty scoop of lemon sorbet is a refreshing palate cleanser that contrasts perfectly with the creamy sweetness of the cups.
- Almond Biscotti: Add crunchy texture by serving with almond biscotti. It makes every bite exciting when paired with the smooth cheesecake.
- Whipped Cream Clouds: A dollop of homemade whipped cream on top adds extra creaminess and makes your dessert look dreamy and inviting.
- Iced Coffee: A glass of chilled coffee offers a bitter counterbalance to the sweet cups—you’ll love how the flavors play together.
Here are some bonus tips for getting each step just right:
- Room Temperature Cream Cheese: Always soften the cream cheese completely before mixing. It prevents lumpy filling and ensures silky smooth cheesecake.
- Whip That Cream Properly: Whip just until stiff peaks form to keep the filling light and airy. The same technique is essential for our Lemon Blueberry Fluff. Overwhipping can turn it grainy or even buttery.
- Press the Crust Firmly: Use even pressure pressing the graham cracker mixture into your cups to create a solid crust that won’t crumble when served.
- Chill Well: Give the filled cups at least 2 hours in the fridge to let flavors blend and the cheesecake set up nicely for creamy perfection.
- Pick the Perfect Strawberries: Choose berries that are bright, plump, and sweet. They really make the difference in flavor and color.
- Mix Gently: Fold the whipped cream into the cream cheese filling carefully to keep everything light and fluffy without deflating it.
Flavor Twists and Substitutions
Want to make this recipe your own? Here are some simple swaps and tweaks that’ll keep the magic alive while fitting everyone’s needs.
- Gluten-Free: Replace graham cracker crumbs with gluten-free cookie crumbs or almond flour for a delicious, safe crust for gluten-sensitive friends.
- Dairy-Free: Use plant-based cream cheese and coconut cream whipped to stiff peaks. You get the same luscious texture without dairy.
- Sugar-Free: Swap in a natural sweetener like stevia or erythritol in both crust and filling for a lower-sugar dessert that doesn’t skimp on flavor.
- Chocolate Twist: Stir in a bit of cocoa powder into the cheesecake filling or drizzle melted chocolate on top for a rich, chocolatey spin.
- Fruit Swaps: If strawberries aren’t your thing, try blueberries (for a blueberry-forward dessert, see Lemon Blueberry Delight), raspberries, or a berry medley. Each brings its own lovely flavor and color vibe!
- Crunch Factor: Mix some chopped nuts like pecans or almonds into the crust for an extra satisfying crunch and a nutty flavor boost.
- Citrus Brightness: Add fresh lemon or orange zest into the filling for an uplifting citrus kick that pairs beautifully with the strawberries—or go all-in on citrus with our Key Lime Bars Recipe.
- Warm Spices: A pinch of cinnamon or nutmeg stirred into the filling adds a cozy warmth that complements the sweetness nicely.
Play around with these ideas, and you’ll have a variety of stunning no-bake treats ready to impress every time!
Storing and Make-Ahead Tips
Refrigerator: Keep the cheesecake cups covered in the fridge for up to 3 days. This helps them stay fresh and creamy—perfect for a busy week!
Freezer: Want to stash some for later? Freeze the cups in airtight containers for up to 2 months. When ready, thaw overnight in the fridge for that smooth, dreamy texture.
No Reheating Needed: These are best served chilled—enjoy them straight from the fridge, or leave them out for a few minutes if you prefer a softer feel. For a similarly chill-and-serve dessert, see the Panna Cotta Recipe with My Italian Twist.
Serving Tip: Just before serving, add a fresh strawberry topping or a delicate drizzle of honey for that extra wow factor and fresh flavor burst.
This recipe is a lifesaver for busy home cooks! You can whip up the crust and cheesecake filling up to 24 hours ahead and keep them stored separately in covered containers in the fridge to keep their texture perfect. You can also slice and toss the strawberries in lemon and honey up to 3 days in advance, storing them sealed in the fridge. When you’re ready to serve, just layer that lovely filling on the crust and top with the berries—easy, elegant, and so delicious! Planning for a crowd? The Summer Berry Jello Lasagna is another berry-forward dessert that sets beautifully in the fridge and can be made ahead.
Common Questions Answered
How do I pick the best strawberries for No-Bake Strawberry Cheesecake Cups?
Look for berries that are bright red all over, plump, and fragrant. Avoid any with dark spots or squishy patches since those mean they’re past their prime. Fresh, ripe strawberries add the perfect natural sweetness and vibrant color that make these cups sing.
Can I keep leftover No-Bake Strawberry Cheesecake Cups in the fridge? How long do they last?
Definitely! Store them covered with plastic wrap or in airtight containers in your fridge. They’ll stay fresh and creamy for up to 3 days. I recommend enjoying them within this time frame to savor the best texture and flavor.
Is freezing No-Bake Strawberry Cheesecake Cups a good idea? What’s the best method?
Yes, freezing works great if you want to prep ahead or save extras. First, chill the cups fully in the fridge. Then wrap each cup tightly in plastic wrap, place them in airtight containers or freezer bags, and freeze for up to 2 months. When ready, thaw them overnight in the fridge to keep that luscious creamy texture.
My cream cheese filling is lumpy, what can I do?
That usually means your cream cheese wasn’t soft enough. Just let it come to room temperature, then whisk vigorously with a hand mixer until smooth. You can also gently warm the cream cheese for 10-15 seconds in the microwave (keep an eye so it doesn’t melt!) before mixing. Soft cream cheese is the secret to silky cheesecake filling!
Are there allergy-friendly versions of these cheesecake cups?
Absolutely! For dairy-free options, swap cream cheese for plant-based varieties and use coconut cream whipped to soft peaks. For gluten-free, replace graham cracker crumbs with gluten-free cookie crumbs or almond flour. Always double-check your ingredient labels, and these cups can be enjoyed by almost everyone!
A quick and delightful no-bake dessert featuring a buttery graham cracker crust, silky cream cheese filling whipped with heavy cream, topped with fresh strawberries glazed with lemon and honey.
- Prep Time: 30 minutes
- Cook Time: 0 minutes
- Total Time: 2 hours 30 minutes (including chilling)
- Yield: 6 servings 1x
- Category: Dessert
Ingredients
- 1 1/2 cups graham cracker crumbs, finely crushed
- 1/4 cup granulated sugar
- 6 tablespoons unsalted butter, melted
- 8 oz cream cheese, softened to room temperature
- 1/2 cup powdered sugar
- 1 cup heavy cream
- 1 teaspoon vanilla extract
- 1 1/2 cups fresh strawberries, hulled and sliced
- 1 tablespoon lemon juice
- 1 tablespoon honey or maple syrup (optional)
Instructions
- Combine graham cracker crumbs, granulated sugar, and melted butter until evenly coated and crumbly.
- Firmly press the crumb mixture into six cups, smooth the tops, and refrigerate for 10 minutes to set the crust.
- Let cream cheese come to room temperature until softened.
- Whisk the softened cream cheese with powdered sugar until silky smooth, about 1–2 minutes.
- In a separate bowl, whip the heavy cream with vanilla extract until stiff, glossy peaks form, about 2–3 minutes.
- Gently fold the whipped cream into the cream cheese mixture until fully combined and light.
- Spoon the cheesecake filling evenly over the chilled crusts, smooth the surfaces, and refrigerate for at least 2 hours or overnight to set.
- Hull and slice the strawberries.
- Toss the sliced strawberries with lemon juice and honey until shiny and syrupy, about 1 minute.
- Spoon the strawberry mixture over each chilled cheesecake cup, allowing some juices to drizzle down the sides.
Notes
For gluten-free, replace graham cracker crumbs with gluten-free cookie crumbs or almond flour., For dairy-free option, substitute cream cheese with plant-based cream cheese and use whipped coconut cream instead of heavy cream., Sugar-free versions can use natural sweeteners like stevia or erythritol., Add cocoa powder to the filling or drizzle melted chocolate on top for a chocolate twist., Swap strawberries with blueberries, raspberries, or a berry medley for flavor variation., Add chopped nuts to the crust for extra texture., Add fresh lemon or orange zest to the filling for citrus brightness., A pinch of cinnamon or nutmeg can be added for warm spice notes., Store covered in the refrigerator up to 3 days or freeze in airtight containers up to 2 months. Thaw overnight in the fridge before serving.
Nutrition
- Serving Size: 1 cup
- Calories: Approximately 350 kcal per serving (estimated)
- Fat: 22 g per serving (estimated)
- Carbohydrates: 30 g per serving (estimated)
- Protein: 6 g per serving (estimated)
More in Uncategorized