Strawberry Cheesecake Cups Recipe
Trying to find a dessert that looks fancy but doesn’t take forever? These strawberry cheesecake cups are exactly what you need. They’re no-bake, featuring a buttery graham cracker crust, smooth cream cheese filling, and fresh, juicy strawberries all layered into charming single servings—no oven needed.
They’re super simple to whip up, even if you’re just starting out, and you can get them ready ahead of time for a party or just a sweet treat on a whim. With just a few layers and a few minutes of your time, you’ll have a beautiful dessert that everyone will be asking for.
Why These Strawberry Cheesecake Cups Are a Total Game-Changer
Imagine a dessert that skips the oven, uses simple pantry staples, but looks like it was made by a fancy pastry chef. That’s exactly what these strawberry cheesecake cups bring to your table. Unlike a classic baked cheesecake, these require no baking—just quick assembly and a bit of chilling. Perfect for hot days or when you’d rather skip the oven mess entirely.
The best part? Their flexibility. They’re just as perfect for a casual backyard gathering as they are for a bridal shower or holiday party. Clear cups show off the stunning layers, and serving them individually is a breeze. Kids, adults, everyone loves them—they bring big, restaurant-style flavor with zero stress.
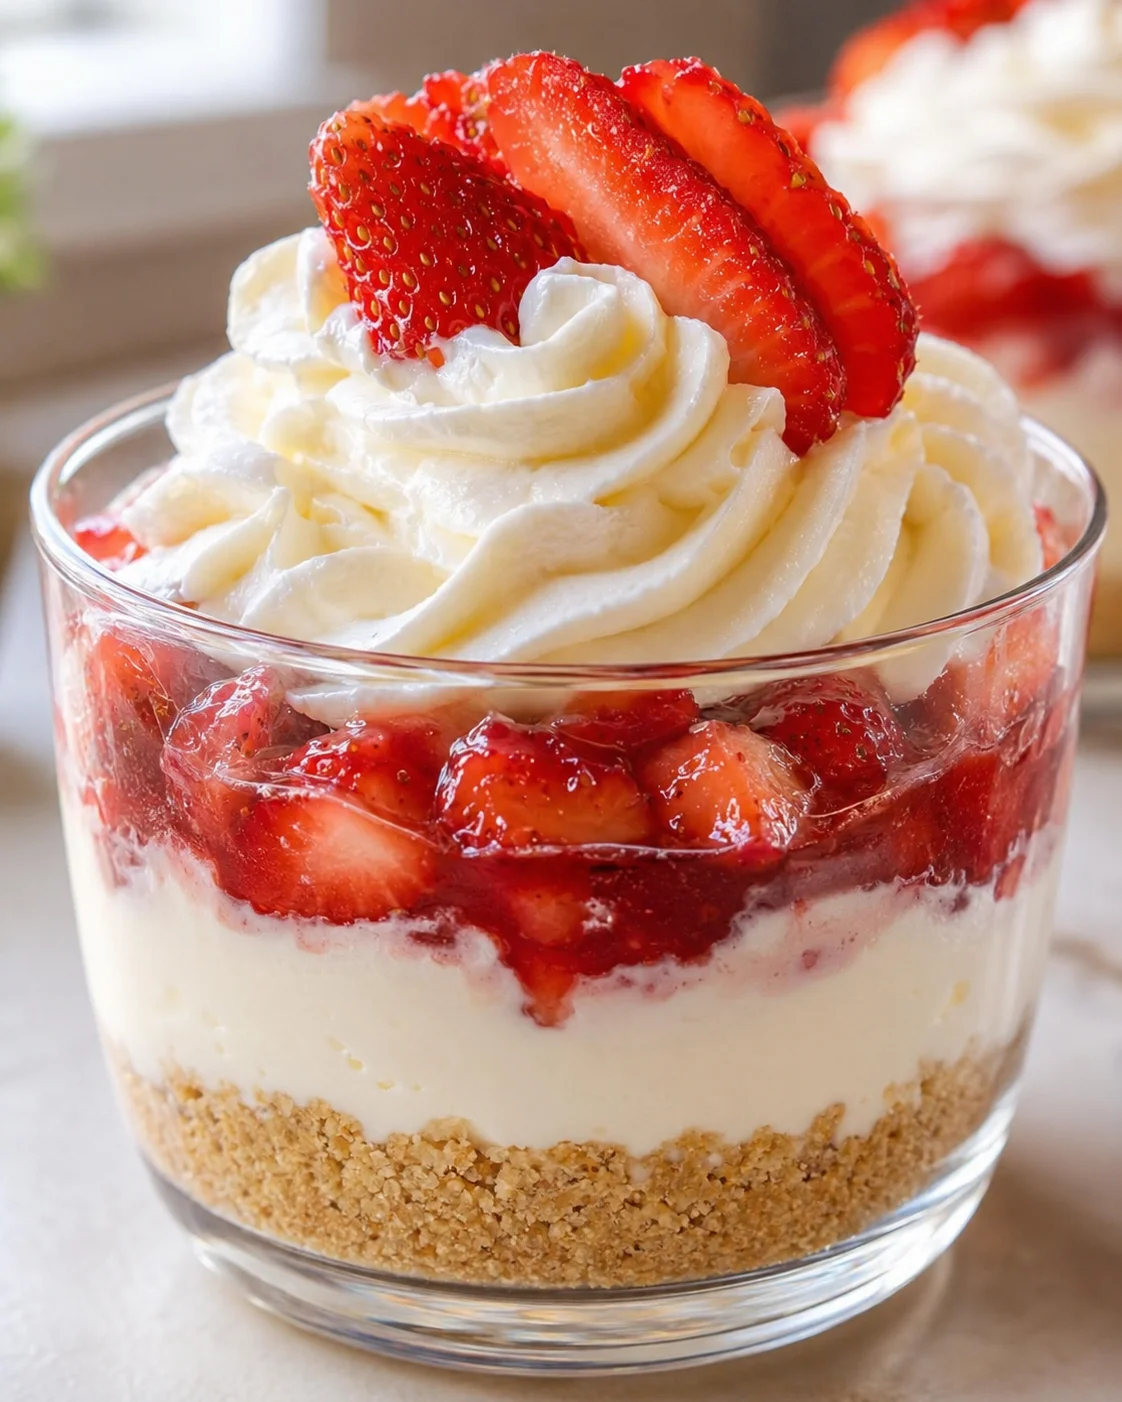
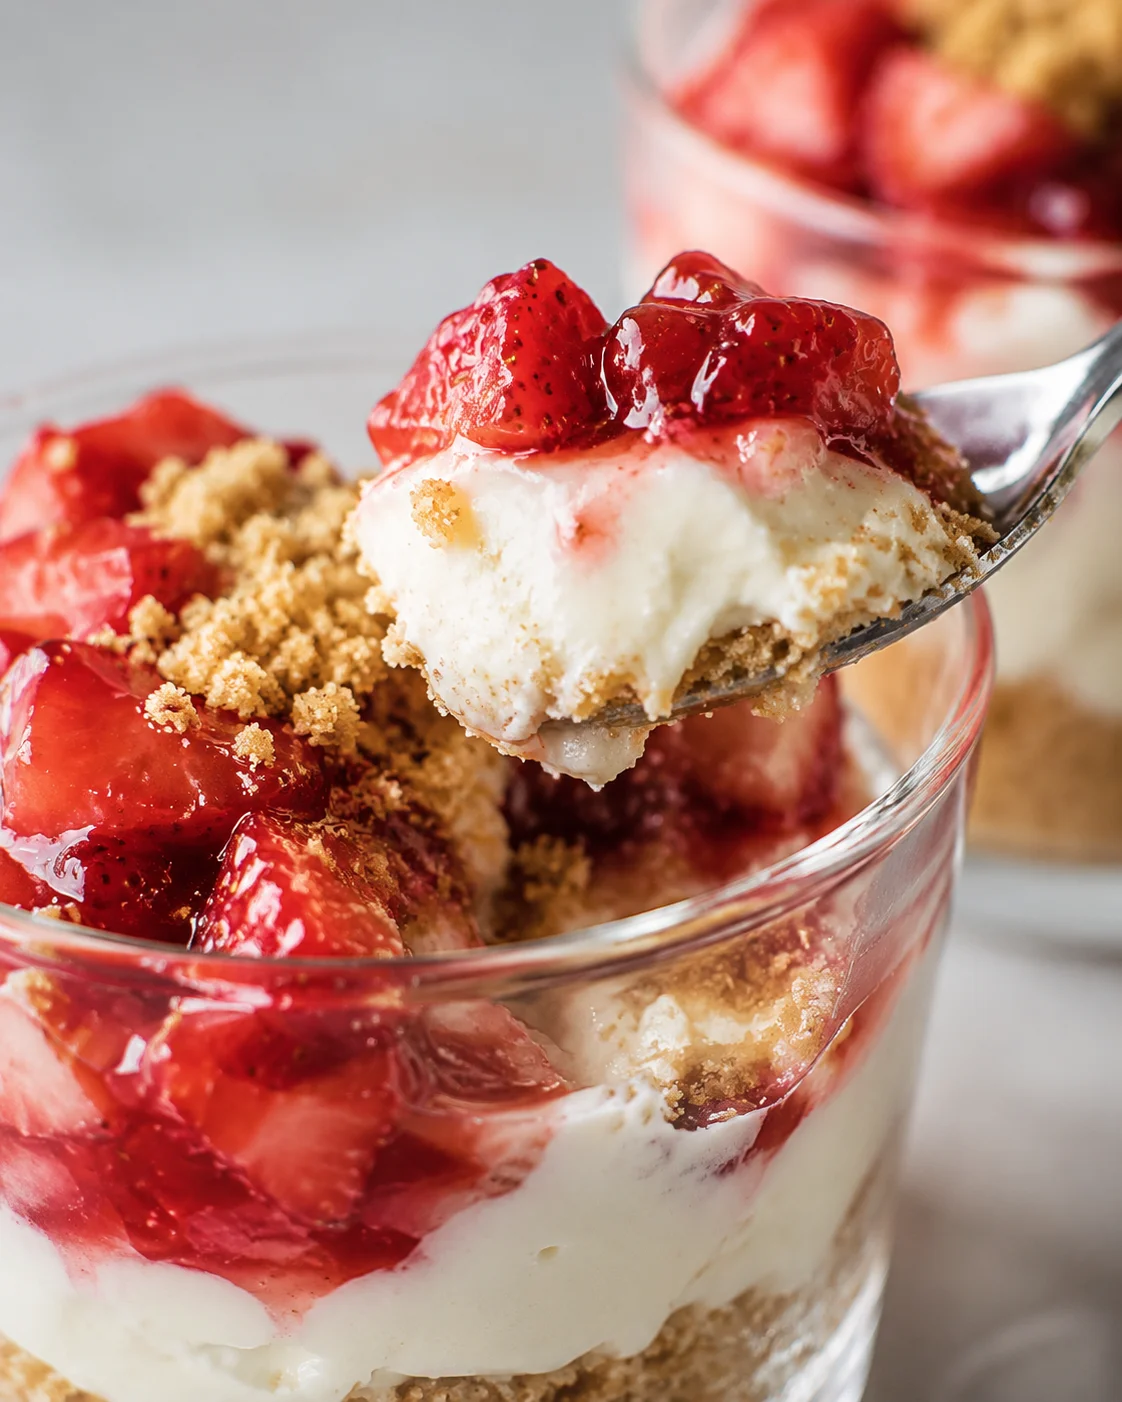
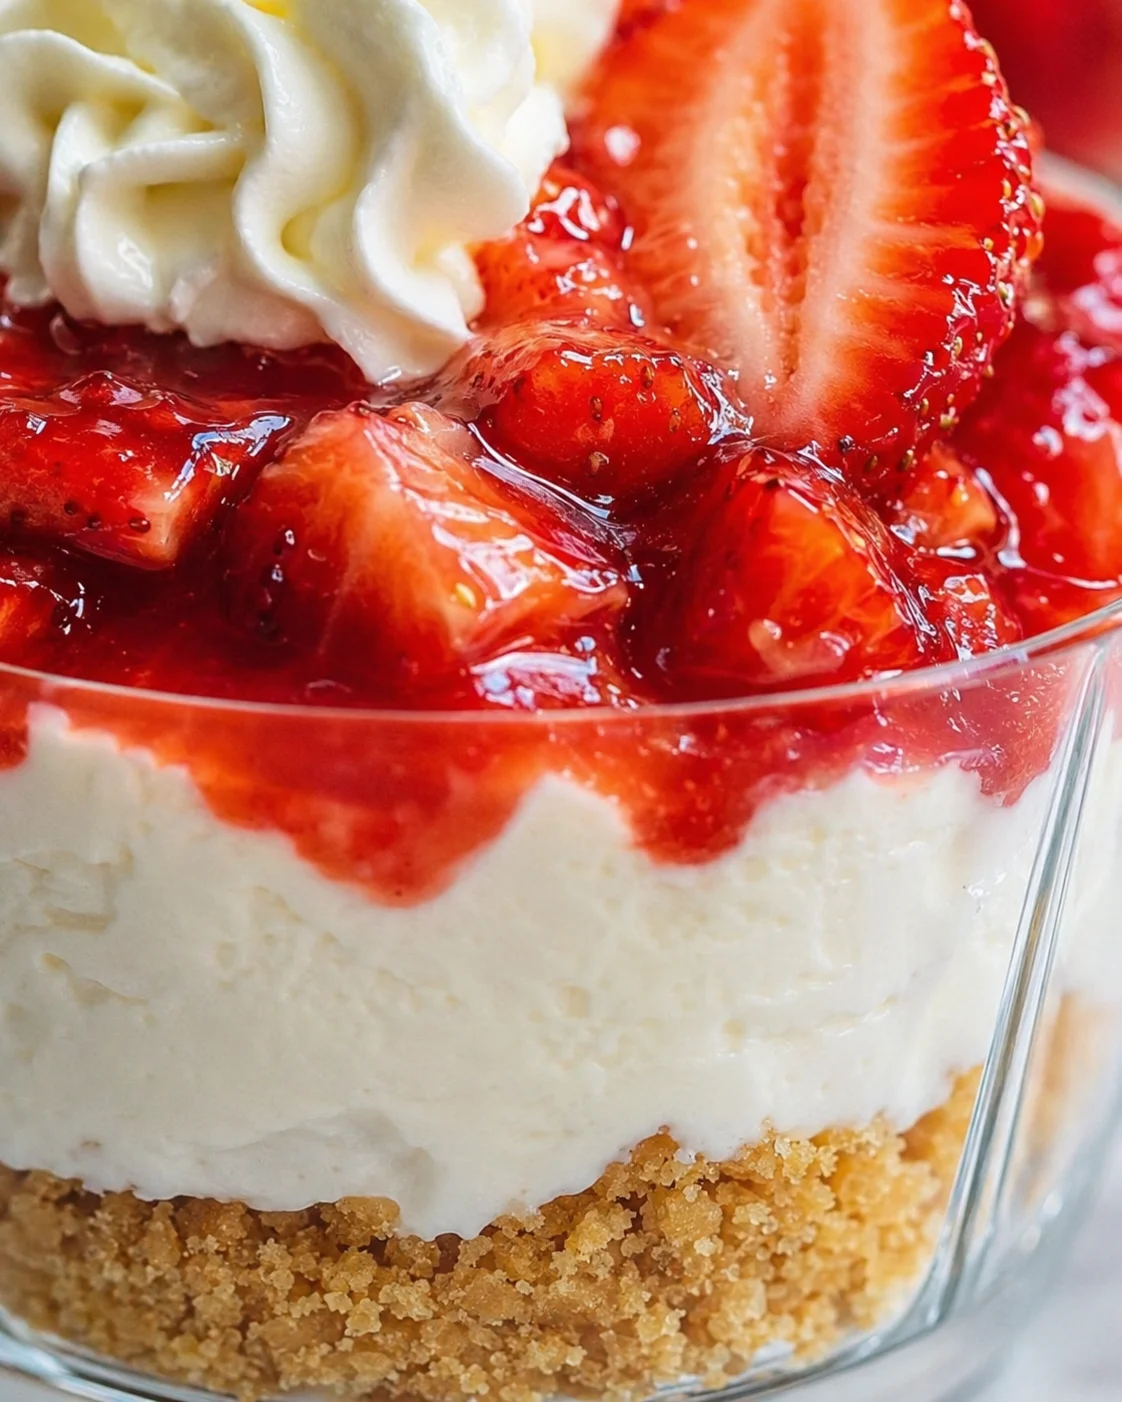
Delicious no-bake strawberry cheesecake cups featuring a crisp graham crust, creamy filling, and fresh strawberry layers. A quick, elegant dessert that’s perfect anytime.
Craving a dessert that looks like it came straight from a bakery but takes almost no time or effort? These no-bake strawberry cheesecake cups are just that—a buttery, crumbly graham cracker crust, a light and fluffy cream cheese filling, and juicy strawberries all stacked into cute, individual cups with zero oven time.
In this guide, I’ll walk you through everything: a clear ingredient list, easy step-by-step instructions, tips to get the texture just right, plus how to prep ahead and store your cheesecake cups. The hands-on part only takes a few minutes, then a couple of hours chilling lets these beauties set into a creamy, dreamy dessert ready to enjoy.
Whether you want a quick family dessert, a party-ready treat, or you’re just in the mood to mix things up, these strawberry cheesecake cups are flexible and fun with simple swaps to fit your needs.
- Inside: ingredients, tools, step-by-step assembly tips, flavor twists, and storage advice.
- Why you’ll adore them: no baking, super beginner-friendly, gorgeous individual servings, and easy to prep ahead.
No-bake strawberry cheesecake cups with a buttery graham crust, creamy filling, and juicy fresh strawberries. A quick, elegant dessert perfect for any occasion.
Why You’ll Love This Dessert
These strawberry cheesecake cups show that fancy desserts don’t have to be complicated. Using just a handful of ingredients and a no-bake approach—like in our No Bake Strawberry Cheesecake—you get a dessert that looks and tastes like something special. That buttery graham cracker crust paired with silky cream cheese filling and fresh strawberries gives you the perfect balance of creamy, crunchy, and fruity flavors that everyone loves.
The versatility is key here—you can serve them at a fancy dinner, a casual weekend hangout, or take them on a picnic. Once you get the hang of this base recipe, you’ll want to tweak it with different berries, crusts, or toppings—try the ultra-creamy twist in Easy No-Bake Strawberry Cheesecake Cups with Creamy Bliss. Either way, you’re in for a dessert that’s as impressive as it is simple.
Sweet, simple, and totally delicious—that’s how we roll with cheesecake! 🍓
No-Bake Strawberry Cheesecake Cups
No-bake strawberry cheesecake cups with a buttery graham crust, creamy filling, and juicy fresh strawberries. A quick, elegant dessert perfect for any occasion.
Equipment
- 1 Electric mixer or hand mixer
- Mixing bowls
- 1 Rubber spatula
- Measuring Cups & Spoons
- 1 Clear dessert cups or mason jars
- 1 Spoon or cookie scoop
- 1 Piping bag (optional)
Pro tip: Use melted butter that’s warm but not hot—too hot can make your crust soggy. Butter just at room temp works like a charm.
Step 2: Whipping Up the Creamy Filling
- Using an electric mixer, beat the softened cream cheese in a large bowl until it’s smooth and fluffy, which usually takes about 2 minutes.
- Add the powdered sugar and vanilla extract, then beat again for another minute until everything is well mixed.
- In a separate bowl, whip the cold heavy whipping cream until stiff peaks form. This usually takes around 3 to 4 minutes.
- Carefully fold the whipped cream into the cream cheese mixture using a rubber spatula, gently mixing so you don’t lose all the airy fluff.
Pro tip: Make sure your cream cheese is really soft before you start beating—it will prevent lumps and give you a silky smooth filling.
Step 3: Assembling Your Dessert Cups
- Take the cups out of the fridge and spoon a good layer of cream cheese filling (about ¼ cup) over the graham cracker crust.
- Next, add 2 to 3 tablespoons of the diced strawberries over the filling.
- Add another layer of cream cheese filling on top of the strawberries and smooth it out with the back of your spoon.
- Finish up with a beautiful layer of strawberries on top, arranging them just right.
Pro tip: For a gorgeous touch, use a piping bag fitted with a star tip to pipe the cream cheese layers—it makes your cups look bakery-level stunning.
Step 4: The Important Chill Time
- Cover each cup tightly with plastic wrap or a lid if you have one for your container.
- Refrigerate for at least 2 hours, although overnight chilling makes them taste even better because the flavors get to mingle.
- Right before serving, add a dollop of fluffy whipped cream and a fresh strawberry slice on top.
- Optional: sprinkle a pinch of graham cracker crumbs on top for extra crunch and a pretty finish.
Expert Cooking Tips
Cream Cheese
- Always let cream cheese come to room temperature before starting—this makes for lump-free mixing.
- If you’re in a hurry, soften it quickly in the microwave in 10-second bursts, checking often.
- Beat cream cheese alone first for the smoothest, creamiest base possible.
Whipped Cream
- Use chilled heavy cream along with cold bowls and beaters for the best volume.
- Stop whipping once stiff peaks form—if you go too far, it turns to butter!
Strawberries
- Dice strawberries evenly to keep the layers neat and clean.
- Toss them gently with a little sugar and lemon juice to boost flavor and keep them bright.
- Pat them dry to avoid extra moisture that can make the filling runny.
- Reserve the prettiest berries for the garnish on top.
Assembly
- Clear cups or jars are best—they really show off those gorgeous layers.
- Use a cookie scoop to portion filling evenly and make assembly faster.
- Leave a little room at the top for your topping and garnish.
- Wipe edges clean with a damp towel for a pro, polished look.
Pro Tips and Equipment Picks
Using the right tools really speeds up the process and helps your cheesecake cups look and taste their best.
- Clear dessert cups or small mason jars (8-10 oz) to show off all those pretty layers and give your desserts a professional vibe.
- Electric hand mixer or stand mixer—a must-have to beat the cream cheese until it’s perfectly smooth and fluffy.
- Rubber spatula, ideal for gently folding in the whipped cream without losing air.
- Medium mixing bowls (at least two)—one for the crust, one for the filling—to keep things tidy.
- Measuring cups and spoons so you get your quantities just right every time.
- Food processor (optional) for crushing graham crackers quickly and evenly for a sturdy graham-cracker base—like the crust in Key Lime Bars.
- Piping bag with star tip (optional) for adding that pretty, swirled cream cheese finishing touch.
Easy budget swaps:
- Use simple plastic cups if you don’t have fancy dessert glasses.
- Crush graham crackers by hand with a fork and some muscle if you don’t have a food processor.
- A whisk and strong arms work instead of an electric mixer, but be prepared to put in a little more elbow grease.
Here’s a little insider secret: the magic happens in how you fold your whipped cream into the cream cheese. Don’t just stir or beat it—instead, add about one-third of the whipped cream first to lighten the mixture. Then fold in the rest gently with a spatula, preserving those tiny air bubbles that give your filling that fluffy, mousse-like texture everyone loves.
And if you have the time, pop your cheesecake cups in the fridge overnight. This extra chill helps the crust soften just enough for an easier bite, firms up the filling to perfection, and lets those flavors blend beautifully. The strawberries somehow taste even fresher, and the whole dessert feels extra special. Yeah, you can serve them in 2 hours, but patience pays off big time here. It’s the same make-ahead magic that sets layered desserts like Summer Berry Jello Lasagna.
Easy Swaps and Flavor Twists
One of the fun parts about this recipe is how easily it adapts to your preferences or dietary needs.
Flavor Variations:
- Chocolate Strawberry Cheesecake Cups: Stir ¼ cup cocoa powder into your cream cheese mixture and swap in chocolate graham crackers for the crust. That chocolate and strawberry combo is pure heaven.
- Mixed Berry Cheesecake Cups: Switch out strawberries for a colorful mix of blueberries, raspberries, and blackberries. Each bite bursts with berry goodness.
- Lemon Strawberry Cheesecake Cups: Add 2 tablespoons fresh lemon juice and 1 teaspoon lemon zest to the filling for a bright, refreshing twist. If you love citrus, try our Lemon Blueberry Delight for more inspiration.
Dietary Modifications:
- Lower Sugar: Swap powdered sugar with a sugar substitute like Swerve or monk fruit sweetener for a lighter touch.
- Dairy-Free: Use dairy-free cream cheese and coconut whipping cream; the texture will stay surprisingly close to the original.
- Gluten-Free: Use gluten-free graham crackers or crushed gluten-free cookies for the crust.
- Lighter Version: Choose reduced-fat cream cheese and replace half the heavy cream with Greek yogurt to cut calories without losing creaminess.
Crust Alternatives:
- Try Oreo cookie crumbs for a cookies-and-cream spin, or go fruity with a strawberry crunch crumb like the one in our Easy Strawberry Crunch Ice Cream Cake recipe.
- Crushed vanilla wafers make for a sweet, mellow crust.
- Gingersnap crumbs add a hint of spice.
- Crushed pretzels give a fun sweet-and-salty crunch.
Storage and Make-Ahead Tips
Refrigerator
- Store covered in the fridge for up to 3 days.
- The filling stays creamy while the crust may get a bit softer.
- Add fresh strawberries and whipped cream right before serving to keep them fresh.
- Use airtight containers or wrap well to avoid absorbing any fridge odors.
Freezer
- Freeze without topping for up to 1 month.
- Wrap tightly and place in a freezer-safe container for best results.
- Thaw overnight in the fridge before serving.
- Add whipped cream and fresh strawberries after thawing for the best texture.
Meal Prep
- You can make the crust and filling up to 2 days ahead—just like Lemon Blueberry Fluff, which benefits from an overnight chill.
- Store crust at room temperature and the filling in the refrigerator.
- Give the filling a quick stir before assembling your cups.
- Put everything together on the day of your event to keep it fresh and beautiful. For another elegant, fully make-ahead dessert that sets in the fridge, try this Panna Cotta recipe with an Italian twist.
The Secret to Cloud-Like Creaminess
Wondering what takes these strawberry cheesecake cups from good to unforgettable? It’s all about how you fold in the whipped cream. Instead of stirring or vigorously mixing, gently fold in about one-third of the whipped cream first to lighten the mix. Then fold in the rest carefully. This keeps those tiny air bubbles intact to give you that fluffy, mousse-like texture that melts in your mouth.
Another tip? Let your cheesecake cups chill overnight if you can. This extra time lets the graham cracker crust soften just the right amount, so it bites together nicely, while the creamy filling firms up perfectly. Plus, the flavors deepen and blend, and the strawberries somehow taste even fresher. You can serve them after just two hours, but believe me, giving them extra time in the fridge is totally worth it!
Frequently Asked Questions
What is the strawberry cheesecake drink at Sonic?
Sonic’s strawberry cheesecake drink is a milkshake loaded with ice cream, cheesecake bits, and strawberry topping. These strawberry cheesecake cups are a no-bake layered dessert made with fresh strawberries and real cream cheese for a homemade feel.
What are the ingredients in Jello strawberry cheesecake Cups?
Jello’s version uses cheesecake-flavored pudding, strawberry topping, and graham cracker crumbs. Our cups use real cream cheese, fresh strawberries, and genuine graham crackers for authentic flavor and texture.
Is it better to bake or not bake a cheesecake?
Both are great! No-bake cheesecake cups are lighter, quicker, and don’t require an oven. They’re perfect if you want individual servings with minimal fuss. For party-friendly inspiration, browse our roundup of 4th of July desserts.
What’s the secret to a creamy no bake filling?
Use cream cheese at room temperature and gently fold in whipped heavy cream. This keeps your filling light, airy, and stable—just like the perfect strawberry cheesecake cup filling should be.
PrintNo-bake strawberry cheesecake cups with a buttery graham crust, creamy filling, and juicy fresh strawberries. A quick, elegant dessert perfect for any occasion.
- Prep Time: 20 minutes
- Cook Time: 0 minutes
- Total Time: 2 hours 20 minutes
- Yield: 6 servings 1x
- Category: Dessert
Ingredients
- 1 ½ cups graham cracker crumbs (about 10–12 crackers)
- 3 tablespoons granulated sugar
- 5 tablespoons unsalted butter, melted
- 16 oz cream cheese, softened (2 packages)
- ¾ cup powdered sugar
- 1 teaspoon vanilla extract
- 1 cup cold heavy whipping cream
- 2 cups fresh strawberries, diced
- 2 tablespoons granulated sugar (optional)
- 1 teaspoon lemon juice (prevents browning)
- Whipped cream, for garnish
- Strawberries, sliced for garnish
- Graham cracker crumbs (optional, for topping)
Instructions
- Mix graham cracker crumbs, granulated sugar, and melted unsalted butter in a medium bowl until mixture resembles wet sand.
- Add 2-3 tablespoons of the crumb mixture to each clear dessert cup or mason jar and press down firmly to create a compact, even crust layer.
- Refrigerate crusts while preparing filling.
- Beat softened cream cheese with an electric mixer for about 2 minutes until smooth and fluffy.
- Add powdered sugar and vanilla extract to the cream cheese and beat until well combined.
- In a separate bowl, whip cold heavy cream until stiff peaks form (3-4 minutes on high speed).
- Gently fold whipped cream into the cream cheese mixture, preserving air bubbles by folding instead of stirring vigorously.
- Remove cups from fridge and spoon approximately ¼ cup cream cheese filling over the crust layer.
- Add a layer of diced strawberries (2-3 tablespoons) on top of the filling.
- Add another layer of cream cheese filling, smoothing the top with the back of a spoon or use a piping bag with a star tip for decorative swirls.
- Finish with a final layer of sliced strawberries arranged on top.
- Cover each cup with plastic wrap or lid and chill in refrigerator for at least 2 hours, preferably overnight to meld flavors and firm filling.
- Just before serving, add a dollop of whipped cream and garnish with a fresh strawberry slice and optional graham cracker crumbs for extra crunch.
Notes
Nutrition information is automatically calculated and should only be used as an approximation., Ensure cream cheese is at room temperature before mixing to avoid lumps; microwave briefly if needed., Use cold heavy cream and chilled tools to achieve stiff whipped cream peaks., Dice strawberries evenly and toss with sugar and lemon juice to boost flavor and prevent browning; pat dry for firmer layers., Use clear cups for visually appealing layers and portion filling with a cookie scoop for consistency., Refrigerate assembled cups for better texture and flavor meld; overnight chilling is ideal., For best results, fold whipped cream gently into the cream cheese mixture to maintain a mousse-like texture.
Nutrition
- Serving Size: 1 cup
- Calories: 340 kcal
- Fat: 22 g
- Carbohydrates: 32 g
- Protein: 5 g
More in Uncategorized