Fireworks Sugar Cookies: Patriotic Dessert to Bake Ahead of Time – Emma’s Cake Studio
You know the feeling when you spot a sugar cookie that looks like a masterpiece but then tastes like cardboard? We’ve all been there. That’s why I always go back to my Fireworks Sugar Cookies with Royal Icing—they’re not just pretty; they genuinely taste amazing.
These cookies have that perfect buttery crunch beneath a smooth, shiny icing. Plus, they hold up beautifully. You can decorate them a day ahead, and they’ll still look fresh when guests arrive. In this post, I’ll guide you through perfecting the dough, mastering royal icing that behaves, and storing these cookies so they stay delicious and crisp.
Whether it’s the Fourth of July, Memorial Day, or your summer get-together, these cookies do more than just fill your dessert plate—they help you save time in the kitchen so you can enjoy the party.
There’s a real gap between cookies that only look good and ones that taste amazing. These Fireworks Sugar Cookies with Royal Icing are definitely the latter. They brighten up any gathering with their shiny decorations and deliver a buttery snap you’ll want to bite into again and again. They’re made to be foolproof: the dough keeps its shape, the icing sets nice and smooth, and the finished cookies stay fresh and tasty at room temp.
Stick with me, and I’ll break down every step—from mixing and chilling the dough to rolling, baking, whipping up perfect royal icing, and piping those easy firework bursts. I’ll also share timing tips, substitutions, storage hacks, and quick fixes so your cookies don’t flatten, crack, or get soggy.
Whether it’s for a holiday spread, a backyard bash, or just a sweet afternoon treat, this guide will give you clear instructions, helpful photos, and honest tips to bake cookies that taste just as amazing as they look.
- What you’ll get: cookie dough basics, royal icing how-to, and decorating secrets
- What to expect: consistent results, prep tips, and how to keep cookies fresh
- Who it’s perfect for: total beginners and seasoned home bakers wanting reliable, stress-free recipes
Why These Stand Out
These Fireworks Sugar Cookies are a rare find — they’re just as delicious as they are eye-catching. The dough gives you that perfect buttery crunch with a tender bite inside. Meanwhile, the royal icing dries glossy and sturdy, making your designs pop without cracking or getting brittle.
They’re super convenient, too. Chill or freeze the dough (freeze the cut shapes and bake straight from frozen, adding about a minute). You can even ice them the day before your event, and guests won’t believe they weren’t made fresh. Once the icing has fully dried, these cookies keep well at room temperature for up to a week—no fridge drama needed.
- Great taste, no cardboard here: all-butter dough for real flavor and a stable yet tender texture.
- Beautiful finish: meringue-powder royal icing that dries glossy and holds all the fine details.
- Reliable baking: dough holds its shape thanks to chilling; baking to ¼” thickness with golden edges keeps centers tender but chewy.
- Prep-friendly: dough, cut shapes, or fully iced cookies can be made ahead with simple timing (chill at least 1 hour; flooded icing dries overnight).
- Easy decorating for beginners: simple firework bursts and dots make a big impact—feel free to practice on parchment first, or for an even quicker patriotic treat, try Easy Patriotic Chocolate-Dipped Cherries.
- Totally customizable: mix gel food colors, swap in some shortening for crispier edges if you like, and these cookies pack great for parties or gifts.
Bottom line: these cookies offer gorgeous, flavorful results without any fuss or frustration. They’re the recipe you want ready whenever you crave festive sweets that taste as good as they look.
The dough starts soft and tender, with unsalted butter whipped together with sugar until fluffy—this step makes sure your cookies aren’t dry or crumbly. Then, the egg binds everything, vanilla adds warmth, and a pinch of baking powder lifts the dough just right so your cookies aren’t dense or heavy.
When the flour mixture joins in, it pulls everything together into a soft, workable dough that firms nicely once chilled.
I know it’s tempting to skip chilling, but trust me—it’s a game changer. Without that cold rest, your cookies will spread too much and lose those perfect sharp edges. One hour in the fridge helps the dough relax and keeps everything tidy. If your kitchen is warm, feel free to chill longer.
These cookies are about more than just looking nice—they’re rock solid reliable. The dough keeps its shape, the icing dries smooth like porcelain, and they stay fresh without needing special storage or refrigeration.
I’ve baked these for all sorts of occasions—community picnics, birthday parties, quiet Sunday afternoons. Every time, they get thumbs-up not just for the pretty factor but for the taste too.
One year, I packed up three dozen for a neighbor’s Fourth of July barbecue. She came back to my house with an empty tray and a little note asking for the recipe. That note still sits in the front of my recipe binder—such a sweet reminder! If you’re planning a full spread, browse 150 Best Patriotic 4th of July Desserts.
If you’re looking for one dessert that feels homemade and lets you breathe easy in the kitchen, start with these.
Ingredients You’ll Need
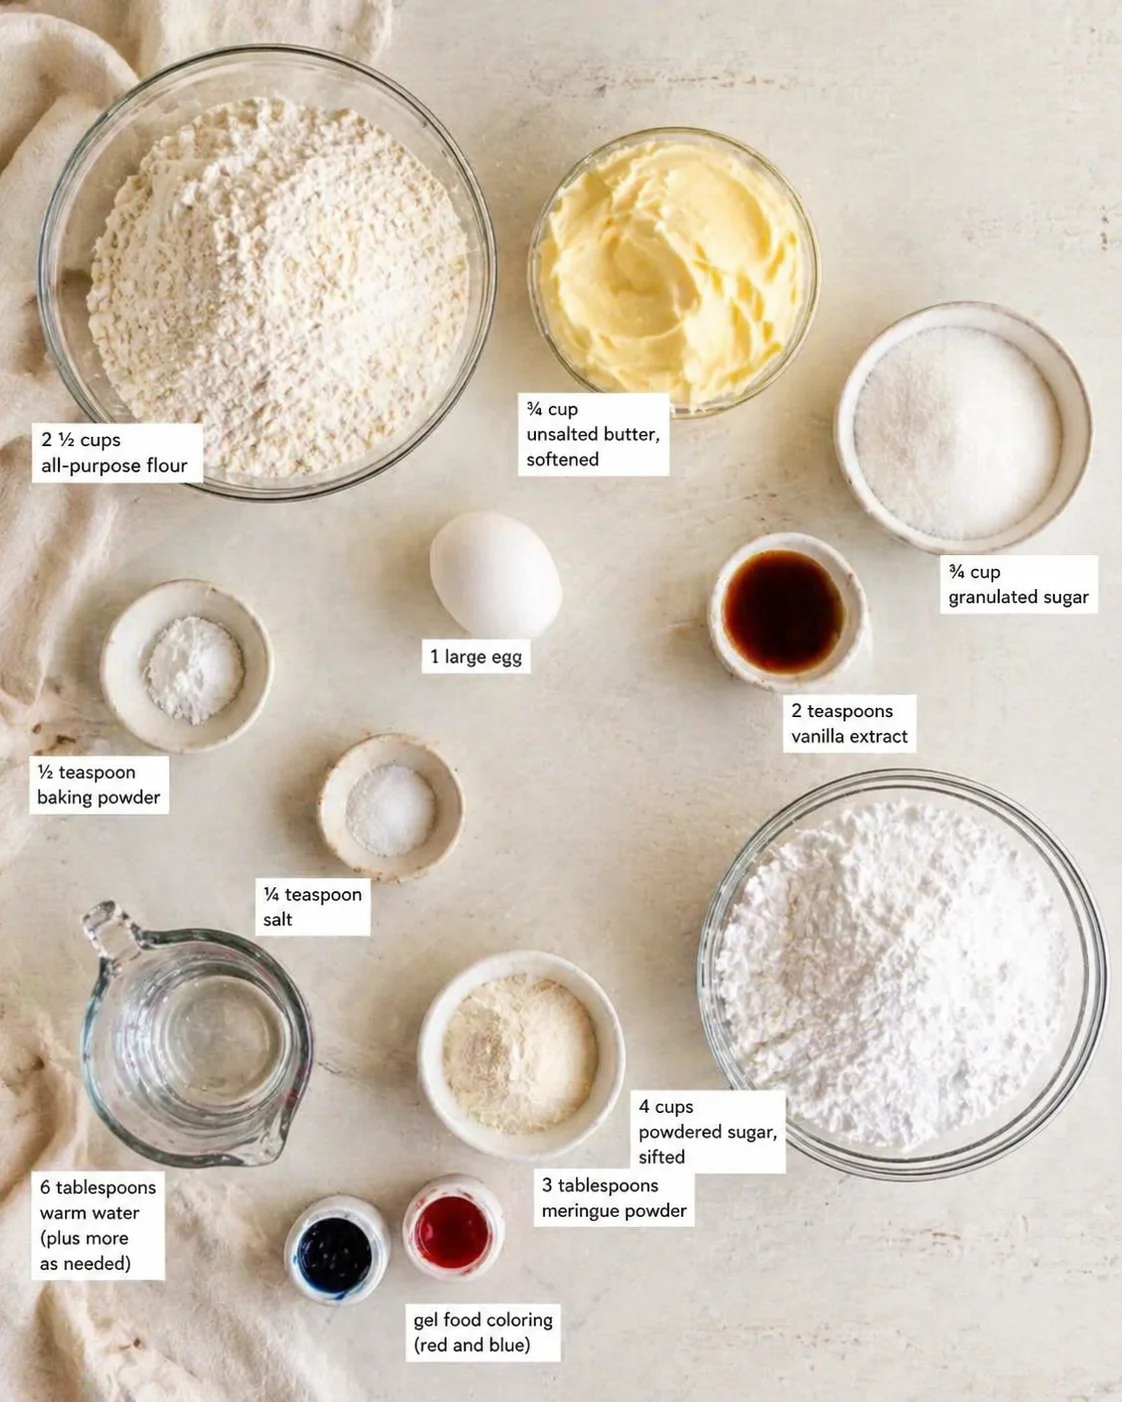
- 2 ½ cups (315g) all-purpose flour
- ½ teaspoon baking powder
- ¼ teaspoon salt
- ¾ cup (170g) unsalted butter, softened
- ¾ cup (150g) granulated sugar
- 1 large egg
- 2 teaspoons vanilla extract
- 4 cups (500g) powdered sugar, sifted
- 3 tablespoons meringue powder
- 6 tablespoons warm water (plus more as needed)
- Gel food coloring (red and blue)
Roll, Bake, and Decorate
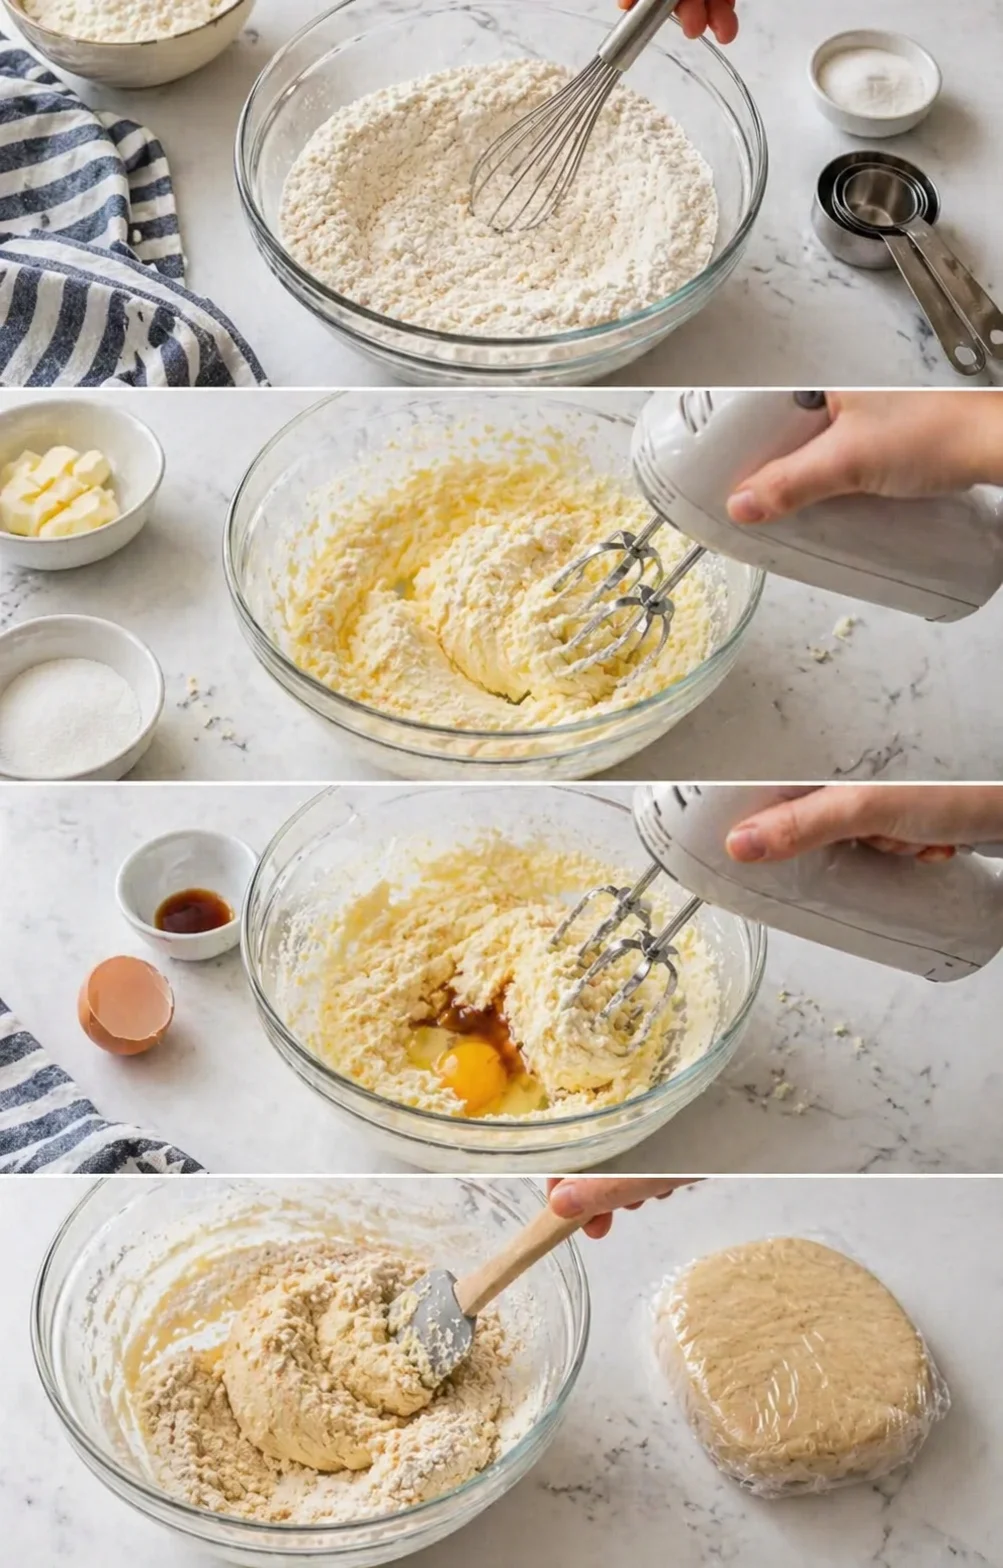
- Whisk together the flour, baking powder, and salt in a medium bowl.
- Cream the softened butter and granulated sugar until pale and fluffy (about 2–3 minutes).
- Beat in the egg and vanilla until fully blended.
-
Gradually fold in the dry ingredients until a soft dough forms; shape into a flat disc, wrap tightly, and chill in the fridge for at least 1 hour.
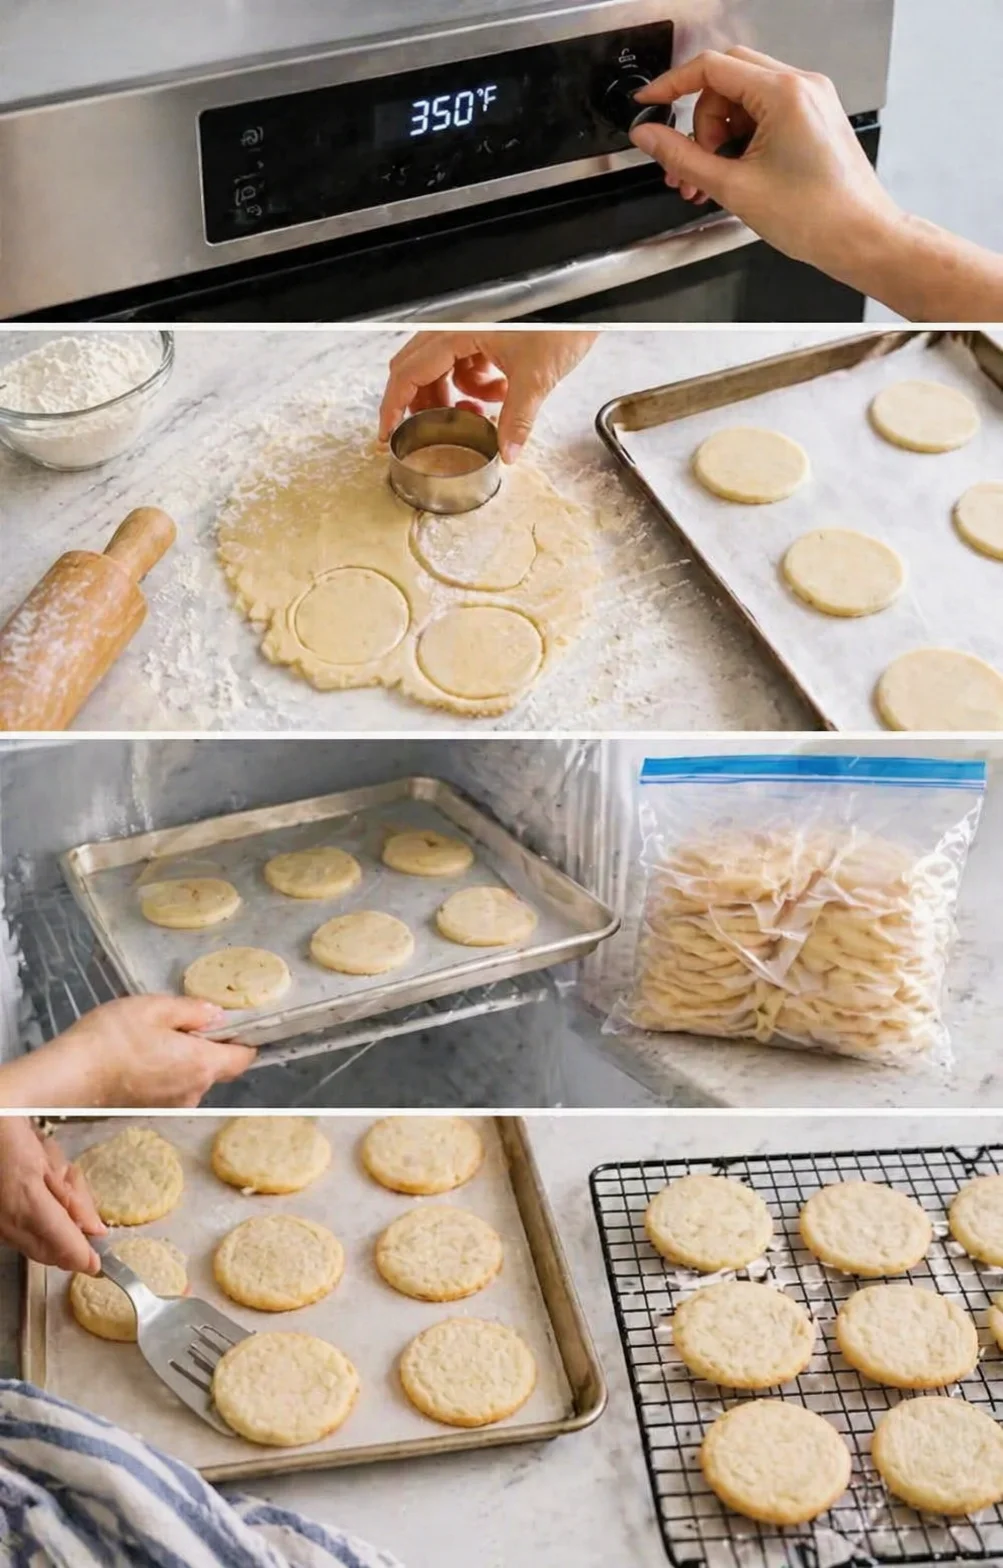
- Preheat the oven to 350°F (175°C).
- Lightly dust a work surface with flour and roll chilled dough to ¼-inch thickness; use a 3-inch round cutter to cut circles and place them on a parchment-lined baking sheet about 1 inch apart.
- Optional: Freeze cut dough shapes on trays until solid, transfer to bags, and when ready to bake, bake from frozen adding about 1 minute to the bake time.
-
Bake the cookies 8–10 minutes until the edges are set and just turning light golden; cool on the pan 5 minutes, then transfer to a wire rack to cool completely.
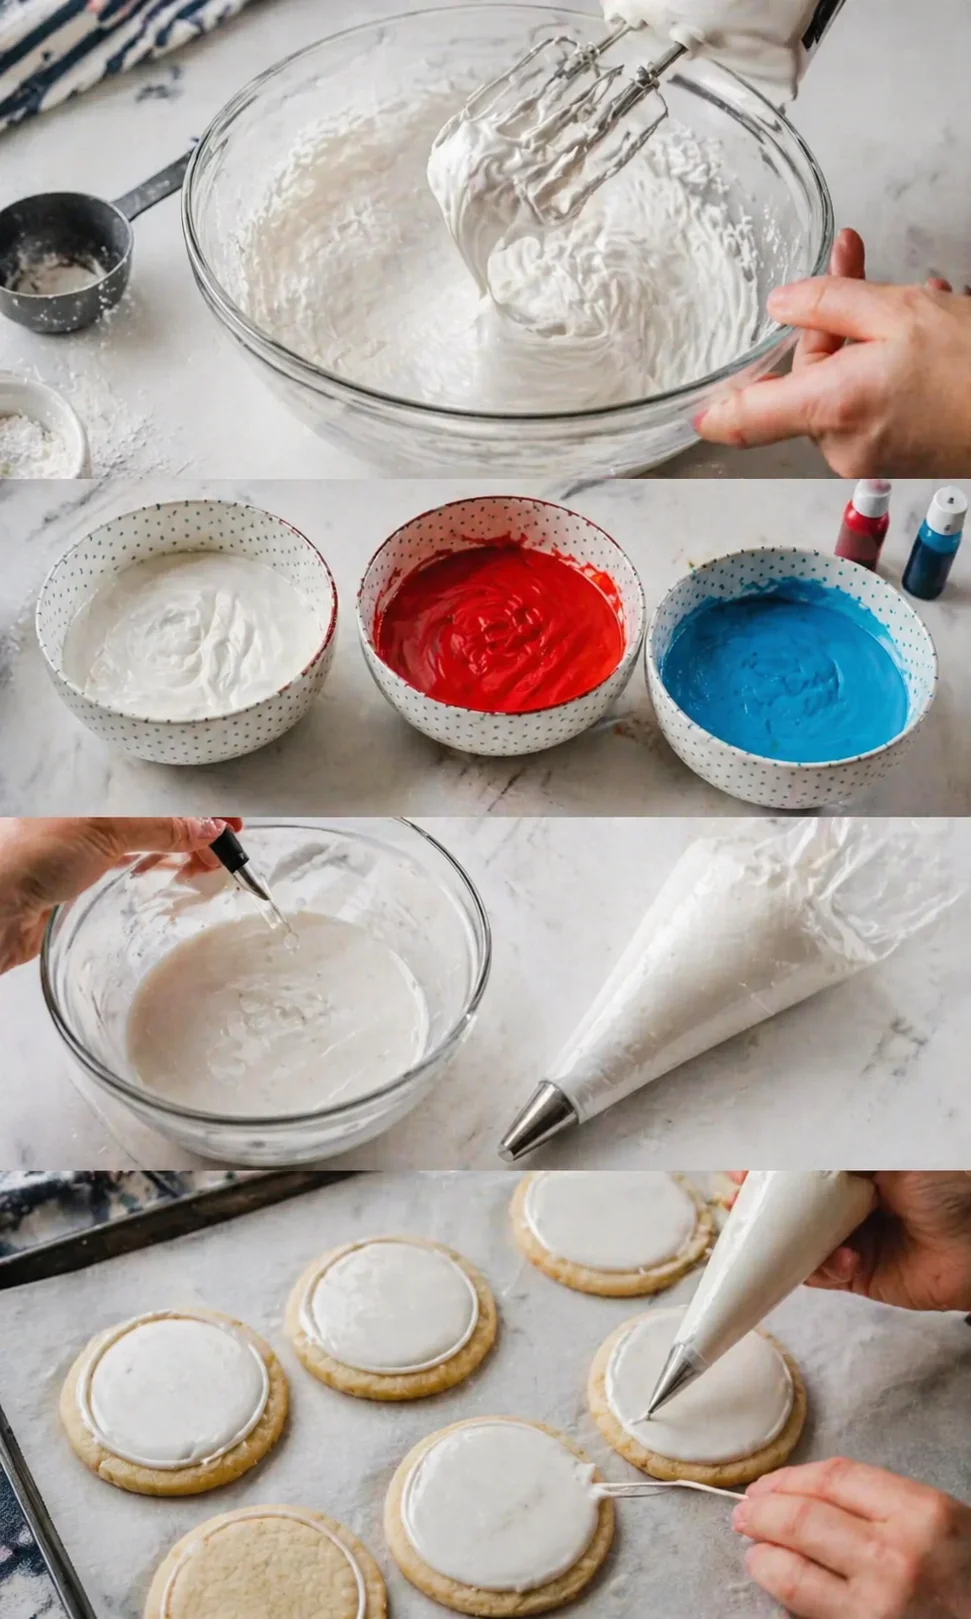
- Combine sifted powdered sugar, meringue powder, and warm water in a large bowl and beat on high for 5–7 minutes until the icing holds stiff peaks.
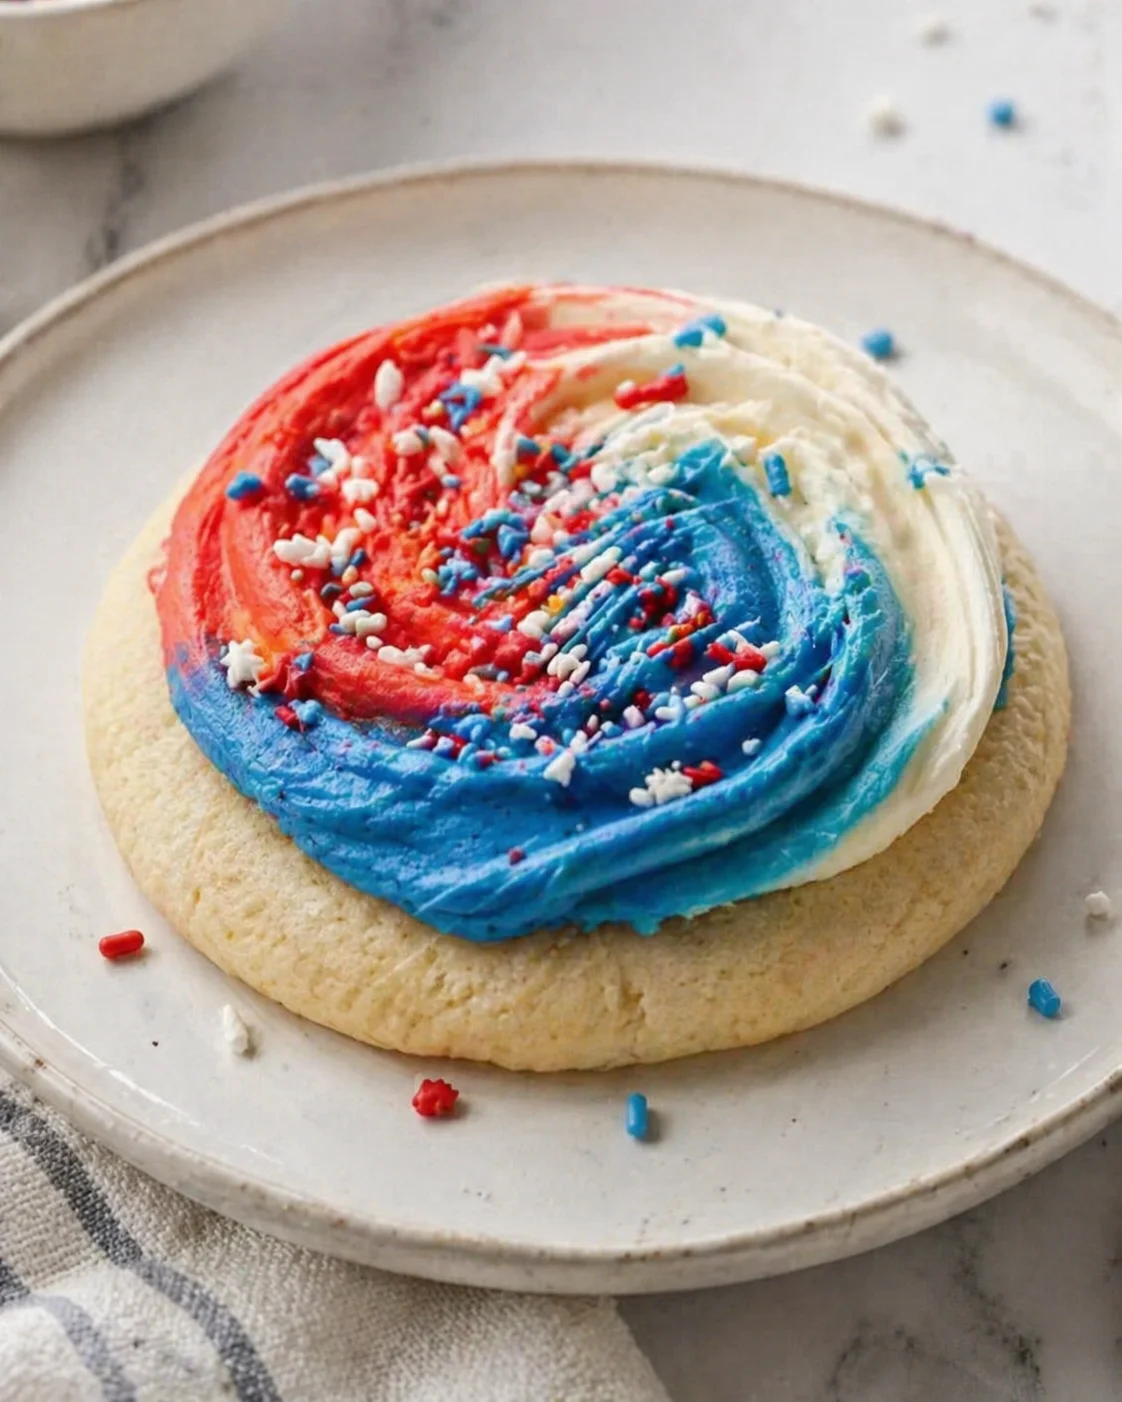
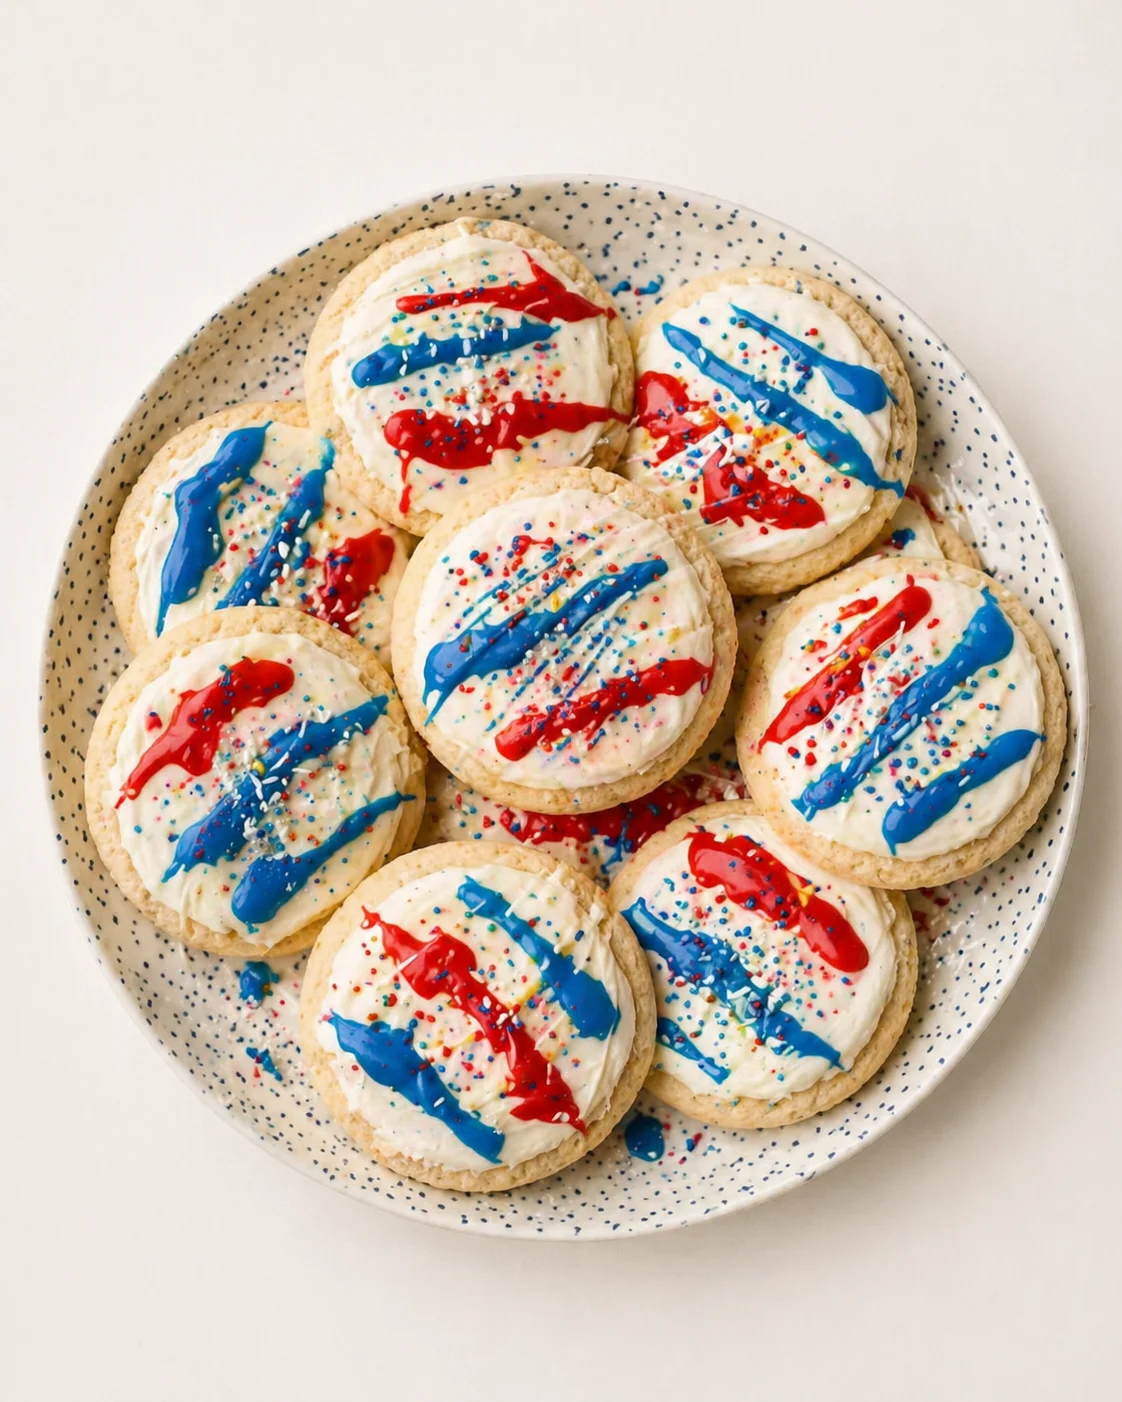
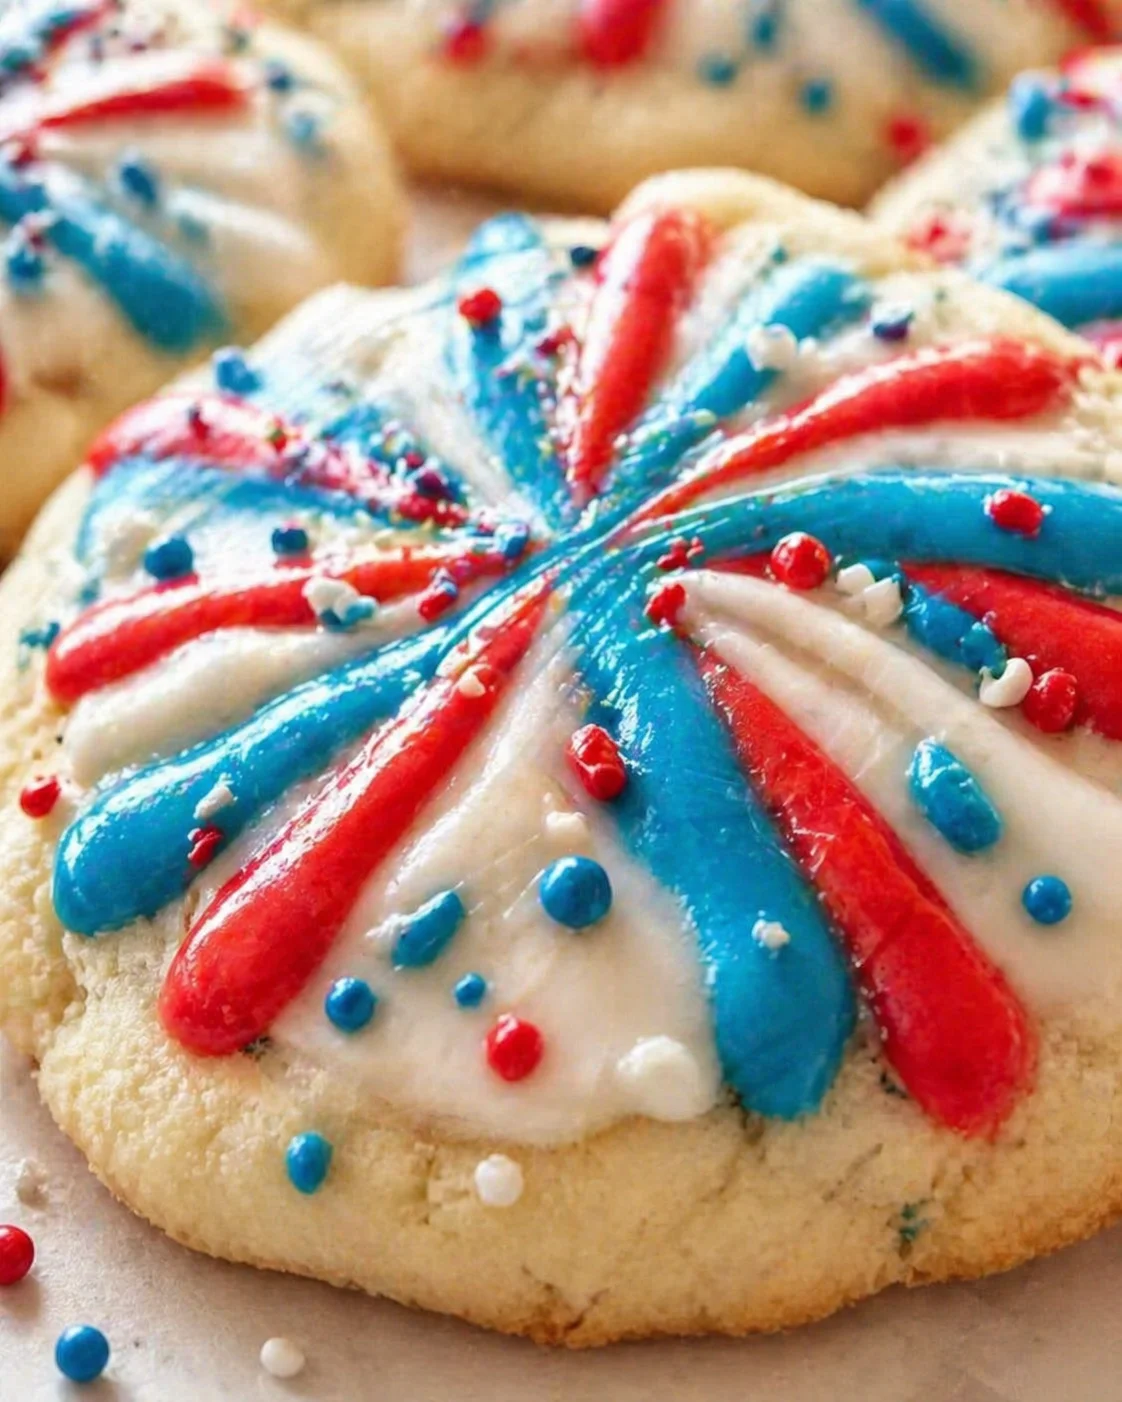
- Divide the icing into three bowls; leave one white and tint the other two with red and blue gel food coloring.
- Thin the white icing with drops of warm water to a 10-second flood consistency and transfer it to a piping bag fitted with a small round tip.
-
Pipe an outline around each cookie, flood the interior with the thinned white icing, and use a toothpick or scribe tool to even out the surface; let the base layer dry at room temperature at least 6 hours or overnight.
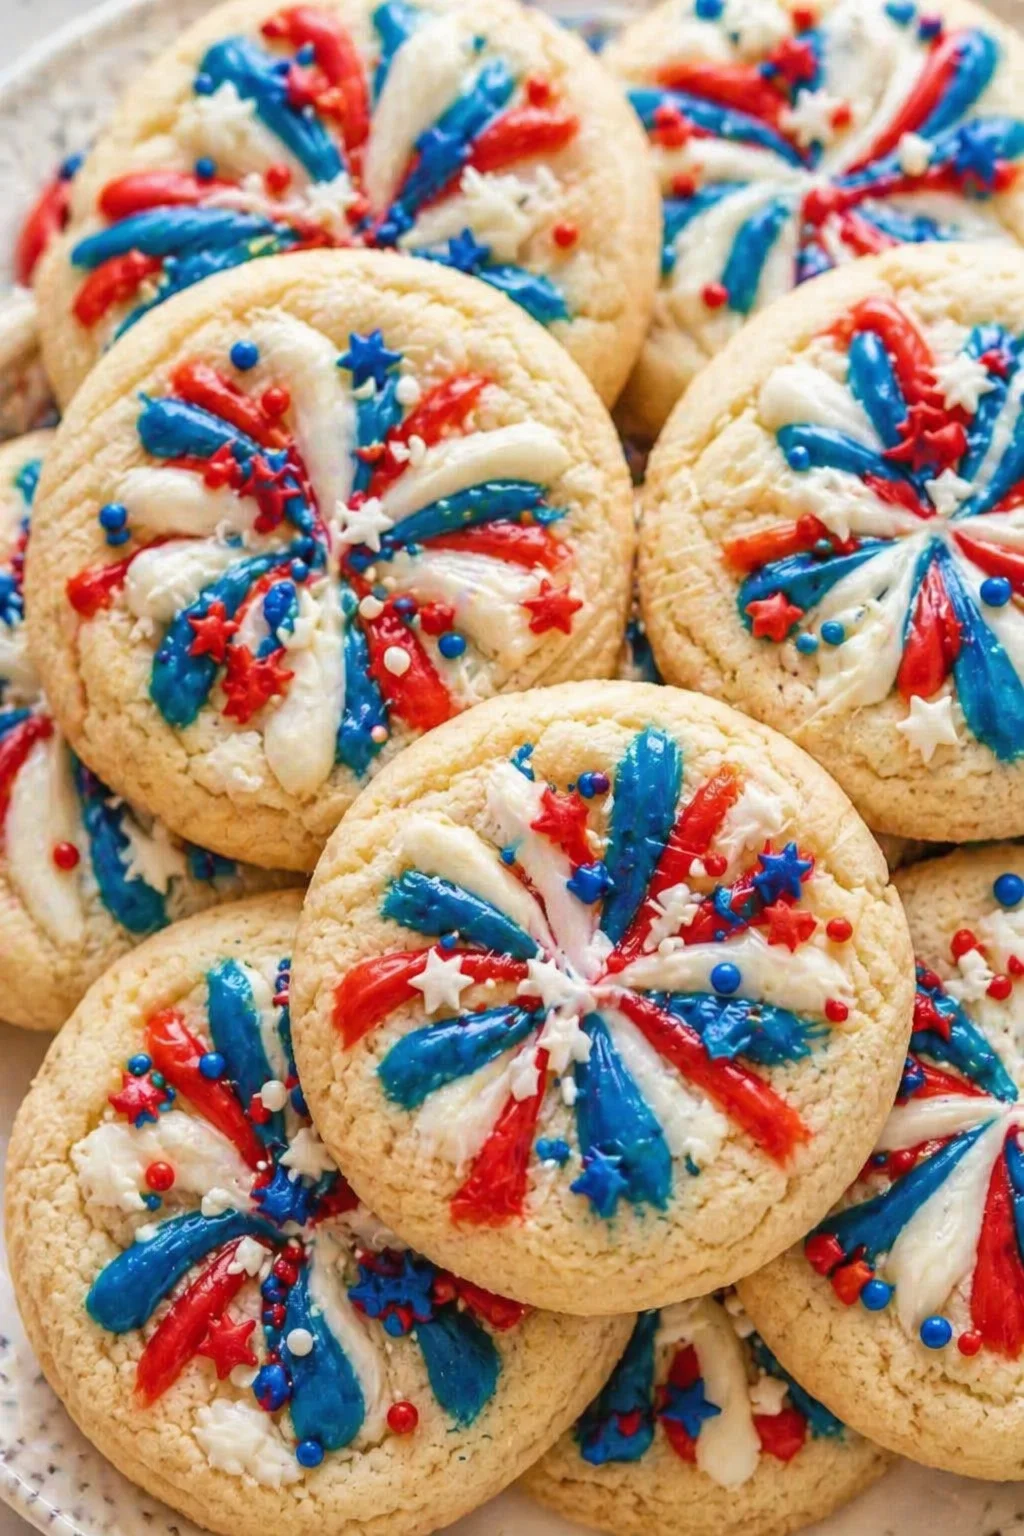
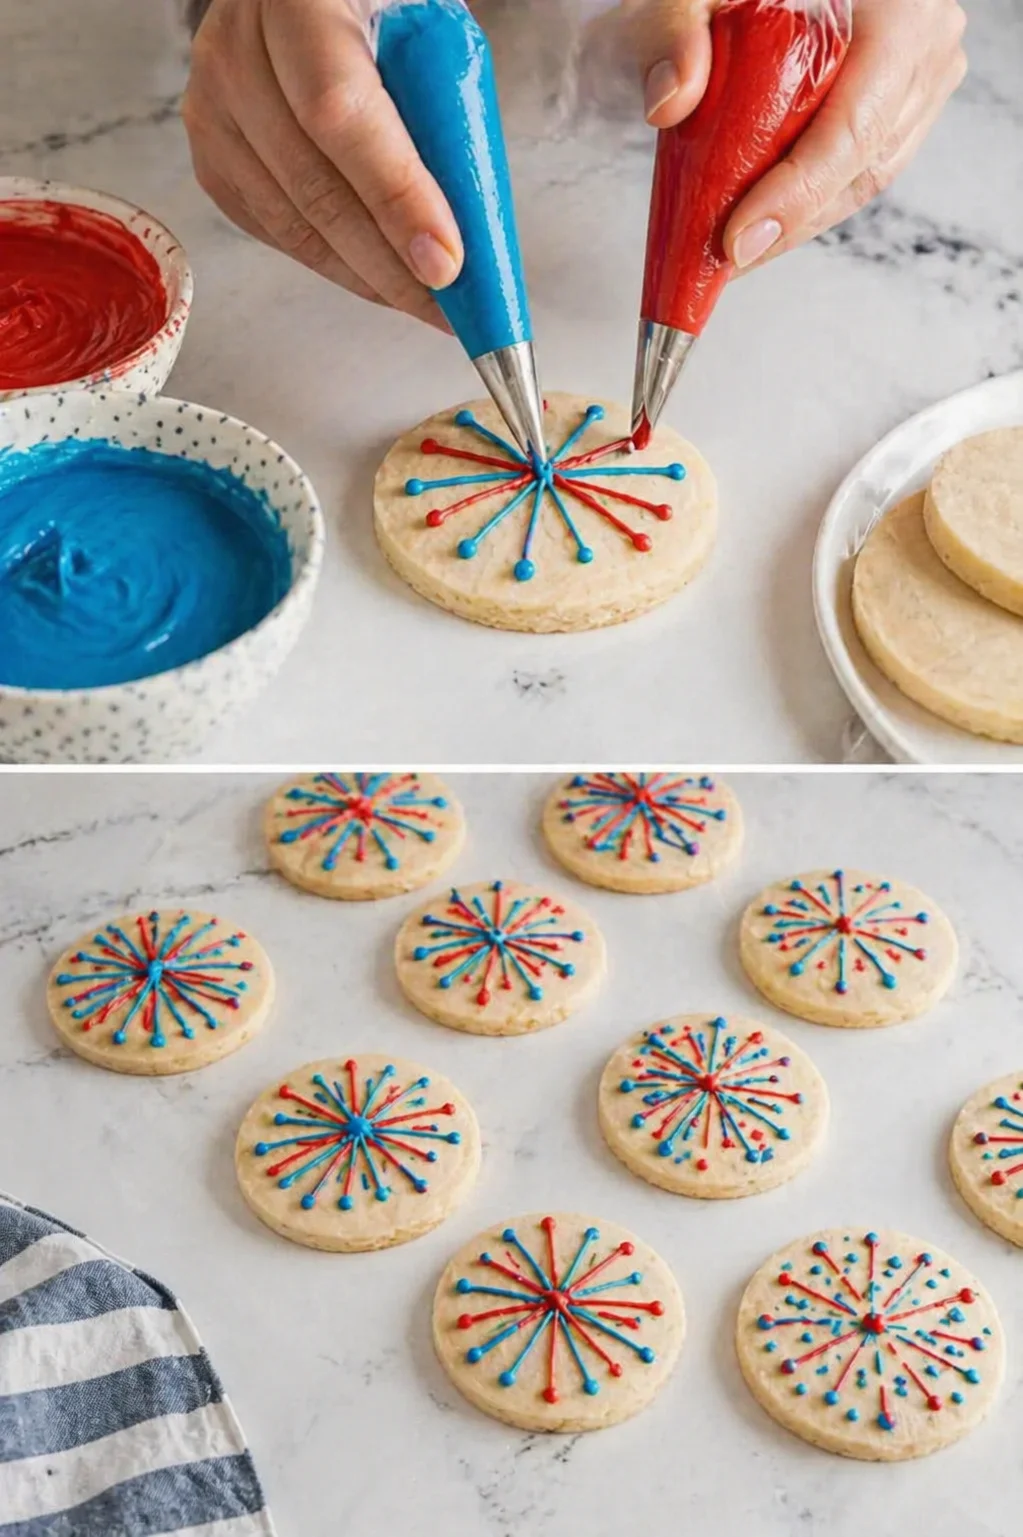
- Fill two piping bags fitted with small round tips with the red and blue icing and pipe short lines radiating from the center of each cookie, adding dots at the ends of some lines to mimic fireworks.
-
Let the decorated cookies dry completely at room temperature before handling or packaging.
Troubleshooting and Pro Tips
Small tricks help make huge improvements when baking these cookies. Here are my best tips to get you consistent, beautiful results without headaches.
- Chill that dough at least an hour—longer if your kitchen feels warm. Cold dough means better shape and sharp edges.
- Dust your rolling surface lightly with flour. Too much dries out the dough edges. Stick to even ¼-inch thickness so your cookies can hold all that icing.
- Take your cookies out once the edges just turn golden. Don’t overbake—they’ll lose their chew.
- Freeze your cut dough on trays, then transfer to bags once solid. Bake from frozen, adding about a minute to the cook time.
- Beat your royal icing until it forms stiff peaks, then thin only what you need for flooding to a 10-second consistency. Warm water works best to keep the icing stable.
- Stick to gel colors for tinting icing. Liquid food colors water down your icing and make drying tricky.
- Practice your piping on parchment paper before the real deal. Simple, consistent bursts look much better than uneven, complicated shapes.
- Let flooded icing dry naturally overnight at room temp. Avoid fans and dehydrators, which can dull the shine and cause cracks. Short on time? Try quick Fourth of July Chocolate-Dipped Pretzels you can decorate and serve the same day.
- Store completely dried cookies in an airtight container at room temp with parchment layers between. Skip the fridge—it ruins the icing texture. For a no-bake option that travels well, make Red White and Blue Rice Krispie Treats.
- If you want crisper edges and don’t mind dialing down the butter flavor slightly, swap half the butter for shortening. For the best taste, stick with all butter.
Substitutions and Mix-Ins
I’ve tried using shortening instead of butter to get dough that holds shape better. It works for structure, but you lose that rich, buttery flavor. Butter is what makes these cookies taste like homemade comfort.
If you’re chasing perfect shape, consider blending butter and shortening. If clean lines and defined shapes are your priority for red, white, and blue treats, this baker’s guide to Patriotic Éclairs walks through techniques where structure really counts. But if flavor is your top priority—especially for holiday cookies that get eaten plain—stick with all butter. That warm, cozy taste is worth it.
Storage and Make-Ahead
These cookies actually keep really well! Once your icing is dry, layer the cookies between parchment sheets in an airtight container. At room temperature, they’re good for up to a week with no texture loss.
Keep them out of the fridge—too much moisture softens the icing and leads to unsightly spots. For longer storage, freeze the plain cut cookies and ice them fresh later. Royal icing doesn’t freeze well once it’s already on the cookie.
Serve your finished cookies with a cold glass of milk, fresh-squeezed lemonade, or sweet tea for a perfect summer treat, or pair them with a make-ahead Summer Berry Jello Lasagna for a crowd-pleasing dessert spread.
Common Baking Questions Answered
Q: Can I make the dough or cookies ahead? A: Absolutely! Dough can chill in the fridge for several days or freeze for longer. You can also freeze cut shapes on trays and bake them from frozen (just add about 1 minute to bake time). Fully decorated cookies will keep at room temp for up to a week.
Q: My royal icing feels too runny or too stiff. What do I do? A: To thicken it up, add sifted powdered sugar a little at a time. To thin, add tiny drops of warm water and stir until it’s just right. Flooding consistency should smooth out in around 10 seconds.
Q: Can I use liquid food coloring instead of gel? A: I don’t recommend it. Liquid dyes add water that thins the icing too much and can mess with drying times and texture. For bold color without thinning, see how gel colors create vibrant patriotic tones in this American Flag Cake Roll with a red, white, and blue watercolor finish.
Q: Why did my cookies spread too much and lose their edges? A: Usually that means the dough wasn’t chilled long enough or your kitchen/ingredients were too warm. Over-creaming butter or rolling the dough thinner than ¼ inch can also cause spreading.
Q: Is meringue powder really necessary? A: Yes, it’s what makes royal icing set firm and smooth. It’s dried egg white powder. If you need an egg-free alternative, try an egg-free royal icing mix or a tested aquafaba icing recipe—but drying and texture will differ a bit.
Q: How do I get that shiny, porcelain-like icing finish? A: Keep the proper sugar-to-meringue ratio, thin only your base layer to that 10-second flood consistency, and let the cookies dry slowly at room temperature overnight without forced air or fans.
Q: Can I substitute shortening for butter in the cookie dough? A: Shortening improves shape hold and reduces spread but sacrifices flavor. A blend of butter and shortening balances taste and shape, but for the best buttery flavor, stick with all butter.
Q: When should I decorate cookies after baking? A: Make sure your cookies are completely cool before icing. Decorating warm cookies can cause the icing to melt or crack as it dries.
Buttery sugar cookies with a tender snap, decorated with glossy royal icing in patriotic colors. Perfect for holidays and parties, these cookies hold their shape well, dry smoothly, and stay fresh at room temperature.
- Prep Time: 15 minutes active + at least 1 hour chilling
- Cook Time: 8 to 10 minutes per batch
- Total Time: 1 hour 25 minutes to 1 hour 30 minutes including chilling and drying
- Yield: About 24 cookies (3-inch rounds) 1x
- Category: Dessert
Ingredients
- 2 ½ cups (315g) all-purpose flour
- ½ teaspoon baking powder
- ¼ teaspoon salt
- ¾ cup (170g) unsalted butter, softened
- ¾ cup (150g) granulated sugar
- 1 large egg
- 2 teaspoons vanilla extract
- 4 cups (500g) powdered sugar, sifted
- 3 tablespoons meringue powder
- 6 tablespoons warm water (plus more as needed)
- Gel food coloring (red and blue)
Instructions
- Whisk together the flour, baking powder, and salt in a medium bowl.
- Cream the softened butter and granulated sugar until pale and fluffy (about 2–3 minutes).
- Beat in the egg and vanilla until fully blended.
- Gradually fold in the dry ingredients until a soft dough forms; shape into a flat disc, wrap tightly, and chill in the fridge for at least 1 hour.
- Preheat the oven to 350°F (175°C).
- Lightly dust a work surface with flour and roll chilled dough to ¼-inch thickness; use a 3-inch round cutter to cut circles and place them on a parchment-lined baking sheet about 1 inch apart.
- Optional: Freeze cut dough shapes on trays until solid, transfer to bags, and when ready to bake, bake from frozen adding about 1 minute to the bake time.
- Bake the cookies 8–10 minutes until the edges are set and just turning light golden; cool on the pan 5 minutes, then transfer to a wire rack to cool completely.
- Combine sifted powdered sugar, meringue powder, and warm water in a large bowl and beat on high for 5–7 minutes until the icing holds stiff peaks.
- Divide the icing into three bowls; leave one white and tint the other two with red and blue gel food coloring.
- Thin the white icing with drops of warm water to a 10-second flood consistency and transfer it to a piping bag fitted with a small round tip.
- Pipe an outline around each cookie, flood the interior with the thinned white icing, and use a toothpick or scribe tool to even out the surface; let the base layer dry at room temperature at least 6 hours or overnight.
- Fill two piping bags fitted with small round tips with the red and blue icing and pipe short lines radiating from the center of each cookie, adding dots at the ends of some lines to mimic fireworks.
- Let the decorated cookies dry completely at room temperature before handling or packaging.
Notes
Chill dough at least 1 hour to prevent spreading and keep sharp edges., Use gel food coloring to avoid thinning royal icing and to ensure proper drying., Fully dried iced cookies keep well at room temp for up to a week; avoid refrigeration to maintain icing texture., For crisper edges, substitute half the butter with shortening, but all butter yields best flavor., Bake cookies at 350°F for 8–10 minutes until edges just turn light golden for tender-chewy centers., Practice piping fireworks designs on parchment before decorating cookies., Allow flooded icing to dry naturally overnight without fans or dehydrators for a glossy finish., Freeze cut dough shapes to bake fresh later, adding one minute to baking time when baking from frozen.
Nutrition
- Serving Size: 1 cookie
- Calories: Approximately 120-140 calories per cookie (estimated)
- Fat: Approximately 6-8 grams per cookie (estimated)
- Carbohydrates: Approximately 18-20 grams per cookie (estimated)
- Protein: Approximately 1-2 grams per cookie (estimated)
More in Uncategorized